Dowager Lady Grantham and Date Caramel

IMG_4851

Hmm. Monday things.

1. DOWNTON ABBEY. OMG. I’m. OBSESSED. Maggie Smith has hands down the best facial expressions. Ever. “That will be an easy caveat to accept, as I am never wrong”… the dowager Lady Grantham is now my role model for getting old. Machiavellian and meddlesome. Heaven help whoever is supposed to be “taking care” of me…

2. Working out is amazing. I was about ready to crawl out of my skin today but then Marilyn kicked my butt and I lifted lots of heavy things and now I feel much better! Time to go eat [cookies, preferably  a sensible post-workout snack].

3. I’m now Mat Pilates 1 certified! Wheeee! Watch this space for further developments.

4. I know this is a little delayed, but too bad because it’s funny anyway. This is what I looked like when I got to Disneyland:

IMG_4798

… annnnnnndddd 13 hours later. Winning.

IMG_4831

6. And yes. I bought myself a princess crown. You should be very jealous. Now I can wear it whilst cooking!!! Because… I’m a princess. Obvs.

IMG_20130203_083358

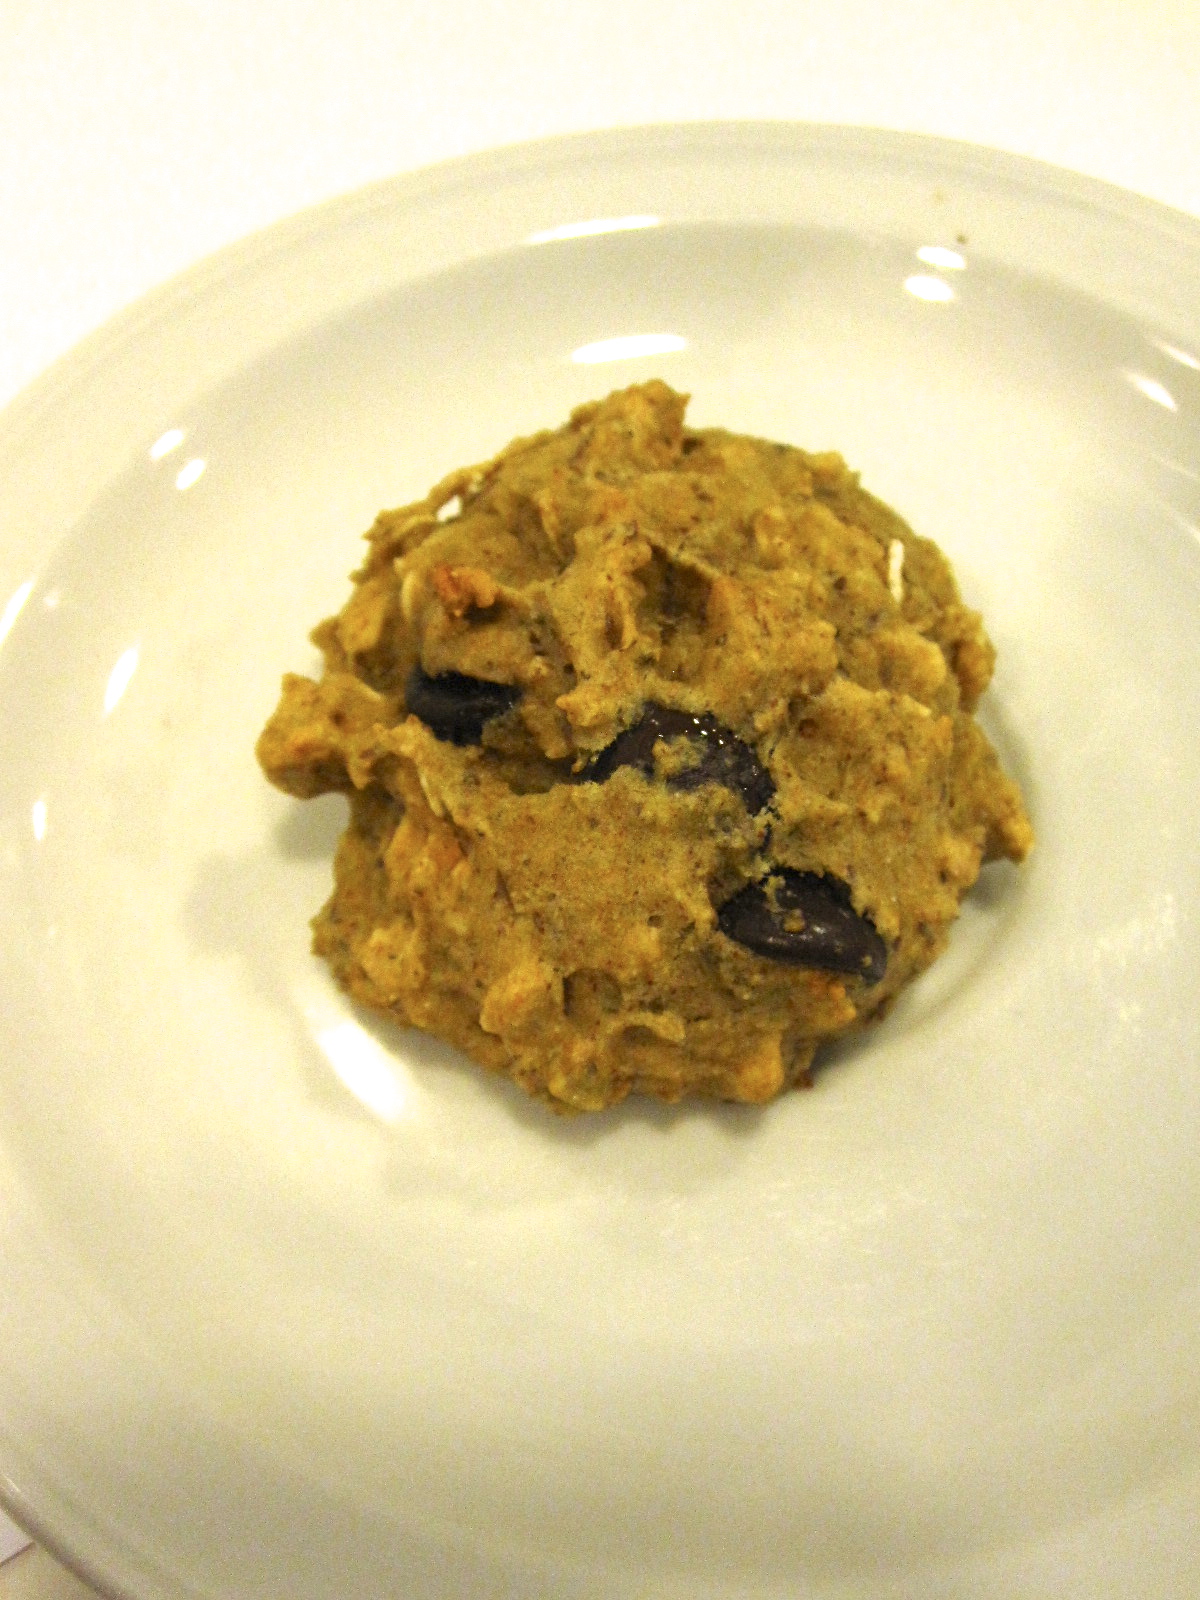
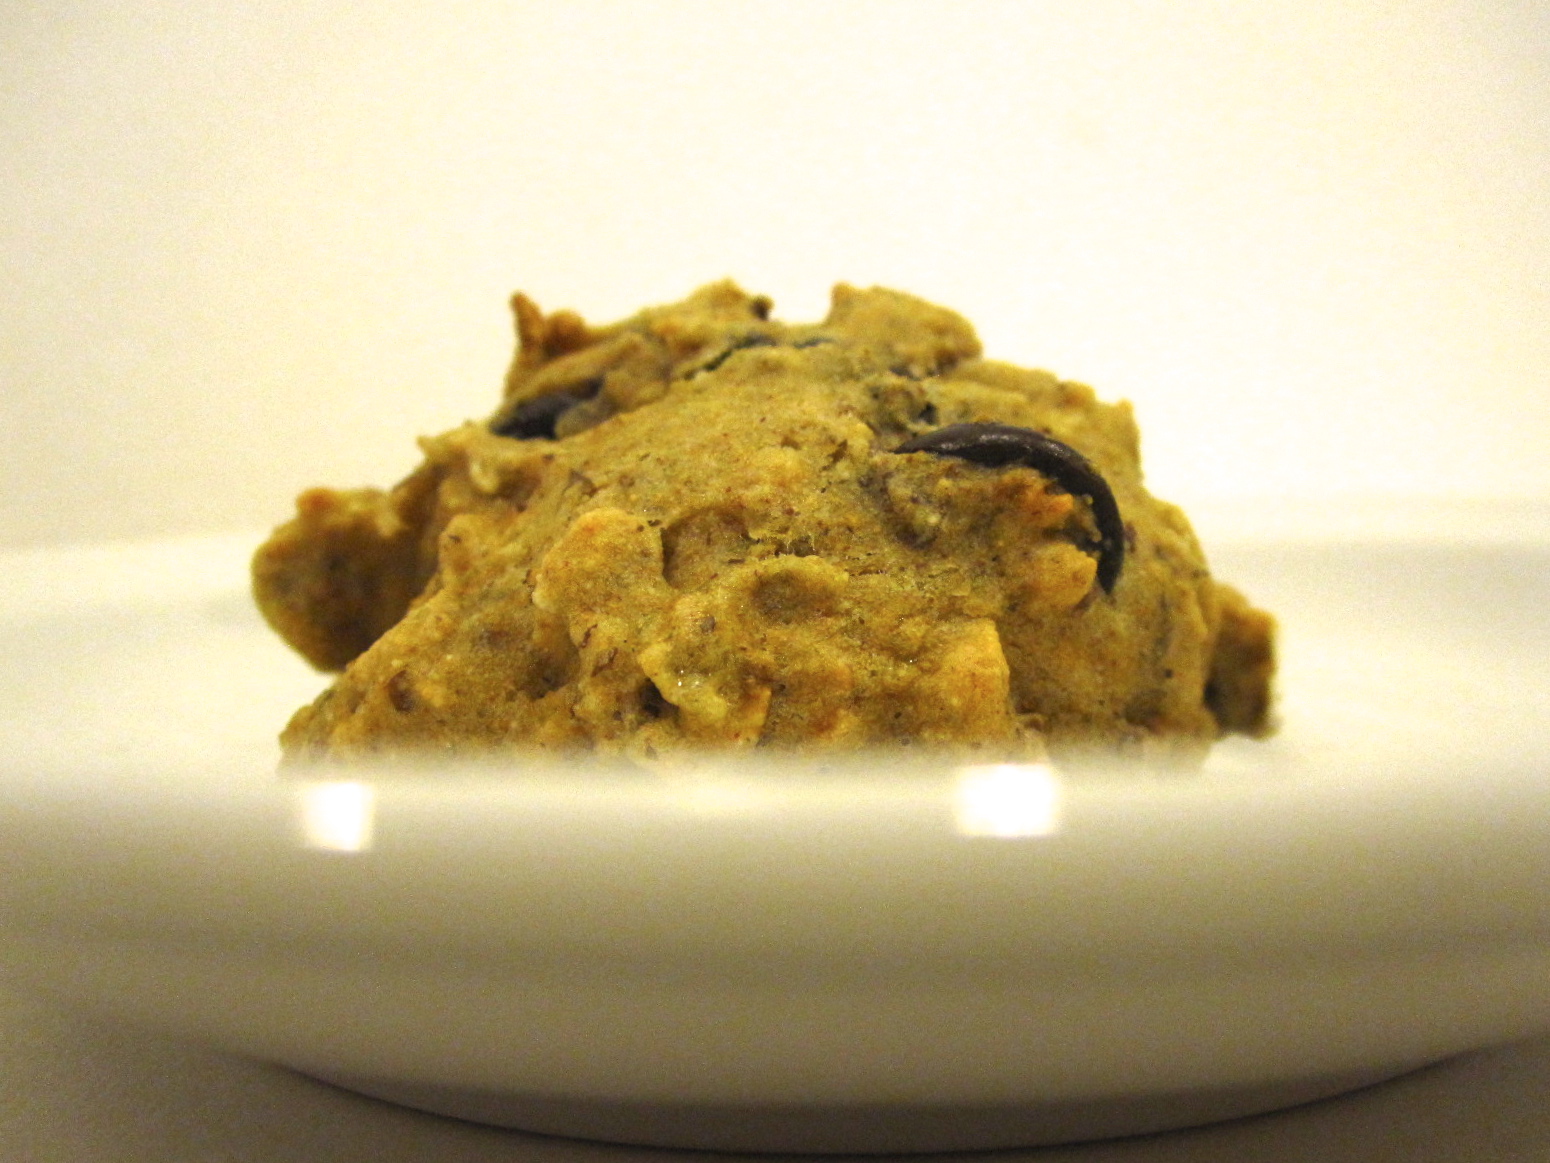
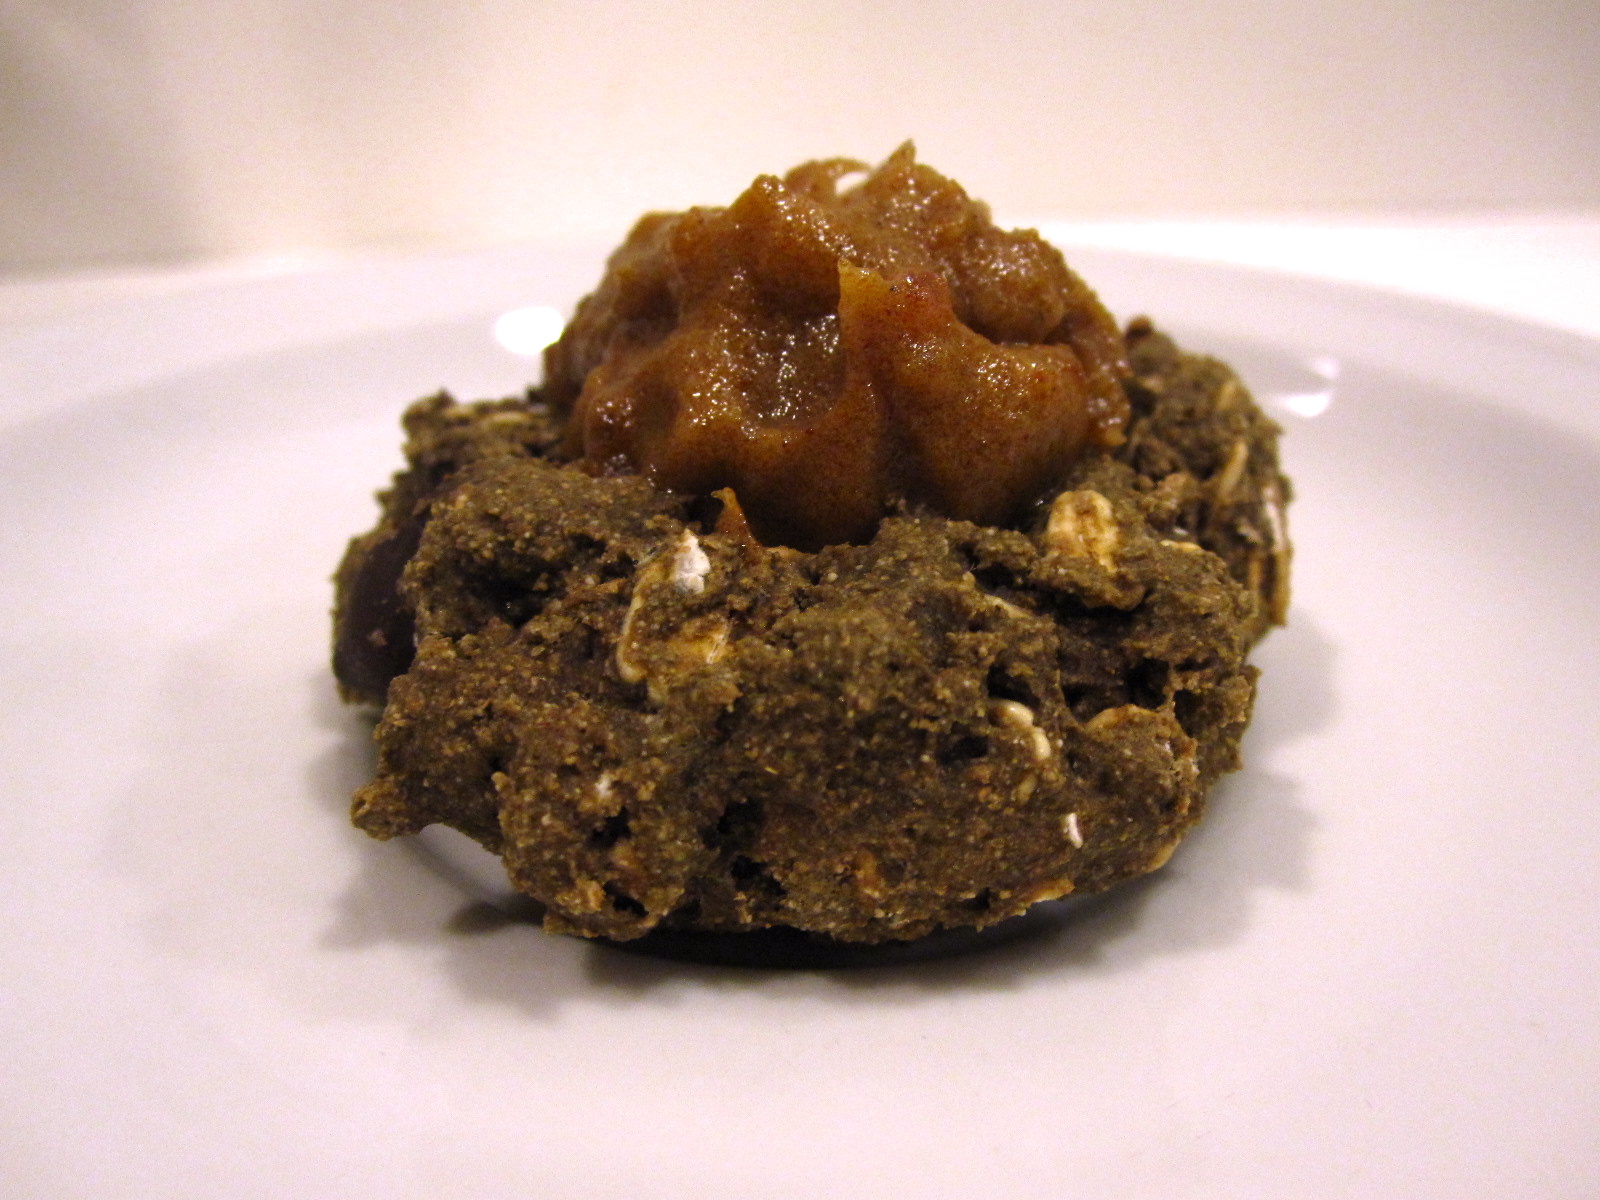
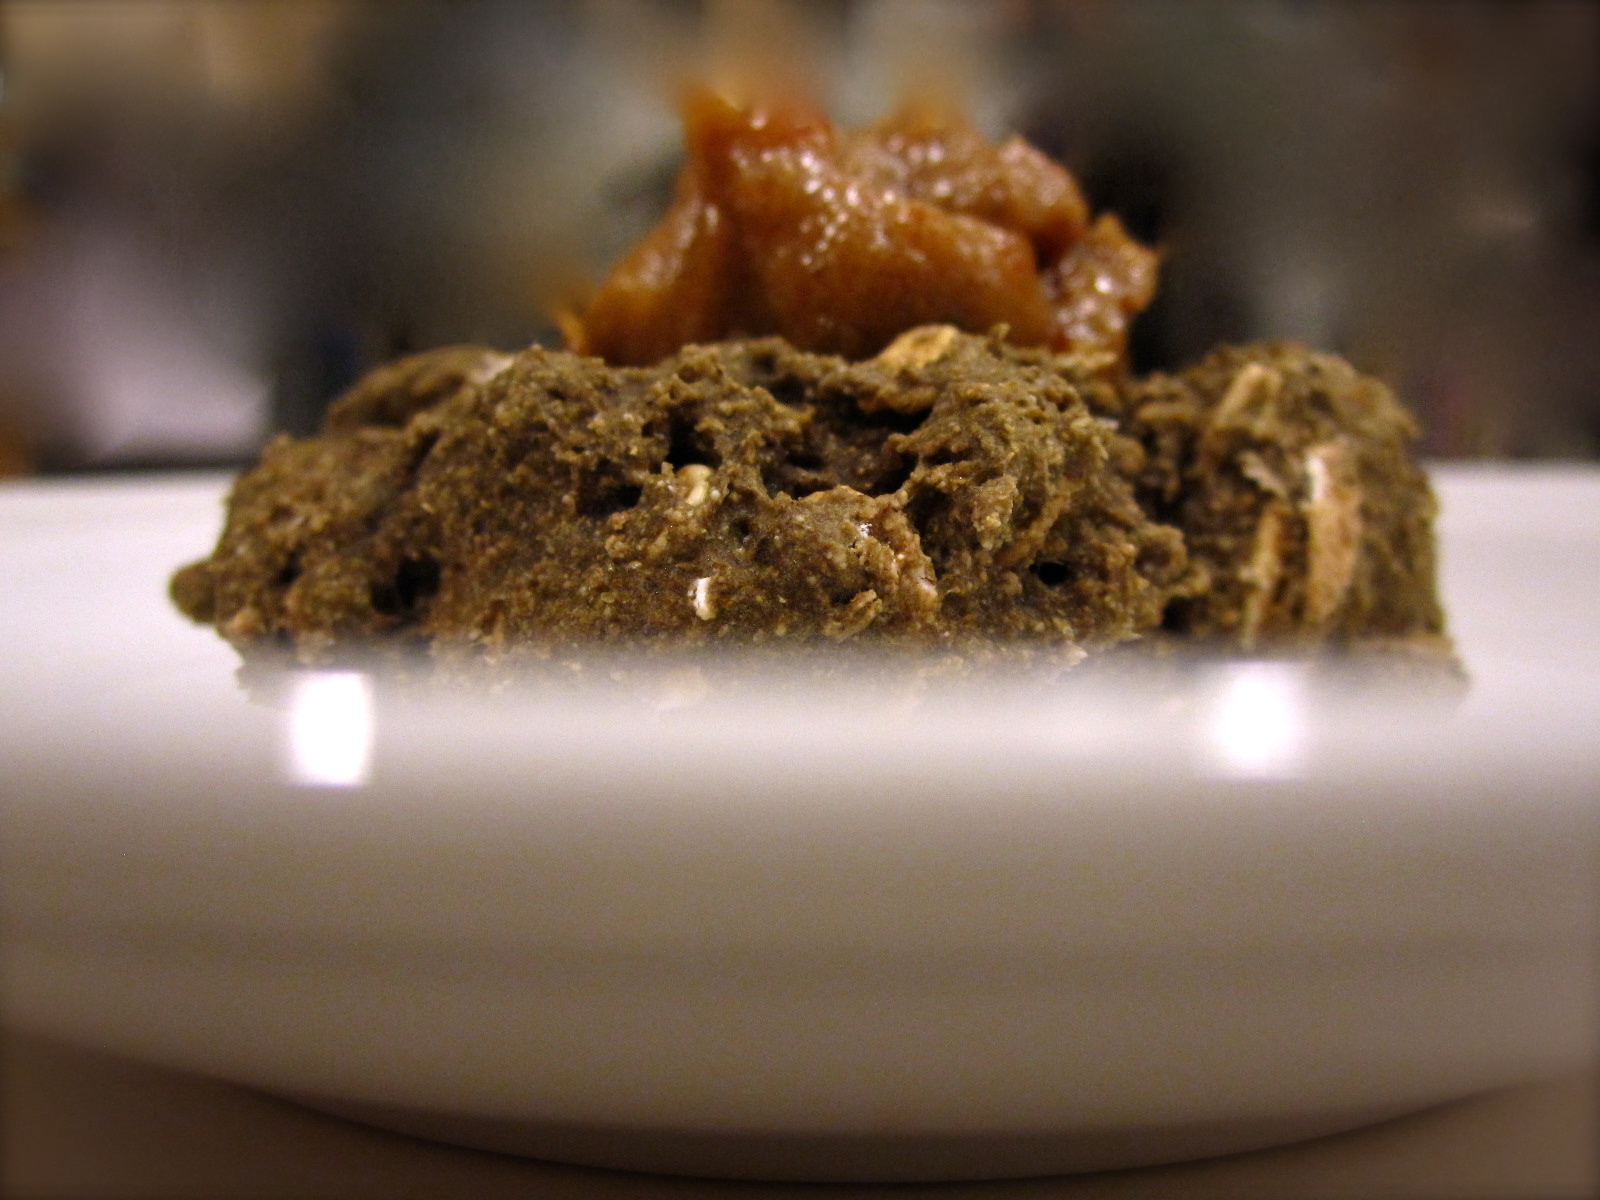
7. Date caramel. There are no words. It’s amazing, you’ll just have to go make it immediately. But before you go, admire the photo up at the top. That little blob? Yep. Amazing. Make it. Thank me later. Okay? Okay. Good. Bye bye, off to the kitchen you go.

IMG_4853

Raw, Vegan and Clean Date Caramel

Ever so slightly adapted from Food Doodles, here! I got about a cup, ish, of caramel, maybe a bit more. This stuff is amazing on pretty much anything you could dream up… like ice cream…whirled with frozen banana….on a spoon….in cookies…. whatever. I put some of mine on cookies (underwhelming cookies, so no recipe), and I’m hoarding/rationing the rest. No big deal.

The what:

  • 2 c pitted organic dates
  • 1/2 c + 2 tbsp water
  • 2 tsp vanilla
  • 1 tsp cinnamon
  • scant 1/2 tsp sea salt

*dates+water+vanilla make the basic caramel. You can leave it like that, or add cinnamon, salt, maple, or whatever your heart desires to taste for something different.

The how:

Firstly. PIT THE DATES. Do not murder your food processor, pretty please… Mine made unhappy noises at first but I promise I got all the pits out of there. Once pitted, chuck them all into the bowl of the processor. Pulse until they form a ball. Add in the water and vanilla, and blend until smooth. This took me about five minutes, and I still have a few very small pieces of date left. Scrape down the sides as necessary. Add in whatever spices you want, and pulse again to incorporate. I keep mine in a sealed jar in the fridge, and I’m sure it’ll keep for a good while, but good luck keeping it around longer than about three days…

IMG_4819
Not really relevant at all but awesome. Who doesn’t love Disneyland at night?

One awkwardly dead banana and what to do with it

IMG_4721

Banana bread bites.

Somewhere between a cookie, banana bread, and… a scone? Muffin? A skookie? Or a brone? Or a mookie?

Clearly my brain has gone on holiday, can you tell?

IMG_4727

Either way, these are delicious! Vegan, refined sugar free (and low sugar), whole grain, high in fiber, and full of potassium and antioxidants. I can’t even really call it a cookie because it’s so healthy… but then you can have a cookie for a snack and feel good about it, so errrybody wins. And I win, because I’ve been buying an excess of bananas so that I can let some go all mushy and disgusting. This is all on account of Vacuum Vati, you see. I thought I ate a lot of bananas?! Apparently it’s genetic. Sheeeesh. If I didn’t buy extras and explicitly forbid him from eating them, there would never be any banana bread/bites/cake/cookies around here. And that would just be sad. So obviously I just circumvent this by buying an extra bunch and doodling on their skins to designate them off limits. MY DEAD BANANAS! MINE!

IMG_4724

I am, of course, very nice. How, you say? Welll… I share the PRODUCT of the hoarded bananas! I may be territorial regarding my dead bananas, but there are always several lucky recipients of the buuhhnahhhnuhhh creation. I think these went over well…. there are currently two left. *Pause for effect*… I made them yesterday. Obviously time to make something else, wouldn’t you think?

Except now I have one awkwardly dead banana and I’m not sure what to do with it. It needs friends. Does anyone care to donate their dead bananas? Anyone? Anyone? …Bueller?

IMG_4730

Vegan Banana Bread Cookie Pucks

Recipe adapted ever so slightly from Minimalist Baker (fabby blog!), here! The recipe makes about 18 little puck thingies… about 2-3″ across. Freaking delicious. Good for you. There is absolutely nooo reason why you shouldn’t trot off to your kitchen and make these… (unless, that is, you haven’t properly hoarded and defended your dead bananas).

IMG_4725

  • 2 ripe (read: dead) bananas
  • 1 tsp baking soda
  • 1/2 tsp baking powder
  • pinch of salt
  • 2 tbsp ground flaxseed
  • 1 tsp vanilla extract
  • 1/4 tsp pure almond extract
  • 2 tbsp smooth almond butter (I used Maranatha unsalted)
  • 1.5 tbsp grade B organic maple syrup
  • 1.5 tbsp olive oil
  • 1 c whole wheat pastry flour
  • 3/4 c rolled oats
  • 1/4 c dark chocolate chips

In a bowl, mash the two dead bananas so they can become delicious. Toss in baking powder, soda, salt, flaxseed, extracts, almond butter, maple, and olive oil, and stir to combine. Add in flour, oats, and chocolate chips, and once more stir to combine everything. The dough should be thick and a bit sticky. Cover the bowl with whatever’s handy, and refrigerate while the oven is preheating.

Preheat the oven to 375, and line a baking sheet with parchment paper. Once the oven is done, grab your chilling dough, and drop heaping tablespoons onto the sheet, with a bit of room between (though I was able to get all 18 on one sheet). Slightly flatten the tops. Bake for 9-10 minutes, until the tops are set. Don’t let them brown, as you want them hydrated and soft! Let cool on a rack for a bit, then store in a tupperware for about five seconds before they all get eaten.

IMG_4733

Tarting (torte-ing?!) it up

IMG_4682

Holy moly.

Gooey chocolate deliciousness.

IMG_4683

But. If I didn’t tell you… could you guess what this decadent wedge holds? Well… if you know me, I’m sure you have a decent idea… just take  a minute to think it over and then get back to me.

Okay.

Did you think?

Did you guess vegetables?!

Because if you did… you’re right! And maybe the green peeking out of that first picture was kind of a giveaway… whatever. Get a little more specific: perhaps two servings of vegetables, and about two servings of fruit?! And it’s dessert. Cholesterol free, vegan, and delicious dessert. Make this for your friends when they’re skeptical that vegan = delicious.

IMG_4693

Besides, when I do things like this, I get to eat things like this as a reward:

0

See? Life is all about balance (and trx handstands, natch). As Oscar Wilde so wisely said: “everything in moderation, including moderation!”. I do have to say though, this torte requires less moderation than usual since it’s so freaking good for you. Chocolate= antioxidants. Zucchini= veggie (veggie = by definition, healthy, obvs). Banana= potassium. Whole wheat flour = whole grain fiber. Almonds = healthy fats! Wheeeee!

IMG_4687

Chocolate Zucchini Torte

Recipe gratefully adapted slightly from Kohler Created, here! Next time I would perhaps leave out or reduce the oil, as the cake is definitely hydrated (you see I avoid that ‘oist’ word) enough with all the produce crammed inside.

  • 2 c whole wheat pastry flour
  • 1/2 c unsweetened cocoa powder
  • 1 tsp baking soda
  • 1/2 tsp baking powder
  • 1/4 tsp salt
  • 1/8 c canola oil
  • 1/4 c unsweetened applesauce
  • 1/3 c granulated sugar
  • 1/2 c brown sugar
  • 1 tsp vanilla extract
  • 1/2 tsp ground coffee
  • 1.5 ripe bananas, mashed
  • 4 tbsp water
  • 1/4 c unsweetened almond milk
  • 2 c zucchini, finely grated
  • 1/2 c dark chocolate chips

For topping: 3 tbsp brown sugar + 1/2 c chopped almonds

Preheat the oven to 360. Grease and flour a 9″ cake pan.

In a largeish bowl, sift flour, cocoa powder, baking soda and powder, and salt. In another bowl, combine oil, applesauce, sugars, vanilla, and coffee. Beat vigorously (use those biceps!) for a few minutes… or use a mixer. In a smallish bowl, mash bananas, then add water. Add bananas, beat to combine, then add milk.

Combine 1/2 c of the flour mix to the grated zucchini and chocolate chips. Slowly beat in the remaining flour into the banana bowl, until incorporated. Stir in zucchini and mix thoroughly. The batter should be thick (and delicious). Pour into the prepared pan, top with brown sugar+almonds, and bake for about 45 minutes, until a tester comes out clean. Cool in the pan before attempting to slice! This cake is even better the next day (promise!), if you can make it last that long…

IMG_4689

Sassy savories and other unphotogenic food items

IMG_20130112_184907
carpet picnic!

Woah woah woah.

Two savory posts in a row? Is she sick?

..

Nahh. Just inspired! You see… I do make savory food hugely often. Like, my mother says it’s impossible to keep me in vegetables. As in… I eat. Them. ALL. Alllll the time! (And applesauce, that too). Except that usually by dinner time, I have no interest in photographing my food because a) I’m hungry and b) by the time I’m finished photographing it’ll be cold and c) I’m lazy and d) … okay never mind there was no d. Whatever, suffice it to say this is the main list of reasons why I never get around to photographing savory dinners. Also because savory stuff can be kind of uncooperative on the photography front sometimes…. like it’s delicious but it’s freaking ugly. Or it sasses me and gets all unphotogenic when I think it’s going to cooperate. I hate when that happens! No one wants to look at ugly food, right?!

IMG_4629

Anyway… but this time things cooperated! Ish. And I’ve been keeping myself fully stocked in cookies, just so you know (I wouldn’t want you to get concerned, or anything). Besides, I need snacks for after my bodyrock and lifting sessions, durrrr. Sore and shaky definitely qualifies for a snack of a healthy cookie and kombucha…

This dish was a bit of an experiment, which happily turned out well. Gotta love that. It’s easy and comes together in a snap with pantry staples, which is also excellent. ANNDD I invented it! So you should doubly love it and go running to your kitchen, obviously.

IMG_4634

Salmon Primavera with Polenta

Recipe from.. me! The polenta is my favorite recipe from the Moosewood Cookbook. The rest was inspired by the can of salmon lurking in the pantry. Serves 3, with a teeny bit of leftovers (though this does make enough polenta for another serving, there isn’t as much topping left).

  • 1.5  c polenta
  • 5 c water
  • 1 tsp salt
  • 2 tbsp olive oil, divided
  • 1 can of salmon, flaked and deboned (if necessary)
  • 1 zucchini, grated*
  • 1 bell pepper, sliced
  • 1/2 box of mushrooms (7-8ish), sliced
  • 3/4 c frozen peas, thawed
  • a good handful of fresh spinach
  • marjoram, basil, salt and pepper to taste**
  • grated parmesan, to garnish

IMG_4637

*I used whatever veggies we had, but any would be good. I like the sweetness of peas with salmon though, so try to have those at least (unless you hate them, of course)

**we grow fresh marjoram, so I used a few sprigs, and 2 frozen basil cubes. I salted the salmon a bit before use and then tossed in a bit later, and as for pepper, don’t use my family as an example as we’re pepper-nuts (read: we use an excessive amount on everything). Do what suits you!

In a saucepan, heat 4 cups of water to a a boil. Combine the polenta and salt with the other cup of water, stirring slightly (this prevents lumps). Once the water boils, toss in polenta and whisk constantly until the polenta thickens (for me, 11-12 minutes as I use a quicker cooking, not instant, polenta). Once thick (and you’ll know, as your arm will be about to fall off), remove from heat and stir in about a tablespoon of olive oil.

In a saute pan, heat a good glug of olive oil over medium heat. When hot, add marjoram and basil, followed by grated zucchini, bell pepper, and mushrooms. Saute until veggies are fork tender and the mushrooms have released some juices. Toss in spinach, peas, and flaked salmon and saute a few minutes more. Season to taste with salt and pepper, and serve over hot polenta with plenty of cheese (obvs)!

IMG_4636

Paleo hockey pucks (no just kidding, they’re actually tasty cookies)

I was too lazy to put two recipes into one post, so here are those paleo cookies I was nerding out about in my last post.

Short and sweet, just some photos and a recipe!

Apple Cinnamon Cookies (Paleo-friendly)

Recipe from What Runs Lori, here! My yield was about 10ish cookies, ish. I’m a little behind, I’m not entirely sure since this batch is long gone. Ehhh, you get delicious cookies anyway, what do you care?! Moist HYDRATED, apple-y, and full of cinnamon. Yum yum yum. AND grain-free, vegan, refined sugar free, and full of healthy fats.

  • 1 buhhnahhhnuhh
  • 1/3 c grated apple, skin on
  • 2 tbsp almond butter
  • 1-2 tbsp milk bev (use almond or coconut to keep things vegan/paleo), if needed
  • 2 tsp vanilla extract
  • pinch of salt
  • 1/2 tsp cinnamon
  • 1/4 tsp ground ginger
  • 1/3 c coconut flour
  • 1 tsp baking soda
  • 2 tsp apple cider vinegar

Preheat the oven to 350, and line a baking sheet with parchment paper.

In a bowl, mash yo’ buhhhnahhnuhhh. Toss in everything else: grated apple, almond butter, vanilla, salt, cinnamon, ginger, coconut flour, baking soda, and vinegar. Stir together, and add in 1-2 tbsp milk bev if the batter looks too dry (I used 2 tbsp). Drop cookies by the heaping glob onto the prepared cookie sheet, and bake for 8-10 minutes (mine went for 8)—an appropriately short baking time (hellooo, instant gratification). Let cool on a rack… or maybe in your stomach.

Squashlets, Kale, and Chèvre

I’m slightly behind in bloggingness. AGAIN.

But that’s okay, because I have some pretty freaking amazing stuff to share! Like…

SUPER SQUASH STRIKES AGAIN! Remember all that silly business with the epic mega tons of squash I ate last winter? Welllll, yeah. It’s back. Complete with kale, it’s trusty sidekick. Oh. And goat cheese. Because… REALLY?! You expect me to give you a savory dish without goat cheese??

Psshhh.

Let’s be real. Cheese is where it’s at.

I could probably eat goat cheese all day until the cows came home, and then I would look at the cows and say: “COWS! Why are you here?! I need GOATS for goat cheese, obviously” and then go back to eating my goat cheese. Forever.

This dish is easy and comes together quickly—the only longish part is all the prep work of wrestling the squash and chopping the kale (both of which can be done ahead of time to save on dinner prep when you’re starving). Squash and chèvre complement each other beautifully, and are perfect with kale. Besides all that, you get antioxidants galore from the squash and kale, as well as a ton of other health benefits. AND goat cheese is good for your soul, obviously.

Butternut Squash and Kale Skillet with Goat Cheese

Serves 3, with enough leftovers for 2 dinners and one small lunch. Recipe adapted from Fitness Magazine.

Do yourself a favor and be liberal with the goat cheese, you’ll thank me later!

  • one enormous butternut squash, peeled and diced into 1/2″ cubes
  • a good glug of olive oil
  • salt/pepper to taste
  • 1 small onion, diced
  • 1 clove of garlic
  • 4.5 c kale, finely chopped
  • 1 tsp freshly grated lemon zest
  • 2 tsp fresh-squeezed lemon juice (From the lemon you just zested… you see what I did there?)
  • 1/2 c low-sodium chicken broth
  • 1/4 c dried apples, chopped and soaked in water for a few minutes to soften
  • chicken sausage, casing removed (optional: mine was smoked apple chardonnay)
  • small log of goat cheese, crumbled

In a LARGE (no, really. LARGE) skillet, heat olive oil over medium high heat. Add squash, onion, and garlic, and cook, stirring constantly, until squash is lightly browned and tender: about 7 minutes. Add kale, lemon zest and juice,  and salt/pepper to taste. If using sausage, add now. Cook until kale is wilted and squash is fork tender, about 5-7 minutes more. Add in chicken broth and and apples, and simmer for a few minutes before serving, so everything is heated through. Serve immediately, and top with goat cheese! (liberally, of course)

awkward shadow…

I’m hippie-granola…and apples are pretty freaking awesome.

I told you I was hippie-granola.

I wear leg warmers… and birkenstocks. Sometimes together… possibly more often than I care to admit.

My traveling attire when I went to Oregon was truly something spectacular… the usual leg warmers… and my yoga mat! Wow. People in the airport were REAL jealous, let me tell you.

Not my fault I was raised on tofu and bananas and other sorts of natural-type foods like peanut butter that separates (that no stir stuff has always creeped me out). Born in Berkeley, what can I say. Admit it, it’s part of my charm.

And look… I made granolaaaa!!! Like, real granola. Not like my type of hippie crunchy granola. I figured it would be easy and more cost effective to make my own, not to mention healthier, as I know exactly what goes in it. Not that we eat really sketchy granola, as a rule: Nature’s Path is pretty non sketch and delicious. But still. I wanted to try my hand at making some anyway… and I’m pretty sure it was a success.

Besides, this granola is full o’ the good stuff… like healthy fats from the pepitas and the flaxseed (can you say omegaaaasss!), whole grains (oats), and blood sugar stabilization from cinnamon. Apples are pretty freaking awesome too, since they provide soluble fiber (mostly in the form of pectin) for happy digestion and lower cholesterol levels, AND antioxidants…not to mention vitamin C! I love me some anti-free radial activity. Soooo, basically apples are awesome. You know what they say, about apples and doctors? Yeah. Pretty much true. Or maybe you should just eat some granola instead, nudge nudge wink wink…!

Apple-Cinnamon Granola

The recipe is slightly modified from Sally’s Baking Addiction, here! It made three jars worth of granola (as some of you are aware, I ADORE jars and store nearly everything in them)… which probably amounts to about 3 cups, ish? The recipe comes together quickly, bakes in half an hour, and is great snacking/breakfast/yogurt topping option. Gotta love granola and it’s ridiculous versatility!

  • 2.5 c rolled oats (not quick oats)
  • 3/4 c ground flaxseed
  • 2 tsp cinnamon
  • heaping 1/4 c raw pepitas
  • 1 c dried apples*, diced
  • 1/4 tsp salt
  • 5 tbsp unsweetened applesauce
  • 1/4 c maple syrup

*preferably use dried apples that are just that: apples that have been dried! None of those icky sulphites or sugars. Ew. None of that.

Preheat the oven to 300, and line a rimmed baking sheet with parchment paper.

In a largish bowl, mix together oats, flaxseed, cinnamon, pepitas, and diced apples. In a smaller bowl, whisk together salt, applesauce, and maple. Pour the wet over the dry and stir to combine, making sure that the wet ingredients are evenly distributed. Spread the mix onto the prepared baking sheet. Bake for 30 minutes, stirring slightly at the 15 minute mark. Let cool for at least a half an hour on the stove top (you wouldn’t want soggy granola, would you?!). Store in jars!!

Fickle tastebuds and a bit of gastronomical distraction

Woah. I just ate the best pear. Ever.

mmmm, PEAR!

Like, so freaking good I got distracted from what I actually sat down to write about, and took pictures of its deliciousness. Occupational hazard, you know. Textbook example of the fickle nature of my tastebuds.

But seriously. Pear = gastronomical delight. Go eat one. Do it now, do it now, do it now….

fork full o’pear

Or maybe do it after you make these cookies— you know, the whole reason I was going to write this post, NOT the pear. That way, while the cookies are baking, you can eat your pear. Because pears and pumpkin are basically fall in a bite. Annnnd, they go really well together. Like pumpkin butter on an almond butter-pear sammie. Delicious. Especially when you use your Star Wars sandwich cutters. What? No, of course I don’t own those… um. Moving ON!

As we know, I am the Queen of Orange! Soooo, that means when pumpkin season rolls around, I start hoarding. Because you never know when some crazy might buy ALL of the pumpkin in the store, and heaven forbid THAT might happen, I would be devastated. To prevent this (imagined) eventuality, I buy about two cans of pumpkin per shopping trip. Just in case, you know. Besides, considering I used two cans in the last two days, my stockpile lasts a laughably short time. Ridiculous, I know… but I LOVE pumpkin cookies almost as much as I love pears, aaannnddd pumpkin curry happened last night. I also recently discovered that pumpkin in quesadillas is BOMB. Feel free to be jealous…

Pumpkin cookies are amazing. I’ve lost track of how many different recipes I’ve tried, but I have at least one reigning favorite vegan one at the moment, and then the one I’ll share below. The one below is fabulous chilled—in fact, I prefer them that way, as they get nice and solid, with a bit of chewy from the oats, and they taste almost like pumpkin pie. AND they’re healthy: totally breakfast appropriate. They’re fat free and  (very nearly) cholesterol free, if you’re into that kind of thing, relatively low in sugar, and full of whole grains. Besides all that, on a very kindergartenish level, when I come home, they mean I can have milk and cookies. Which to me, is  a perfect afternoon pick me up.

So. Go make these. And then eat a perfect pear while the cookies are baking. And then eat a cookie. And then smile inside and out :)

Chewy Oaty-Pumpkin Cookies

The recipe is slightly modified from Pardon the Dog Hair, here! I ended up with 18 tablespoon-ish sized cookies (which I naturally squashed all onto one cookie sheet, as I’m lazy).

  • 1 c whole wheat pastry flour
  • 2 c rolled oats
  • 1 tsp baking powder
  • 1/2 tsp baking soda
  • scant 1/2 tsp salt
  • 1 tsp cinnamon
  • 1/4 tsp allspice
  • 1/4 tsp ground ginger
  • pinch of cloves
  • 2 tbsp unsweetened applesauce
  • scant 1/2 c maple syrup
  • 1 egg
  • 6 tbsp pumpkin puree (perfect for using up those awkward amounts)
  • 1 tsp vanilla extract
  • 1/4 c chocolate chippies

I’m pretty sure you’re familiar with cookie making methods… buttttt, just in case:

Preheat the oven to 350. Line a cookie sheet with parchment paper, or lightly grease.

In a bowl (no, really?), whisk together all the dry ingredients: flour, oats, baking soda and powder, salt, cinnamon, allspice, ginger, and cloves. Set aside. In a slightly smaller bowl, vigorously (use those biceps!) whisk applesauce and maple syrup. Add in egg and whisk a few seconds more. Add in pumpkin and vanilla, and whisk to combine. Pour wet into dry and add chocolate chippies, and stir until incorporated. Drop by fatty tablespoonfuls onto prepared cookie sheet, and bake for about 11-12 minutes. Easy money! Let cool on a rack before storage—I like to store mine in a tupperware in the fridge. Enjoy the fall deliciousness :)

Get those balls rolling…

BALLS!

Okay… so I finally did it.

Apparently I’ve jumped onto the balls bandwagon.

Not THAT kind (pshhh—get your mind out of the gutter); THIS kind!

and then there was one.

Except to me they’re really like healthful no-bake cookies. But in ball form. Because I don’t really use these for energy, let’s be real… but they’re perfect snackies for when you want something kinda sorta sweet but good for you all at the same time. But not dessert. A ball.

Besides, saying BALLSSSSS is fun! Try it: just make sure there’s no one around, they might look at you a little funny.

And they’re fun to stack, and roll around…

all by its lonesome

Let’s face it, I have yoga brain after my class this morning. Yes, I know the class was finished at 11 and I had a chai afterwards and should be fully functional by now (at 4:15 pm), buuttt my brain says… NO. Apparently we’re having a small tantrum today: it’s fuzzy Thursday. Acceptable, I suppose, for my day off. Good thing I don’t have to do anything more strenuous than go grocery shopping (oh wait. That required efficient decision making.whoops, FAIL) and photograph balls. Tee hee.

yum yum yum

Anywayyy. I digress. These balls are delicious and easy and come together in a snap. They’re a little on the crumbly side and excellent to grab on the way out the door (just don’t get crumbs all in your car; oh wait… I already did that).

I suppose you could call them blobs… but balls is more fun!

Balls balls balls:

aerial shot!

No-Bake Energy Balls

Ever so slightly adapted from Running to the Kitchen, here! I doubled the recipe and got 18, since I’ve made a single recipe before and we fight over them…

  • 1 c raw cashews
  • 1/2 c rolled oats
  • 4 tbsp nut butter (I’ve used all peanut, half peanut/half almond, both are good!)
  • 3 tbsp dark chocolate chips
  • 1 tbsp chia seeds
  • 2 tbsp maple syrup
  • 1 tsp vanilla extract

Couldn’t be simpler: chuck nuts into your food processor. Pulverize until they’re a fine powder. Add in oats and pulse again. Add everything else (nut butter, chocolate chips, chia, maple, and vanilla), and pulse until it all comes together. Form/roll into balls and store in the fridge. Easy money.

it looks like…a rock?!

Ice cream the size of my face and other musings…

Today, I ate an ice cream the size of my FACE. No. Really. It was. Don’t believe me?

you’re welcome.

Yep, now you do.

In all fairness, I did share with Vaccuum Vati. Thank heavens. It was enormous.

And then I took a nap. Seriously. I have never in all my life gone into that serious of a food coma… but I actually napped when I got home! With my kitty, love love love! And then… I did kitty yoga and went to the gym. A lovely day all around, I must say.

You see, I’ve been going to Fenton’s ever since I was a child, with my gram. So it brings back all kinds of nice memories, besides giving me the ability to stuff  my face with deliciousness. As a kid, I used to search the menu for the least painful, smallest lunch option possible, so I could go speedily onto dessert… and I realized today that I apparently still do that. Ice cream is infinitely superior to lunch. Duh. Everyone knows that.

phew. Healthy eye-relief.

Anyway. Getting back to the point of this blog, which is, after all, recipezzz… I made chickpea cakes! I’ve made them before and they’re fab… but was too lazy at the time to blog about them. Sooo you get them now! Do a happy dance, they’re amazing. They sort of taste like hummus in cake form. Winner winner, hummus dinner…

mmm, chickpeas!

Chickpea Cakes with Yogurt Drizzle

The recipe is ever so slightly adapted from Naturally Ella, here. These are delicious. Hummusyyy and with a nice texture. The yogurt drizzle gives them just the right amount of sauciness… and they’re particularly good with cucumber. I doubled the recipe to serve 3.

yum.

Chickpea Cakes

  • 2 c cooked chickpeas (I used canned)
  • 2 tbsp tahini
  • sprinkle of garlic powder (I was out of for reals garlic, if you have it, use about one clove)
  • 2 tbsp Braggs Liquid Aminos (or soy sauce, whatever you prefer)
  • 1/2 c parmesan
  • 4 tbsp whole wheat pastry flour
  • 2 eggs
  • salt/pepper to taste
  • glug of olive oil

Yogurt Sauce

  • a few spoonfuls of plain yogurt of choice (mine was lowfat, not greek)
  • drizzle of olive oil
  • salt, pepper to taste
perfect antidote to ridiculous amounts of ice cream.

Muscle your food processor out of it’s hiding place/lair in the cupboard. Set up the whole shebang. Toss in chickpeas, tahini, Braggs, garlic powder (or normal garlic), and parmesan, and pulse until the mixture comes together and is a bit crumbly. Add in flour and eggs, and salt and pepper, and pulse to combine. Add a teeny bit more flour if it seems a little too thin—it should be like sticky batter consistency.

Heat olive oil in a nonstickish pan over medium heat. Once pan is hot, drop large spoonfuls of the batter into the pan. Let cook until you can easily flip them and the bottoms are done, then flip and cook until both sides are nicely browned, about 5ish minutes.

To make yogurt sauce, vigorously stir all ingredients together in a small bowl. Seriously. It’s that easy.

Stack prettily… drizzle… eat… repeat.

drizzle!!