Kitchen wisdom is sage advice

IMG_1526

Sending all the good vibes and healing thoughts to those caught in the terrible wildfires in the North Bay – I can’t even imagine the scale of destruction happening. I don’t even live in the thick of it, and I still can’t see the sky on account of smoke. My heart hurts for my state and for those in the middle of it all.

IMG_1500

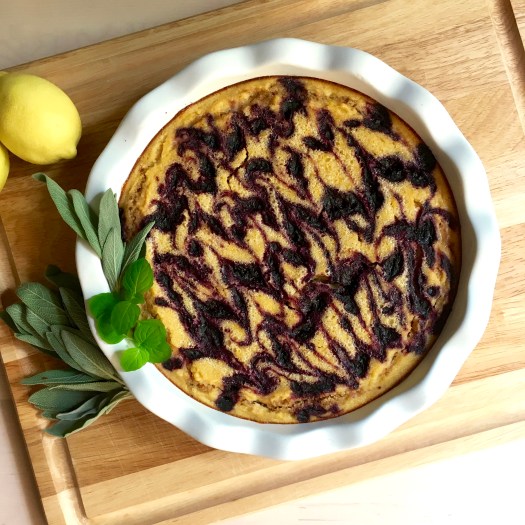
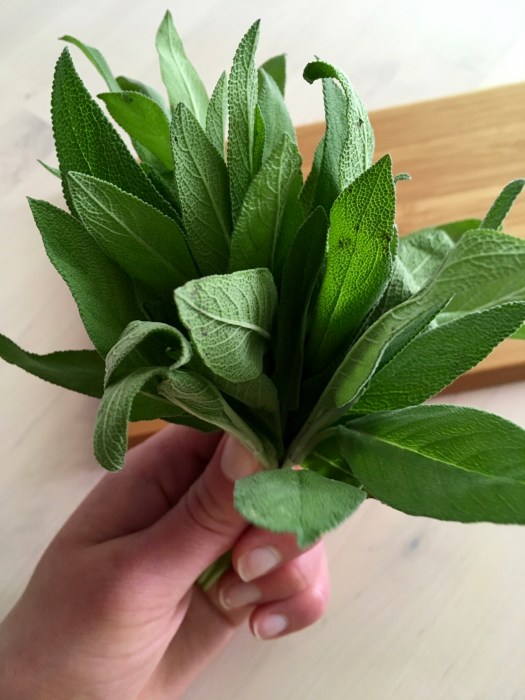
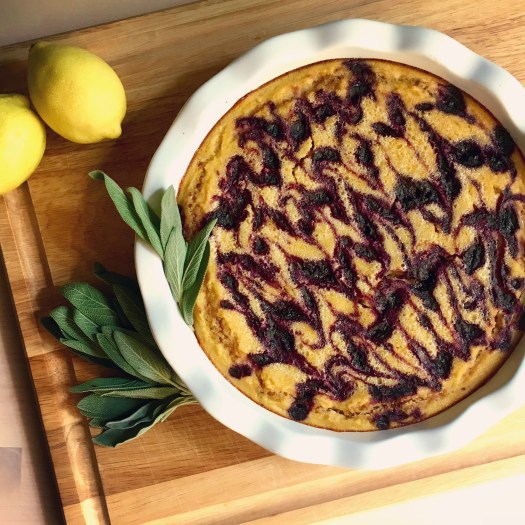
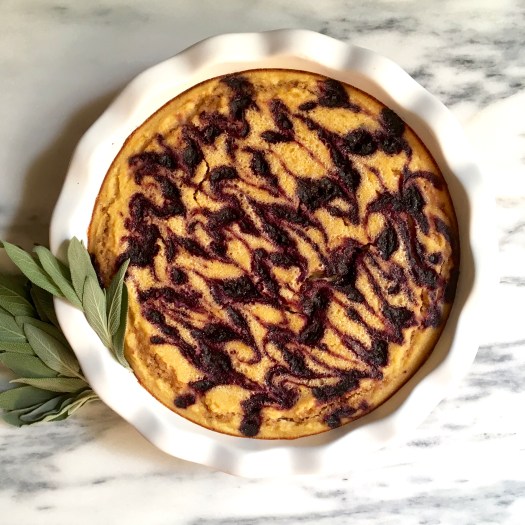
These bars can bring a little sunshine to otherwise smoky, obscured days – the citrus is bright and fresh, and we all know I’m obsessed with herbs in dessert, so this is no exception. The sage in the crust is noticeable but not aggressive – just a hint of earthiness to play up the brightness of the meyer lemons (locally grown, of course!). Blueberries and almonds go with just about anything, so why not invite them to the party too?

IMG_1508

These do double duty as dessert and breakfast (that seems to be a theme around here, hmm) – makes some amount of sense, since my desserts are almost all whole-food and fruit focused.

IMG_1524

Besides, these have a hefty dose of eggs which basically makes them breakfast. See? Science!

IMG_1505

In other news, there are finally leaves on the ground, and of course I’m excited about a return to sweater, boot and scarf weather. I’m a little sad at the shortening days though, especially because I miss my good morning photography light! Sigh. It will be back!

IMG_1484

IMG_1496In the meantime, I’ll make bright, citrusy and quite probably herb-y desserts to bring some brightness to the shorter days. Happy Autumn!

IMG_1507

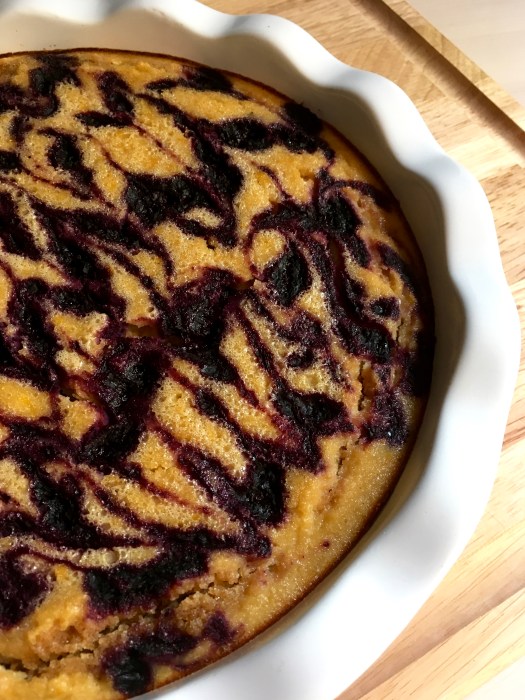
Meyer Lemon Blueberry Bars on an Almond Sage Crust

Lightly sweet, tangy, and perfect if you have a glut of meyer lemons (though regular lemons are fine too!). The sage adds such a nice earthy twist to the basic lemon bar – I love lemon with almond so these just hit all high points for me! Grain free, gluten free, refined sugar free, dairy free, arguably paleo. Yield: 1 9″ pie plate or 1 8 by 8 square pan, serves 2-8 (ha – I recommend dessert and then for breakfast the next day). Adapted from my orange creamsicle bars, here!

For the crust:

1.5 c almond flour
3/4 tsp baking soda
heaping 1/4 tsp fine sea salt
1/4 + 1/8 c unsalted almond butter
1.5 tbsp pure maple syrup
1.5 tbsp coconut oil, melted
2 tsp vanilla extract
1/4 tsp almond extract
1.5 tbsp chopped sage

Preheat the oven to 350, and grease an 9″ round pie dish (must be deep) or an 8 by 8 pan.

In a large bowl, stir together almond flour, baking soda, and sea salt. Add in almond butter, maple syrup, melted coconut oil, vanilla, and almond extract and stir until combined and crumbly. Stir in chopped sage. Press the crust dough evenly into the prepared pan, and poke with a fork a few times. Bake for 10 minutes. Remove and set aside when done.

For the filling:

4.5 eggs*
1/2 c pure maple syrup
zest of 3 meyer lemons, roughly chopped
1/4c + 1/8c fresh lemon juice
pinch of sea salt
4.5 tbsp coconut flour
2 tsp vanilla extract
* to achieve half an egg: crack an egg into a small bowl and whisk it; then either measure or eyeball half and use that. or just use a whole one as long as it’s small, I doubt it would affect the consistency of the bars all that much…

For the blueberry swirl:
1 c wild blueberries (preferably frozen, thawed)
1 tsp vanilla extract

While the crust is baking, make the filling! In a large bowl, whisk together eggs, maple, lemon zest and juice, sea salt, coconut flour (sifted if lumpy) and vanilla until smooth. Pour the filling into the par-baked crust. For the blueberry swirl, blend blueberries with their juice (some is released during thawing) and vanilla either with an immersion blender or a food processor. The sauce won’t be especially thick, but that’s fine. Pour the sauce into a ziplock bag (or use a piping bag, but be warned that blueberry stains!), carefully snip a really small triangle off of one corner, and pipe 5-6 lines across the lemon filling. Some will sink in, but most will stay on top (and no, the lines do NOT have to be perfect!). Take a table knife and swirl the lines gently into the filling.

Bake for 30-35 minutes. The top should be mostly firm and the filling set, with just a small amount of wiggle (it’ll firm up as it cools). Let cool completely and eat immediately or chill in the fridge for later (I like them cold!) — serve with vanilla ice cream :) Store any leftovers in the fridge.

IMG_1510

Rhubarb Stalking

IMG_0270

Rhubarb stalking!

… see what I did there? I’m especially proud of that one…

IMG_0264

Sometimes, you just gotta stalk the seasonal produce of your dreams (especially when it has stalks… heeheeehe!) Luckily, I found a big bunch at my local market a few weeks ago, chopped it up and threw it in the freezer for later use. And what a smart plan that was! Frozen rhubarb bakes like a dream, which meant this crisp was in and out of the oven in an hour, including prep time.

IMG_0269

We seem to be getting full-on summer weather (90+ degrees, ew someone save me) here for a few days — I trotted out my old trick of baking at 6:30 in the morning so that the oven doesn’t heat up the apartment overly much (definitely warranted when you live in a studio… no one likes a furnace for an apartment).

IMG_0271

But! This crisp is worth a slightly warm apartment… especially since we’re getting close to the end of the rhubarb season I think (at least around here); I’m not seeing it in the market as much lately. If it’s still around you, stalk those suckers! You need this crisp in your life.

IMG_0259

Tart-sweet, with an unexpected earthiness from the sage – this one is a winner for dessert with some ice cream, and for breakfast the next day (obviously, that’s what leftover crisp is made for, it’s basically granola and fruit!) Not really sure what prompted me to try sage in dessert but I am NOT sorry – I think it might become a reoccurring thing around here, that’s how good it was! I really like the flavor paired with fruit, and it would be interesting to see where else it might play a role.

IMG_0253

Another from the SF series – I photographed the dome when I was over at the Herbst Theater a bit over a week ago.

IMG_0246

Happy May! Go stalk some rhubarb before it disappears for the season, make crisp & eat it with your loved ones. I promise it tastes even better in good company :)

IMG_0261

Rhubarb Blackberry Crisp with Sage

Tart-sweet, with an unexpected earthiness hit from the sage. Perfect for dessert with ice cream of choice, and for breakfast the next day. Refined sugar free, gluten free, dairy free, vegan. Yield: 1 9″ pie plate; serves 6-8 (or 2… not that I speak from experience). A Wait are those Cookies original.

IMG_0273

For the filling:

  • 3.5 c fresh rhubarb, chopped into small pieces (frozen is also fine – run briefly under cool water in a colander to thaw slightly before using)
  • 1.5 c blackberries (mine were frozen)
  • 2 tsp vanilla extract
  • juice of one meyer (or regular) lemon
  • 3 tbsp maple syrup

For the crisp:

  • 1 c rolled oats (gluten free if needed)
  • 1/2 c almond flour
  • large pinch of sea salt
  • 1/4 c raw pecans, chopped
  • 1/4 c raw almonds, chopped
  • 1/4 c coconut sugar
  • 4 tbsp coconut oil, solid
  • 1 tsp vanilla extract
  • 1 heaping tbsp chopped fresh sage

Preheat the oven to 350, and grease a 9″ pie plate or 9×9 pan with coconut oil.

In a large bowl, combine rolled oats, almond flour, sea salt, pecans, almonds, and coconut sugar. Cut in the coconut oil, using a fork/your fingers/a pastry cutter if you’re feeling fancy — I used a fork and my fingers and it worked just fine (crisp is exceedingly forgiving). Stir in vanilla extract and chopped sage.

If using frozen rhubarb & blackberries, put them in a colander and run them briefly under cool water in the sink to thaw them slightly. Drain any excess water and toss into another large bowl. Add vanilla extract, lemon juice, and maple, and toss to combine.

Add the rhubarb + berry mix into the prepared pie plate or baking pan, top evenly with the crisp. Pop the whole thing into the oven for 45-50 minutes, until the fruit is bubbly and the crisp is lightly browned and… crisp!

Serve with your fave vanilla ice cream/non dairy of choice (whipped coconut cream would also be good here), and store any leftovers covered in the fridge. Makes EXCELLENT breakfast the next day – the crisp solidifies a little in the fridge and omg it’s good. Besides, who is going to pass up crisp for breakfast?! Not this girl.

IMG_0260

IMG_0272

A little cheese with your vegan risotto?

IMG_4650

Stop the presses!

Something savory?! What the what?

But this was amazing, so I had to share. I totally made risotto in less than an hour (And then I made cookies. All within that same hour) And the risotto was vegan. And then I put cheese on it. Don’t judge me, I love me some cheese (Life would be soooo boring without cheese, no?).  All an excellent use of my Monday, I might add.

IMG_4642

I’m not feeling particularly wordy today, so a short post it is. But the recipe is fantastic and was very well received… sooooo since it’s dinner time in my part of the world, this is directed at those of you over here on the west coast with me: y’all should head to the kitchen with your laptop. Right…about…now! You know you want to…

IMG_4647

Vegan Cashew ‘Risotto’

This recipe is slightly adapted from the Whole Foods site, which is awesome as they have some bomb stuff! Served 4, with leftovers for 2-3. This came together really quickly, and is totally nutritious and sooo delicious. It’s economical too, with most ingredients being something you’d have on hand, or that is inexpensive.

  • 1 butternut squash, peeled and diced into 1/2″ cubes
  • 1 c raw cashews
  • 1/2 tsp cinnamon
  • 1/2 tsp sea salt
  • 1.5 c unsweetened almond milk (soy, rice, or dairy okay too)
  • 1 small onion, diced
  • 1-2 cloves of garlic (I used 1.5 frozen cubes, each cube=1 clove)
  • 3/4 c low-sodium veggie broth
  • 20 oz frozen brown rice (which equated to one package. I used frozen as it’s precooked, lessening my cook time)
  • 2 tbsp minced fresh sage
  • 1 tbsp minced fresh marjoram
  • ground cracked pepper, to taste

IMG_4639

Soak cashews in just enough water to cover, for a few hours or overnight (I left mine overnight).

Peel, seed, and slice the squash. Bring a large pot of water to boil over high heat, then add squash and boil until fork tender (4-5 minutes). Take out about a cup of squashlet cubes for later, and let the rest boil until very soft, about another five minutes. Remove squash from water and set aside.

Drain cashews, and add them to a blender (if you have a non-crap one, or a food processor like me if your blender is worthless) with the very soft squash, cinnamon, sea salt, and milk bev. Blenderize or process until smooth.

IMG_4641

Heat a large saute pan with some olive oil over medium heat. Add in garlic and onions once hot, and let cook for about 5 minutes, stirring frequently, until onions are just beginning to brown. Add in broth, frozen rice, and reserved cup of squash cubes, and cook for another few minutes, still stirring (it’s risotto, after all…). Stir in blenderized mix still sitting in your blender*, followed by the minced sage and marjoram. I added just a wee bit more salt here, as well as pepper. Cook for several more minutes, until the sauce reduces a bit and the risotto thickens slightly (6 to 8 minutes more). Remove from heat and stir in more pepper, if desired.

*the original recipe called for 2.5 c of squash cubes. I definitely had waaaay more than that since I went ahead and used the whole (rather large) squash, so when I added the cashew mixture to the risotto, I didn’t use it all (probably about 3/4 of it). Any more and the risotto would have been too soupy—use your judgement based on how large your squash is, and how much liquid your rice absorbs. I love the sauce anyway, as it makes great dip for veggies or over a salad, so I was happy to have 1+ cups left over!

Garnish. Serve. Eat. Love!

IMG_4648

I am the Queen of Orange!

it's hiding... can you tell what it is?!

Yet another orange dish.

Who’s surprised?

Yeah. Didn’t think so. That’s okay though, you’ll thank me later,  just wait.

Besides, it’s fall! What do you expect?! I’m trying to be more of a seasonal eater. And by this I mean I want my insides to resemble the fall color which has exploded all over trees in Salem, and caused them all to look like they’re on fire… Then I really would be a seasonal eater, so there! Instead of having technicolored insides on account of sprinkles, I can have autumn-inspired innards! Teehee. I am the Queen of ORANGE!

Actually, when I say Queen of Orange, I’m rather reminded of William of Orange, and England’s Glorious Revolution in 1688. And no, I did not look any of those facts up… I am in fact a history nerd to the max, and those fab factoids were actually pulled out of AP European history brain from waaaay back when in sophomore year of high school. Yeeeahh. That’s right. I could also list you quite a bit of British royal genealogy… but I’ll save you the boredom ;) You’ll just have to trust me. Anywayyy. Back to the food, which is why you’re here, right?!

This is how much I love squash:

Like, A LOT. Fat, roundy orange squash. Or alternatively, butternut and acorn are good too… Which are not exactly roundy and fat, more like tan and elongated, or green and oddly lumpy, respectively. Whatever, to each his or her own squashiness, right?!

Because Kira and I realllyyyy love squash, we decided to make a new dish tonight… risotto! BUT. Because I’m a health nut, we made a healthy one. Hooraayyy!! But SO delicious, don’t get me wrong. Mmmmm. This risotto is actually made with barley, not rice. (Would that make it  barley-otto? Or barlotto?) Which is quite a bit more nutrient dense than rice, for the win! In fact, barley is realllyyy good for you: lots of soluble and insoluble fiber, which is handy for a number of things (including lowering blood cholesterol!), as well as vitamins, minerals, and antioxidants. It also has eight amino acids and has is low on the Glycemic index, which is good for blood sugar. Wheeee, whole grains!

Barley seems to be another of those foods that I apparently imprinted on as a small child (hmm… tofu and barley. can you say hippie-granola?! Jeez, no wonder I wear Birkenstocks all the time). Barley cereal was my FAVORITE when I was pretty little— I distinctly remember my mom going to a specific store, where she knew an employee who would get me my special barley cereal. Apparently we could only get it there… I do remember him being awfully nice, hehe. And my mutti was wonderful to go get the cereal for me!  I guess I never really grew out of the barley phase, as I LOVED this dish.

Like I said, you’ll thank me for the orangeness later :)

Butternut Squash and Barley Risotto (or Barlotto)

Serves… a lot? We made half and still have lots of leftovers. I’ll provide the measures we used. Adapted from here!

Acquire this business:

  • 1 butternut squash, cubed and roasted
  • 1 tablespoon olive oil
  • Salt
  • Pepper
  • 2 cups low-sodium chicken or vegetable broth
  • 2 cups water
  • 1/2 onion, minced
  • 1 thingy of garlic (I prefer the handy frozen squares from Trader Joe’s! It eliminates silly mincing and squishing)
  • 3/4 cups whole grain barley (I bought mine in bulk from Whole Foods)
  • 1/2 cup dry white wine
  • 3/8 cups grated Parmesan
  • awkward baggie of frozen peas
  • 1 teaspoon minced fresh sage
  • a judicious sprinkle of nutmeg

How to procure tastiness and gastronomical delight:

Firstly.

Roastify your b-nut squash! Preheat your oven to 450. Peel the squashling, and deseed it with a spoooon. Cubify it. Toss the cublets with a good glug of olive oil, salt, and peppahhh. Roastify the cublets for about 30 minutes, stirring onceish. When removing them from the oven, try not to get blasted with a huge puff of ridiculously hot steam. Seriously oven, I do NOT need that extreme of a facial. Set aside until needed.

Secondly.

In a smallish pan of some sort, bring the broth and water to a simmer, then lower heat just enough to keep it toasty. In a saute pan, saute the onion in olive oil. Cover and cook on medium until onion is softening, about 8-10 minutes. Add in garlic. Add barley, and let it toast for about 4 minutes over medium heat. Stir in wine, and continue stirring until it has been absorbed.

Now prepare to stir for the rest of your life.

At least you’ll have tasty risotto!

Add about a third of the broth/water, and half of your squashlets. Stir/simmer until absorbed, about 20 minutes. Continue to add liquid, stir, and simmer until the liquid is absorbed. This probably took Kira and I about a half hour, to have all the broth be absorbed and the barley to be cooked through.

Off the heat, stir in the remaining squash (assuming you left some out, not a big deal if you don’t want to), peas (another babyhood fave… what can I say, I was a gastronomically advanced child), parmesan, sage, and nutmeg. Salt and pepper to taste. Garnish with fresh basil (of course).

Enjoy the gastronomically delightful orangeness!