An entirely a-peel-ing banana cake

fullsizeoutput_12cd

Hello hello!

I have cake for you today.

fullsizeoutput_12d7

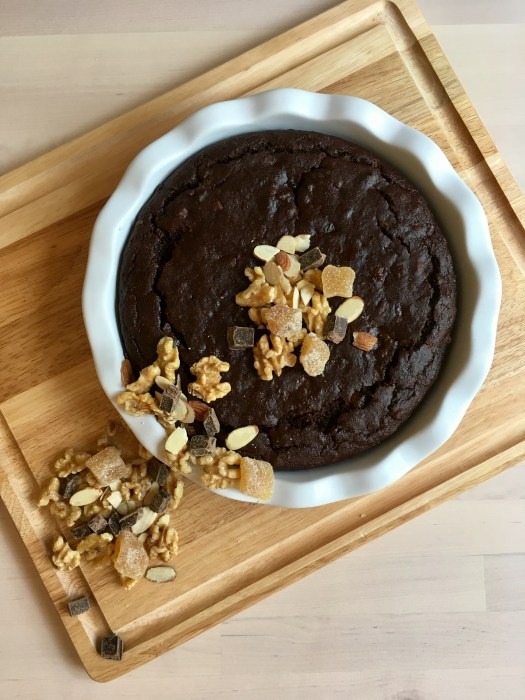
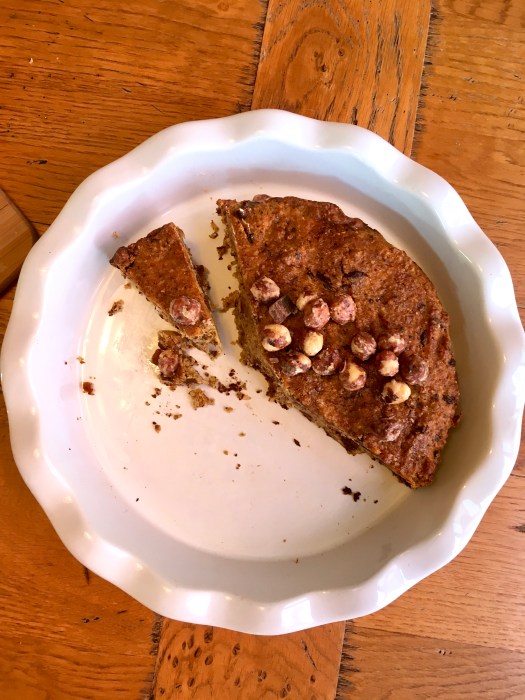
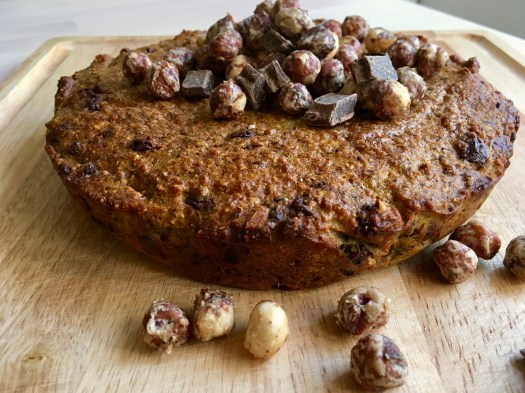
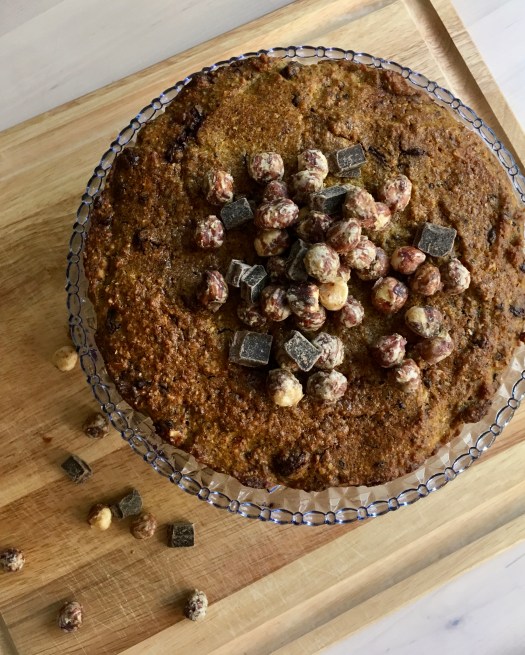
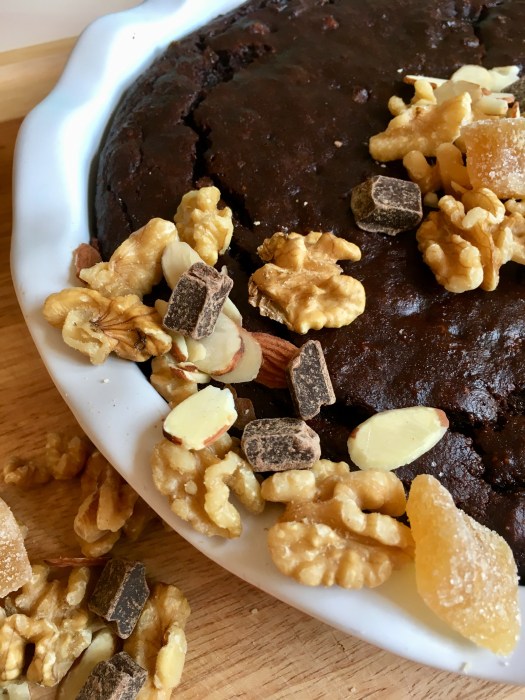
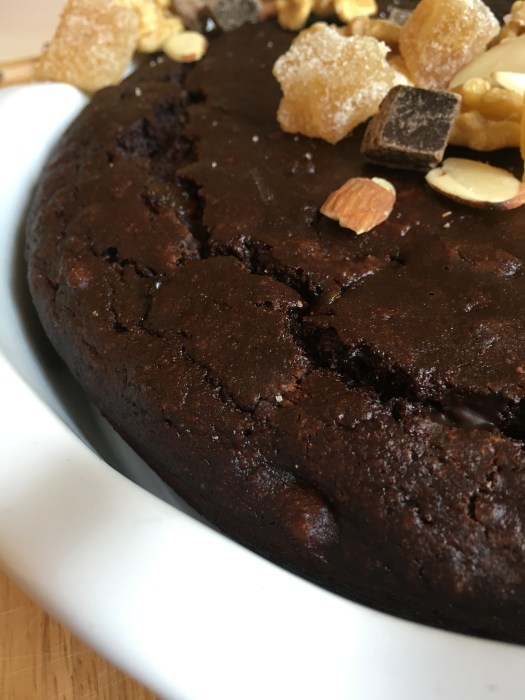
Actually, this is well timed since that holiday of all Hallmark holidays is coming up next Wednesday; since it’s inexplicably tied to chocolate – here you go! This one is dense, dark and exceptionally chocolatey without being overbearing, and the banana flavor comes through nicely so it ends up being a hybrid somewhere between chocolate cake and banana bread. Nothing wrong with that in my book.

fullsizeoutput_12d0

fullsizeoutput_12de

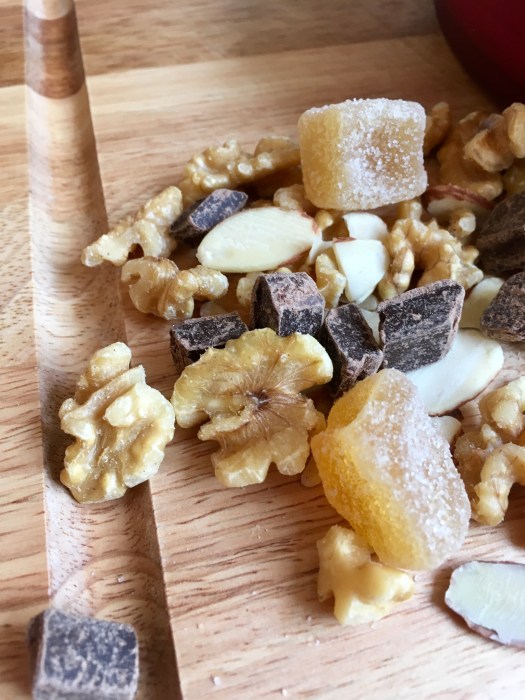
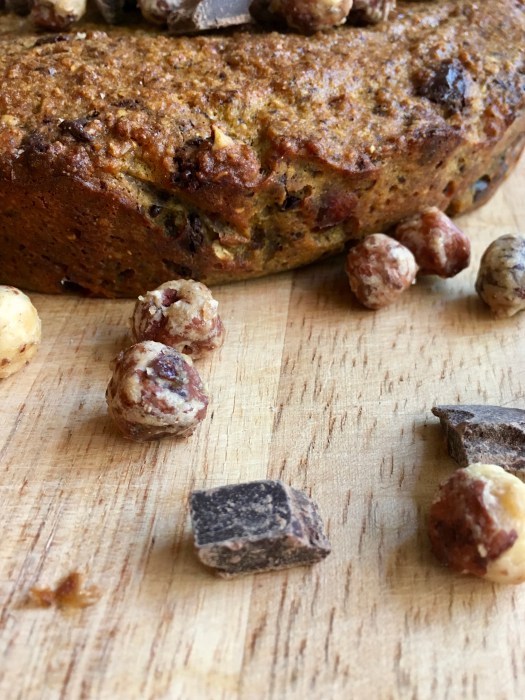
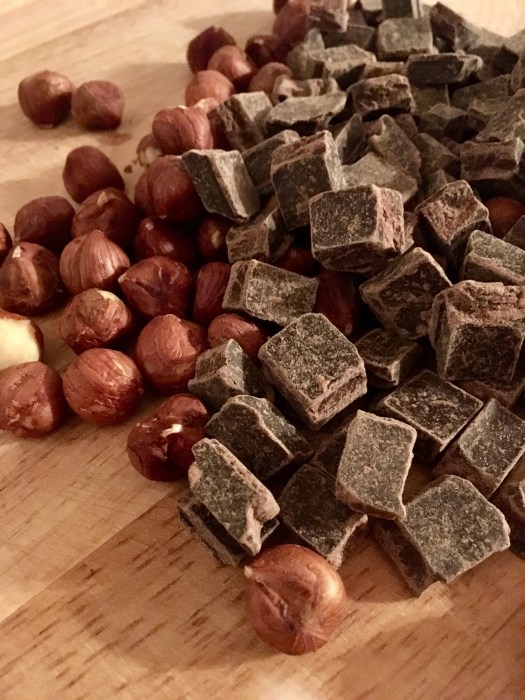
Besides that, somehow I’d forgotten how much I love walnuts and dark chocolate together – and I’m of the opinion that ginger should almost always hang out with chocolate, so that’s a no brainer.

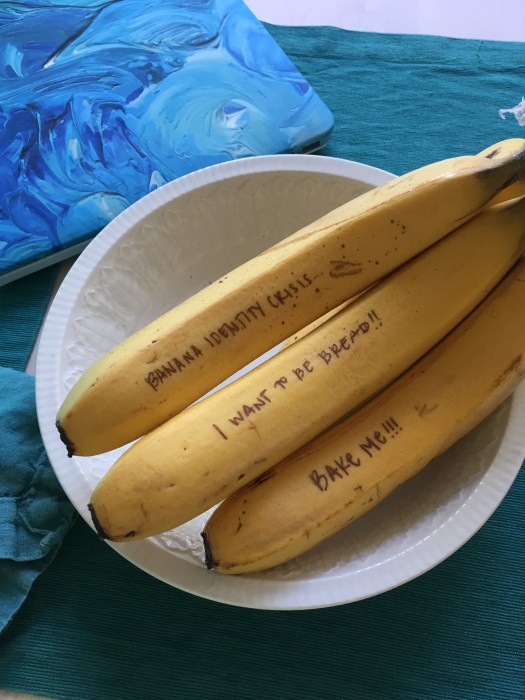
Also – rioting, demanding bananas:

IMG_2367

fullsizeoutput_12cf

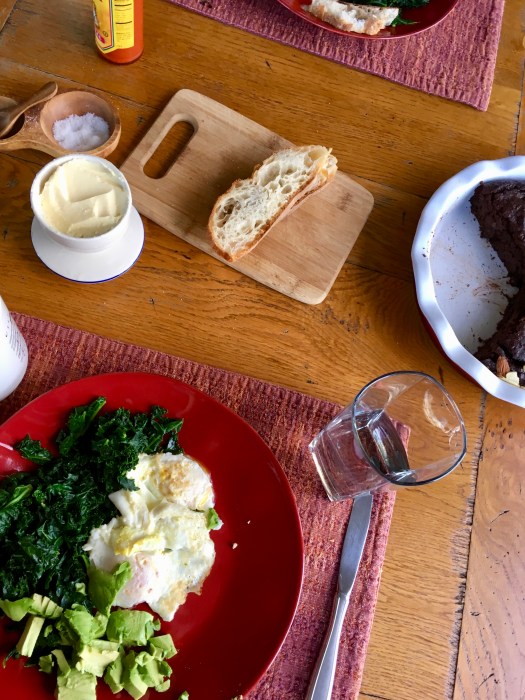
This cake was loved by both of us – it’s excellent with ice cream for desserty shenanigans and while a little heavy for a big breakfast slice alongside eggs and kale, little wedges are definitely doable ;) a little chocolate in the morning alongside coffee never comes amiss.

fullsizeoutput_12df

fullsizeoutput_12dc

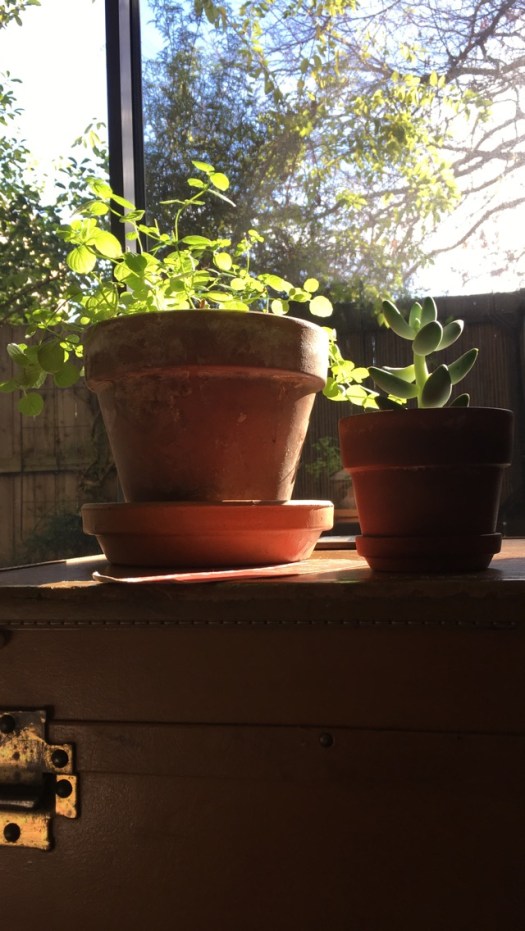
In other news, my plants are happy to be getting more sunshine these days, though I have to say I’d prefer a bit more winter before we do spring, please.

IMG_2368

IMG_2404

So! Make cake, eat with loved ones, be happy. Especially because it’s gluten free, refined sugar free and high in protein, healthy fats, and antioxidants. It’s really a health food in disguise…

fullsizeoutput_12d1

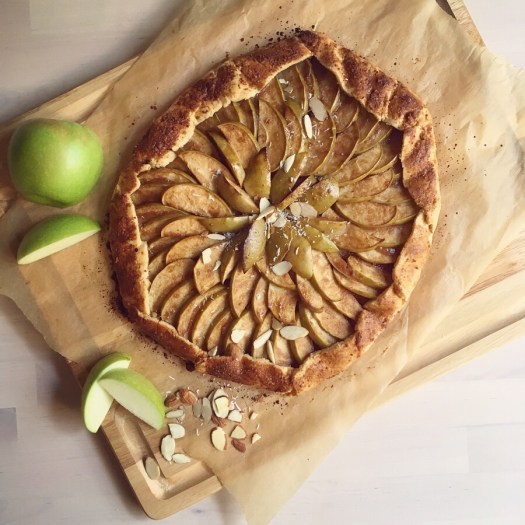
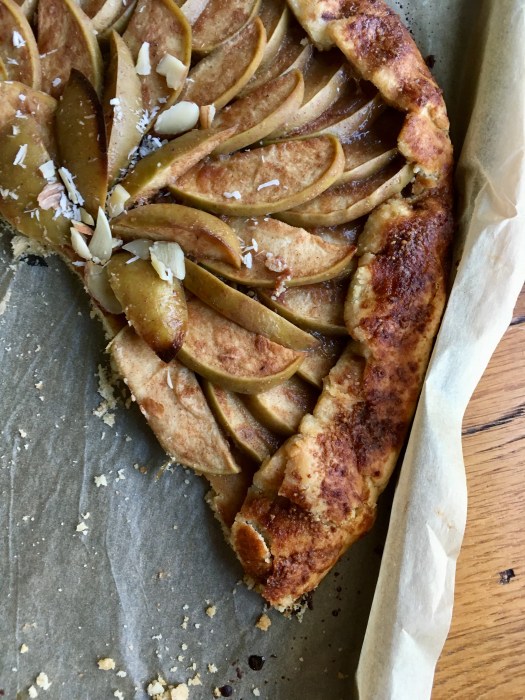
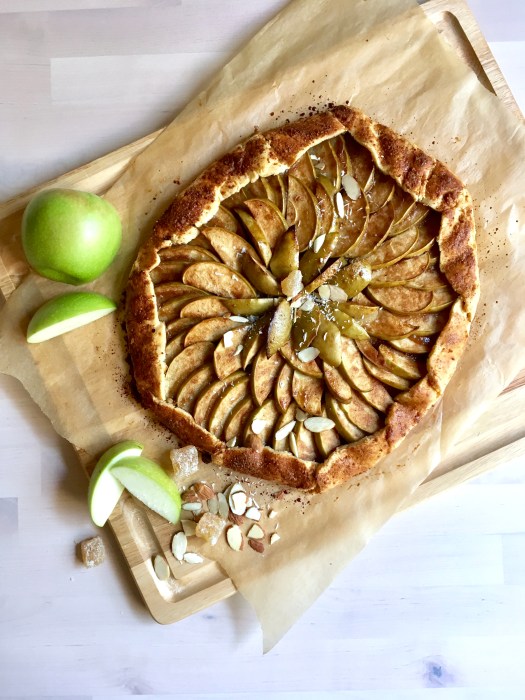
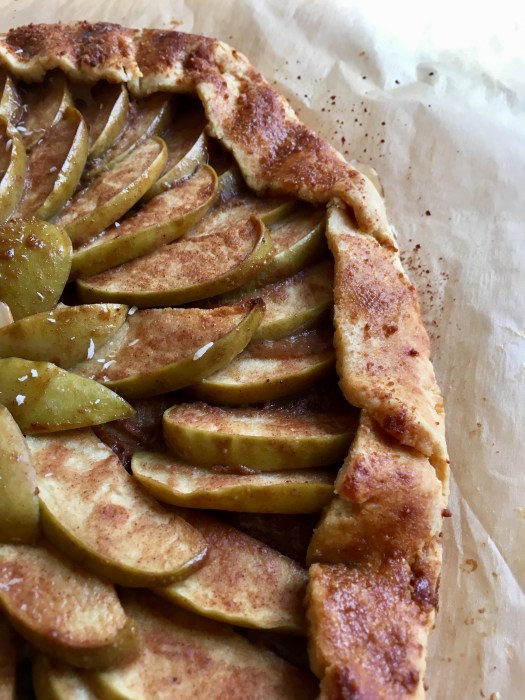
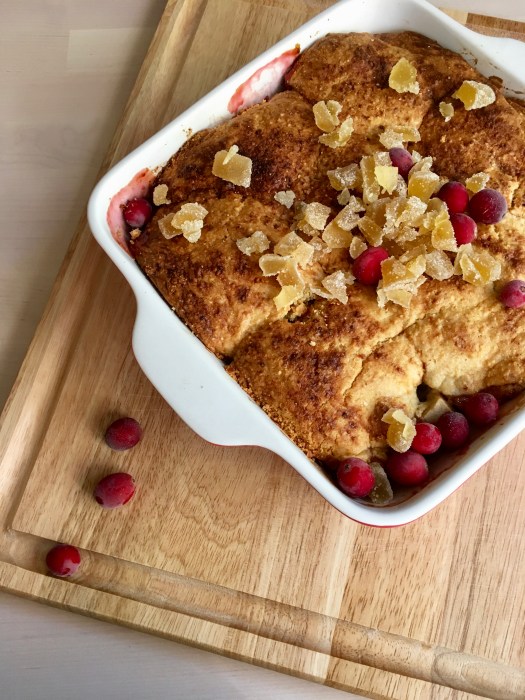
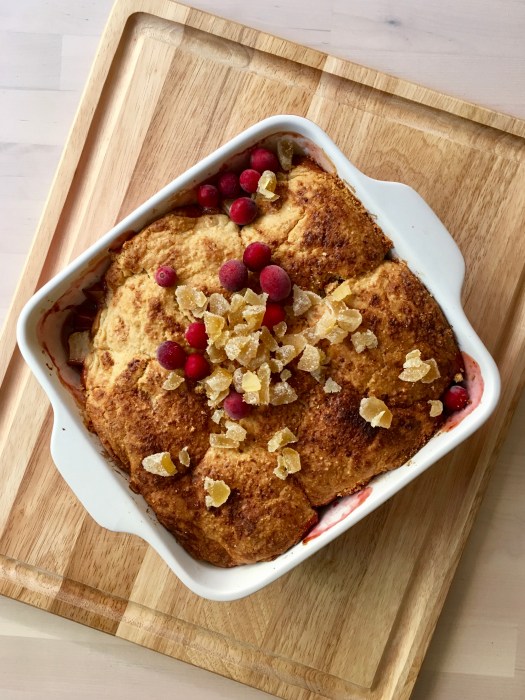
Dark Chocolate Banana Cake with Olive Oil, Ginger & Walnuts

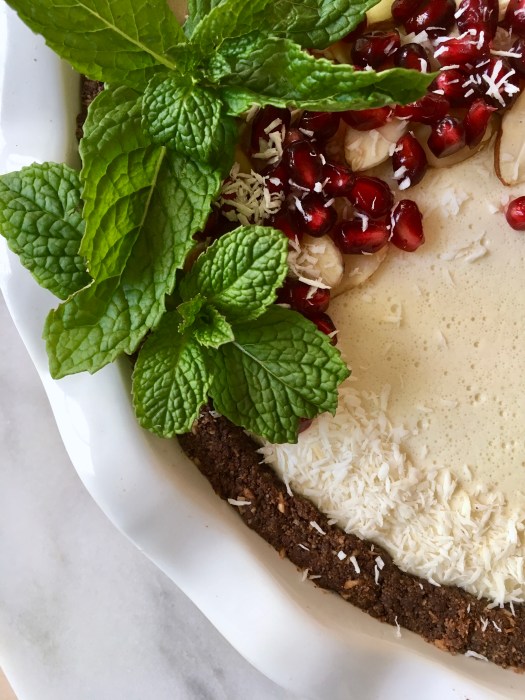
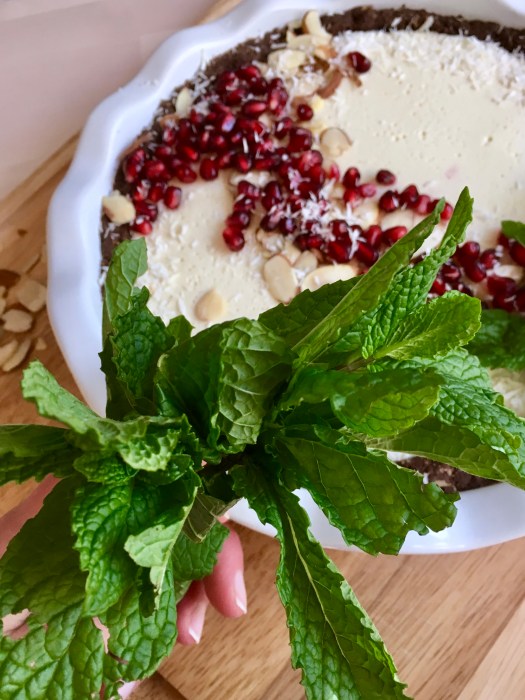
Gluten free, refined sugar free – dark chocolatey banana cake with hits of ginger and chunky walnuts. Not too sweet but a hefty chocolate dose – the olive oil and sea salt temper the natural banana sweetness for a step up from your typical banana bread. Besides, I forgot how much I loved walnuts and chocolate together! Yield: 1 9″ or 10″ cake depending on pan of choice (see below). Heavily adapted from Food52, here.

1c almond flour
1/2 brown rice flour
1/2 c cocoa powder
3/4 tsp baking soda
3/4 tsp sea salt
1/3 c olive oil
2 eggs, beaten
1/4 c maple syrup
1.5 c ripe bananas (from about 3 large bananas), mashed with a fork until smooth
1/4 c plain whole milk Greek yogurt
1.5 tps vanilla extract
1/3 cup coarsely chopped dark chocolate
1/2 cup (65g) chopped walnuts
1/4 c chopped crystallized ginger

Preheat the oven to 350° F. Generously butter or grease a 9″ cake pan (or a 10-inch cast-iron skillet, or a 9×5-inch loaf pan) – I used a 9″ metal cake pan and it worked just fine.

In a large bowl, whisk together the almond flour, brown rice flour, cocoa, baking soda, and salt. In a separate bowl, mix together the olive oil, eggs, maple, mashed banana, yogurt, and vanilla. Pour the banana mixture into the flour mixture and fold with a spatula until just combined. Stir in the chocolate, walnuts and ginger again just until combined. Scrape the batter into the prepared pan or skillet.

Bake until a toothpick or knife inserted into the center of the cake comes out clean, about 28 to 35 minutes (start checking at about 22 minutes for doneness – thinner pans will be done faster. If you used a loaf pan, baking time will be more like 60 minutes). Let cool in the pan for about 10 to 15 minutes, then run a knife around the edge of the pan and invert it onto a cooling rack to cool completely before serving. I like it cold too, straight out of the fridge, but you do you. Also excellent with ice cream, obviously. Keeps well covered in the fridge if you can make it last longer than a day ;)

fullsizeoutput_12d3

Galettes: perfect breakfast food

IMG_2356

Hello hello!

fullsizeoutput_1299

I have galette for you today, which I must say makes excellent breakfast. You can also fly wedges around like they’re star destroyers, not like I did that or anything, ahem.

fullsizeoutput_129d

This comes together really quickly – the caramel can be made up to a week in advance, and the dough does best if left to hang in the fridge overnight, so all that really needs to happen day-of is apple slicing & assembly.

fullsizeoutput_129c

It also makes your kitchen smell amazing – I can attest (the benefits of living in a studio apartment: when you bake something, the entire apartment smells delicious).

fullsizeoutput_1294

Let’s see, what else has been going on… I’ve made a lot of cookies lately, so perhaps I will eventually post that recipe here. More drawing, of course!

IMG_2310

fullsizeoutput_129f

This galette is perfect for a light dessert with ice cream – it’s naturally not overly sweet (who am I kidding; nothing I make ever is!), and the apples make a nice contrast to the spices in the caramel. Grain free, gluten free and refined sugar free, so everyone can get in on the fun! Mostly paleo too, and could even be more so with the use of ghee in the crust.

fullsizeoutput_1295

fullsizeoutput_128c

Our professional opinion is that while it is undeniably delicious for dessert, it really shines for breakfast – it’s a perfect breakfast-pastry consistency and who doesn’t like wedges of this alongside coffee? Right. Exactly.

fullsizeoutput_12a1

My advice is to make and eat galette with those you love – it tastes better that way! And of course save some for breakfast ;)

fullsizeoutput_128e

Apple Chai Caramel Galette

Grain free, gluten free, refined sugar free, paleo. Probably could be lactose free no problem – just swap the butter in the crust for ghee or coconut oil. Lightly sweet, chai spiced caramel and tart apples – perfect for dessert with some ice cream or straight wedges for breakfast. Yield: 1 galette, serves 2-6 :)

For the caramel:
1 14-ounce can full-fat coconut milk
1/3 cup coconut sugar
1 tablespoons pure maple syrup
1/4 teaspoon sea salt, to taste
3/4 teaspoon ground cinnamon
1/8 teaspoon ground nutmeg
1/8 teaspoon ground cardamom
1.5 tablespoons ghee (butter or coconut oil would also work)
1 teaspoon pure vanilla extract

Add the coconut milk, coconut sugar, pure maple syrup, and spices to a medium saucepan and whisk over medium-high heat. Bring mixture to a full boil, then reduce the heat slightly to allow the mixture to continue to cook at a managed boil. Whisk frequently/constantly to avoid the coconut milk from separating or clumping up. Cook and whisk until caramel has thickened slightly and has reduced to one half – one third of its original volume, about 10 to 15 minutes. Remove from heat and whisk in the salt, ghee, and vanilla extract. Let cool to room temperature – it will thicken a bit more as it cools (though mine is still on the runnier side of all things caramel – the longer it sits in the fridge, the thicker it gets).
Store in a glass jar and refrigerate until ready to use. Caramel can be stored in a sealed container in the refrigerator for up to 3 weeks. I usually make it ahead and let it hang in the fridge for a few days, which lessens prep work day-of anyway.

For the galette dough:

1.5 c almond flour (not meal; you want the finer flour variety)
1/2 c tapioca flour
1/4 tsp fine sea salt
6 tbsp salted butter, chopped (or ghee)
1 egg
1 tbsp vanilla extract

In a food processor or high-power blender (I used a food processor), pulse almond flour, tapioca starch, salt, and butter to combine until it looks like coarse meal. Add in egg and vanilla extract and pulse just until combined. Turn out onto a piece of plastic wrap, shape into a disk and chill in the fridge for at least an hour, or up to overnight.

For the filling:
3-4 baking apples (I used granny smith), sliced
2 tbsp chai caramel, from above
juice of 1 lemon
1 tsp ground cinnamon
1 tbsp vanilla extract
2 tsp tapioca starch
2 tsp coconut sugar

For assembly:
1 egg, beaten
1 tbsp butter
1 tbsp coconut sugar
extra caramel, for serving & drizzling!

Once the dough has chilled, preheat the oven to 375. In a large bowl, toss apples with 2 tbsp chai caramel, lemon juice, cinnamon, vanilla, tapioca starch and coconut sugar. Set aside.

Roll out the dough between two pieces of parchment paper, keeping the circle to about 1/4″ thickness. Peel off the top piece of parchment, and slide the rolled out dough on its parchment onto a baking sheet.

Add sliced apples, in whatever pattern you like! Begin folding up the sides, creasing them together as you go – if the dough is cracking, that’s okay (you can crimp the cracks back together; remember: galettes are forgiving and rustic!); you can use the bottom piece of parchment to help fold up the sides. Brush the edges of the dough with the beaten egg and sprinkle a little coconut sugar around the sides. Dot with butter. Bake for 35-40 minutes until edges are golden brown — mine came out just fine at 37 minutes, so check accordingly. Let cool for a few minutes on the baking sheet, then carefully slide the whole galette onto a cooling rack to let it cool completely (it’s fine to leave it on the parchment paper on the cooling rack, I don’t find that it makes it soggy). Serve with extra caramel drizzle & your fave ice cream or whatever of choice! Keeps well covered in foil on the counter for a day or in the fridge overnight; mine didn’t last longer than about 2 days so I can vouch for it at least that long!

fullsizeoutput_1298

Vegetables for dessert? Sure, why not.

fullsizeoutput_11a5

Happy 2018! I hope your new year got off to a good start – mine certainly did, absolutely no complaints over here!

fullsizeoutput_11a8

I’ve always been intrigued by the idea of using a squash other than pumpkin in a dessert.

fullsizeoutput_118f

Don’t be deceived by the cute little dumpling squash hanging out in these pictures – what really went in here is kabocha, one of these guys:

IMG_2199

I like the kabocha here – if you’ve never encountered one, they’re a bit of a cross between pumpkin and butternut squash. I really like it for the earthiness it brings here, which plays nicely against the apples. Side note: after some thought, we gave it mixed reviews – it feels a little vegetabley to be dessert – I almost wonder if it would work as a side dish. That being said, if you like not too sweet things / vegetables, go for it!

fullsizeoutput_117f

Besides, this is my absolute favorite crisp topping – it has a little extra protein from greek yogurt and almond flour, and is just so fun to eat. It stays crispy even after hanging out in the fridge overnight, which makes this excellent breakfast (see exhibit A).

fullsizeoutput_11ac

I also love it for dessert with ice cream (obviously) – the crisp ends up covered in melty ice cream, making it into slightly indulgent granola/muesli.

fullsizeoutput_11ad

fullsizeoutput_118e

In other news, I’ve been museuming and drawing again, which feels great. I let it lag a little too long I think!

fullsizeoutput_1168

IMG_2201

Of course coffee.

IMG_2198

Here’s hoping you’re enjoying the beginning of the new year! I have good feelings for this one. If you’re in the mood for a lightly sweet, perfectly healthy desserty-breakfast, I’ve got you covered! Happy baking :)

fullsizeoutput_1195

fullsizeoutput_11a9

Kabocha Squash and Apple Walnut Crisp

Gluten free, refined sugar free, and whole grain. Full of healthy fats AND fruits & veggies! Feel free to eat this as breakfast, I certainly did. Side note: we gave it mixed reviews – it feels a little vegetabley to be dessert – I almost wonder if it would work as a side dish. That being said, if you like not too sweet things / vegetables, go for it! Adapted from the Raz-Apple crisp I made around Thanksgiving, here. Yield: 1 2-quart baking dish (it’s about 8 by 8 and deep). Serves: 2 for dessert & then breakfast! Or… you know, a normal amount of people.

For the filling:

2-3 largish Granny Smith apples, cored and sliced into thin wedges*
1 small kabocha squash, peeled & cubed*
1/4 cup maple syrup
1/4 c port**
1 tablespoon lemon juice
2 teaspoons arrowroot starch
½ teaspoon ground cinnamon
¼ teaspoon ground allspice

*I just approximate as I slice; I use however many it takes to fill my 2 quart, 8×8 baking dish; for ease of cutting kabocha squash, I recommend slicing it in half, then in wedges and using a knife to carefully peel it. The peel is totally edible, but I didn’t want its texture in the crisp. You’ll still get an arm workout peeling these babies, believe me!

**the port is optional but amazing; if you don’t use it, use 1/4c water instead

For the crisp:

1 cup old-fashioned oats (use certified gluten-free oats for a gluten-free crisp)
½ cup firmly packed almond flour
½ cup chopped walnuts
1/4 c unsweetened shredded coconut
2 tbsp maple sugar
¼ teaspoon fine sea salt
2 tsp vanilla extract
4 tablespoons unsalted butter, melted
¼ cup plain whole milk Greek yogurt

Preheat the oven to 350.
In a veggie steamer (I use a metal steamer inside a pot), steam the kabocha squash for 10-15 minutes, until just barely fork tender.

Slice apples into a deep baking dish, and add steamed kabocha squash (my dish is 8×8, 2 qt capacity; 9″ square or 9″ deep pie dish would also be fine). In a liquid measuring cup, whisk together the maple and water/port until combined. Add the lemon juice, arrowroot, cinnamon and allspice, and whisk to combine. Pour the mixture over the squash and apples and toss to combine. Bake for 15 minutes.

While the filling is baking, make the crisp. In a mixing bowl, stir together the oats, almond meal, walnuts, shredded coconut, maple sugar and salt. Mix in the vanilla, melted butter and the yogurt. Stir until everything is mixed thoroughly.

Once the filling has baked for 15 minutes, stir to redistribute it evenly in the dish. Plop spoonfuls of the crisp topping evenly over the filling – no need to pack it down. Return the dish to the oven and bake for 25 to 30 more minutes, until the filling is bubbling around the edges and the top is golden.

Let the crisp rest at least 5 to 10 minutes before serving; or do like I did and make it earlier in the day, and have it later. Serve with vanilla ice cream, obviously! Keep leftovers, covered, in the fridge for about three days (yeah right. It would take some kind of major feat to make it last that long; ours was gone in just over 1!) Serve cold alongside breakfast because it’s extra awesome that way.

fullsizeoutput_11a5

Walking in a mint-ery wonderland

IMG_2111

Happy holidays!

fullsizeoutput_10e5

As much as certain elements of this time of year drive me bananas (having to throw elbows in the grocery store to retrieve the last piece of whatever, extra lines everywhere, no parking, where do all these extra people come from?!), I do undeniably love the run-up to the holidays.

Everything looks festive, even traffic light reflections in wet pavement. And of course I love the excuse to have a tiny conifer in my living room.

fullsizeoutput_10d5

Let’s not overlook holiday baking! Heaven forbid.

fullsizeoutput_10ae

Fun fact! This is actually a giant panna cotta tart. It didn’t really occur to me while I was making it – I was just thinking, la la la cream tart la la but then I got curious and did some googling. I had forgotten that cream stabilized with gelatin is technically panna cotta… so, there ya go! Panna cotta tart, if that’s even a thing.

This one is even grain and gluten free! I suppose you could make this with coconut milk to make it dairy free, but I haven’t tried that yet (next time!) – partially because I have a massive weakness for cream.

fullsizeoutput_10e6

Heavy cream reminds me of being a kid and pouring a bit over my cereal – my grandmother used to do this, and after my dad told me that, I always lurked around waiting for leftover cream to appear the fridge. As I recall, my favorite combination was a giant bowl of honey nut cheerios with about 3/4 milk and 1/4 cream.

fullsizeoutput_10e3

Now I’ve leveled up and adult-ed my cream: it gets baked into cream biscuits, set into a panna cotta tart, or poured into my coffee (omg heaven).

fullsizeoutput_10c5

I love this dessert though: it looks like a mini winter wonderland! Walking in a mint-er wonderland? Ha. And it’s delicious. It actually took a minute to grow on me, but then I couldn’t get enough. Minty, chocolatey & slightly tart from the yogurt-cream panna cotta, it’s a perfect holiday dessert when something light is called for. I couldn’t resist the pomegranate, both for flavor and texture, but also for color. They are always so pretty!

fullsizeoutput_10dd

fullsizeoutput_10d9

Happy holidays! Share this with loved ones, since it’s so much better enjoyed in good company :)

fullsizeoutput_10e9

fullsizeoutput_10b2

Mint Cream Tart on a Dark Chocolate Coconut Crust

Grain free, gluten free, refined sugar free! A perfect wintery dessert, especially since it even *looks* festive. You can even make the whole thing the night before, since gelatin-based things like to hang out in the fridge for awhile. Lightly minty, slightly tart from the yogurt, balanced nicely by dark chocolate. Who doesn’t love mint and chocolate?! This is really a giant panna cotta in a crust, if we want to get technical. Mint cream adapted from Martha Stewart, here; the rest is my brainchild. Yield: 1 9″ tart, serves… two ;) Kidding! 2-8, realistically.

For the crust:

1.75 c almond flour
1/3 c unsweetened cacao powder
1/4 c unsweetened shredded coconut
heaping 1/4 tsp sea salt
1/2 tsp baking soda
2 tsp vanilla extract
2 tbsp pure maple syrup
3.5 tbsp coconut oil, melted

Preheat the oven to 350, and lightly grease a 9″, deep pie plate with coconut oil. Alternatively, you could use a tart ring with a removable bottom – I needed to transport mine so opted for just keeping it in a less fussy dish.

In a large bowl, stir together almond flour, cacao powder, coconut, sea salt, and baking soda. Add in vanilla, maple, and melted coconut oil and stir until completely combined. The dough will look crumbly, but you’ll be able to press it together with your fingers.

Press the crust into the plate and up the sides with a spoon or your fingers, creating a smooth edge (or not, your call!). Poke the bottom with a fork a few times, and bake for 17 minutes.

For the filling:

2 cups heavy cream
1/4 cup maple sugar*
6 stems peppermint or spearmint, plus more for garnish
1 tsp vanilla extract
2 tsp peppermint extract
1/2 teaspoon fine sea salt
1/3 c dark chocolate, melted
1 tablespoon unflavored gelatin (one envelope)
1/2 cup cold water
1/2 cup whole milk greek yogurt, plain
pomegranate arils

*I use maple sugar here because it’s lighter in color than coconut or maple syrup, and I wanted to preserve the lightness of the cream filling. But any granulated sweetener would be fine, just keep in mind the filling color may darken.

Make the filling: Bring cream, sugar, mint, and salt to a simmer in a medium saucepan. Remove from heat, and let cool completely, about 30 minutes.

In a double boiler or in the microwave, heat the 1/3c dark chocolate until completely melted. I am lazy and use the microwave method: 30 second intervals, and stir in between until everything is melty. If you’re using a double boiler, stir continuously until the chocolate is melted.

With a pastry brush (or a spoon, totally fine – this is what I used), coat the bottom the crust with an even layer of melted chocolate. Refrigerate (or leave on the counter in your freezing apartment) until chocolate sets, about 10 minutes.

Sprinkle gelatin over water in a small bowl. Let stand until softened. Remove mint from cream mixture, and bring cream mixture to a simmer. Whisk in softened gelatin until it dissolves. Remove from heat, and stir in the yogurt. Pour filling into the prepared crust (if there’s leftover, pour it into a ramekin or two & save for later!) Carefully transfer to the refrigerator. Chill, uncovered, until set, at least 4 hours (or overnight). Garnish with mint stems, pomegranates, and sliced almonds if you’re feeling fancy. Slice and serve!

Chocolate dipped mint leaves are easy too: wash and pat dry nice-looking mint leaves, and dip in melted chocolate. Lay on a parchment lined baking sheet, and freeze until needed.

Keep leftovers covered in the fridge for a day or two.

fullsizeoutput_10df

fullsizeoutput_10dc

Let’s get seasonal!

fullsizeoutput_108e

Tis the season! As always, it feels like it’s sneaking up on me.

fullsizeoutput_108f

But I do love the excuse to get very seasonal with my baking – the colors of winter fruit are so pretty!

fullsizeoutput_1071

Pomegranate arils always look like piles of rubies to me – the light shines through them so beautifully, like it does through stained glass windows.

fullsizeoutput_1073

This cake is the best excuse of cake for breakfast I’ve made recently – lightly sweet, lemony and delicious. It’s gluten free and refined sugar free, too!

fullsizeoutput_1069

Incidentally, it’s also high in protein from the almond flour and the ricotta – added bonus, if that’s your thing. We enjoyed it two ways: it’s perfect for dessert with a bit of vanilla ice cream, and excellent for breakfast alongside eggs & kale (see exhibit a).

fullsizeoutput_1092

fullsizeoutput_106c

This cake also includes beaten egg whites – this is one of my favorite examples of baking alchemy: I love watching the egg whites go from straight liquid to soft, foamy whirls. I never get tired of it!

fullsizeoutput_1067

fullsizeoutput_105e

On that note, I’ll keep it short and sweet today. I do hope you’re enjoying the holiday season with loved ones! Might I suggest feeding them cake? Everyone wins!

fullsizeoutput_1094

fullsizeoutput_1078

Lemon Ricotta Cake with Pomegranate Arils

Lightly sweet, perfectly lemony-almondy – dense but not overwhelming. Gluten free and refined sugar free. Not dairy free, but I’m thinking that either non-dairy butter or coconut oil would work for a sub, and I know they make non-dairy ricotta from almond milk. So! We have options. This version does away with the glutens but obviously contains dairy. Serve wedges with a bit of ice cream for dessert, or alongside breakfast. Yield: 1 8″ or 9″ cake, depending on the pan you use (see recipe). Recipe adapted from Foolproof Living, here.

fullsizeoutput_107b

Let’s make cake!

7 tbsp unsalted butter, at room temperature
1/3 c maple syrup, divided
zest of 4 lemons
1.5 tsp vanilla extract
4 eggs, separated
1.25 c (5 oz) almond flour
1 c (4 1/2 ounces) fine polenta
scant 1/2 tsp sea salt
1 cup whole milk ricotta cheese
1/3 cup slivered almonds, optional for garnish
pomegranate arils – I used one full pomegranate

Preheat the oven to 325, and either use an 8″ springform pan OR do like I did and use a 9″ cake pan, well greased and lined with parchment paper so that you can lift the cake out onto a cooling rack easily (see photo for reference).

fullsizeoutput_1055

Using a hand mixer (or a stand mixer) , beat butter, half the maple, lemon zest, and vanilla in a large bowl. Add in egg yolks and beat until combined, another minute-ish. In a smaller bowl, whisk together almond flour, polenta, and sea salt. Add the dry ingredients into the larger bowl, add ricotta, and stir to combine.

In a separate, non-reactive bowl, beat the egg whites until soft peaks form (preferably with your hand mixer or stand mixer so that your arm doesn’t fall off) – drizzle in the rest of the maple while mixing.

Fold the egg whites into the batter in two batches. Pour the batter into the cake pan, and top with almonds, if using. Bake for 40-45 minutes, until a tester inserted into the middle comes out clean. Let cool for at least 10 minutes, then lift out onto a cooling rack to cool completely, removing parchment from underneath if you used it. Let cool completely before serving; also delicious cold if you want to stick it in the fridge for an hour or two.

Garnish with pomegranate arils before serving! Excellent with a bit of vanilla ice cream (really, what isn’t) for dessert or eat it alongside eggs for breakfast. Keeps well for several days, covered in the fridge or stored in an airtight glass container.

fullsizeoutput_107a

Cake with breakfast? Sure, why not.

IMG_1980

Sometimes, you just need cake.

fullsizeoutput_104a

Might I recommend this one?

fullsizeoutput_104b

fullsizeoutput_1049

It’s seasonal without being overbearing (because sometimes you just need a little gastro-break from festive food), perfect for dessert with ice cream or breakfast with eggs, and structurally sound enough that you can pick up wedges and fly them around like a Star Destroyer with appropriate sound effects (not like I do that or anything, ahem. Moving on)

fullsizeoutput_1042

fullsizeoutput_1039

Anyway, I have cake for you today. Not so many words because sometimes life gets in the way, but pictures and cake that I promise is yummy.

fullsizeoutput_1026

fullsizeoutput_1043

I also have a tiny tree, since tis the season and I like to get in a festive mood (plus, who doesn’t like the excuse of having a tree in your living room?)

fullsizeoutput_1008

fullsizeoutput_fff

Make cake. Eat with loved ones! There is nothing better than cake with those who make you smile.

fullsizeoutput_104c

Pumpkin Hazelnut Cake with Dark Chocolate

Gluten free, dairy free, and refined sugar free. Not too sweet, so works for dessert with ice cream or breakfast alongside eggs. Nutty, chocolatey, and seasonal, without being overbearing. Recipe adapted from Food and Wine, here. Yield: 1 8″ cake, serves 2-6.

fullsizeoutput_1035

1/4 c brown rice flour
heaping 1/4 c oat flour
2 tbsp cornmeal
1/2 teaspoon ground cinnamon
1/2 teaspoon ground cardamom
1/4 teaspoon ground nutmeg
1/4 teaspoon sea salt
1 c hazelnut meal*
1/3 c hazelnuts
3 large eggs
1/4 c maple syrup
1 tbsp maple (or coconut) sugar for sprinkling
1/2 cup melted coconut oil
1/2 cup pumpkin puree
1 teaspoon vanilla
1/3 c extra dark chocolate, chopped

*If you can’t find hazelnut meal, almond meal is an easy substitute. Or, if you have a food processor, you can grind fresh hazelnuts and make your own – use slightly more than 1 c of toasted hazelnuts for 1 c meal, but be careful you don’t let it process too long or you’ll end up with hazelnut butter! Delicious, but not practical in this case…

Preheat the oven to 325° and line the bottom of an 8″ cake pan with parchment paper (you could probably also use a 9″ round pan but keep in mind your cake will be thinner). In a medium bowl, whisk together the flour, cinnamon, cardamom, nutmeg, and salt and set aside.

In a small frying pan over medium heat, toast the hazelnuts until fragrant, about 3 minutes. Roughly chop hazelnuts and chocolate into small pieces. Add both to the bowl of dry ingredients.

In a large bowl, whisk together the eggs, maple, coconut oil, pumpkin puree, and vanilla until very smooth. Stir the dry ingredients until incorporated. Scrape the batter into the parchment lined pan, smooth out the surface of the cake batter with the spatula (or not!) and sprinkle the tablespoon of maple (or coconut) sugar over the top.

Bake for 45 minutes until a tester inserted in the center comes out clean. The top of the cake should be crispy and cracked from the scattered sugar coating. Let the cake cool for 15 minutes before removing it from the pan. Gently peel off the parchment paper from the bottom and let stand.

The cake can be made in advance up to 24 hours, thought it’s probably best served the day it was made. Store covered in the fridge for up to 3 days; but good luck keeping it around that long! I like it cold, but feel free to bring it to room temp before eating leftovers.

fullsizeoutput_1025

fullsizeoutput_1044

Pears and cranberries: the perfect pair

IMG_1884

So normally, I would tell you that this makes great dessert but you should save some and eat it for breakfast, blah blah…

fullsizeoutput_e20

But really, this time, I’m going to throw that out the window and tell you to just straight up make this for breakfast. You really won’t be sorry – it’s mostly fruit anyway! Hiding under a whole grain, gluten free cream biscuit – what more do you want for breakfast?! I concede that we added eggs, kale, cholula & coffee, and it was a stellar combination, but you do you of course.

This is one of those homely-but-delicious desserts that doesn’t win any awards in the looks department but is undeniably amazing and should be made and loved immediately!

fullsizeoutput_e3c

I really love this for an autumn-winter breakfast-dessert: the cranberries and pears are a perfect pairing; the cornmeal cream biscuits are hands-down one of my favorite things on this planet (I am not alone in this, either); and the whole thing is just so seasonal!

fullsizeoutput_e24

I leave the skins on the pears, both because I enjoy when my fruit desserts have more texture & body, but also because fiber is good for you! The cranberries soften but still retain their shape and eating them is quite fun, since they pop when you bite them!

fullsizeoutput_e27

fullsizeoutput_e3a

Let’s see. Besides eating this for a stellar breakfast, other things of note lately…

Beautiful skies!

fullsizeoutput_e2d

The worst opera we’ve both ever seen, but in the best company with some awesome seats so it was worth it… as an excellent learning experience and unforgettable evening ;)

fullsizeoutput_e30

fullsizeoutput_e31

Can anyone else believe December starts tomorrow?! I can’t. Where did the fall months go?? Not that I’m particularly sorry, I do love festive holiday time and all the baking that goes along with it.

fullsizeoutput_e28

I highly recommend you throw the rule book out the window and make this for breakfast. I am behind you 100% on the wisdom of this action. Happy eating!

fullsizeoutput_e2b

fullsizeoutput_e29

Pear and Cranberry Cobbler with Cornmeal Cream Biscuits and Ginger

Gluten free, whole grain and refined sugar free! The fruit makes an amazing complement to the cornmeal cream biscuits, which are personally one of my absolute favorite things. Easy to make, the most time consuming bit of this is chopping up the pears. But you don’t even have to peel them, so that bit is even easier! Very lightly sweetened, this is perfect for those who love seasonal, fruity desserts. Adapted from both of my earlier cream biscuit cobblers, here & here.

For the filling:

4-7 Bartlett & Anjou pears (about 2 pounds), peeled, cored and sliced into small bite-sized pieces*
1 cup fresh cranberries
1/4 c maple
2 tbsp port
2 tablespoons arrowroot starch
juice of 1 lemon
1 tsp vanilla
½ teaspoon ground ginger
¼ teaspoon cinnamon

*I used about 6; shrinkage will happen to a point so don’t be afraid to use a little more than you would think

For the cobbler:

3/4 cup fine cornmeal
1/2 cup oat flour
1/3 cup brown rice flour, slightly heaping
1 tablespoons maple (or coconut) sugar
1 1/2 teaspoons baking powder
3/4 teaspoon kosher salt
1 tsp vanilla
1 1/2 cups heavy cream

Crystalized ginger, chopped; for topping – optional but delicious

Preheat the oven to 375°F. Grease a deep 9-inch square baking dish or deep 9-inch pie pan with butter (I prefer the deepness of the 9″ square – mine is a 2qt baker & it holds tons of fruit!). Cut up pears into large chunks and toss them into the buttered baking dish. Add cranberries and toss to combine. Whisk the maple, port, arrowroot, lemon juice, ginger, and cinnamon together, pour over the fruit, and toss to coat.

Combine cornmeal, oat flour, rice flour, sugar, baking powder, and salt in a medium bowl and whisk to combine. Pour in the cream and vanilla, stirring until just combined; the dough will be very wet. Scoop the dough into 8-ish blobs onto the fruit filling. Sprinkle with maple or coconut sugar if desired. Bake until the fruit bubbles and the juices thicken, and the topping is browned and cooked through, 45-55 minutes. Typically I test the biscuit done-ness by sticking a knife between two of them to see if the bottom is done – you’ll know if it isn’t, it will look raw. Stick it back in for about 10 minutes if you find that – mine is typically perfectly done at 55 minutes.

Serve with vanilla ice cream or more cream and chopped crystalized ginger; leftovers keep well, covered, in the fridge for a few days.

fullsizeoutput_e21

Breakfast disguised as dessert

IMG_1823

Ahh, the post-thanksgiving stupor….

IMG_1804

Just kidding! No such thing. First thing Friday morning was jazzercise, of course; I hate sitting still for too long. Thanksgiving itself was full of family and laughter & lots of croquet (ha!) – and of course, food. I was asked to bring the cornmeal apple & ginger cake that I made a few weeks ago; I made it with fresh ginger this time instead of crystallized, and I’m happy to report it’s amazing both ways.

IMG_1811

But for the days after Thanksgiving, a fruit-heavy, non-pie dessert was definitely required.

Perfect mornings look like this:

IMG_1807

Plus, I discovred a glut of late-season raspberries at the market a while back and pounced on them, knowing I’d want to pair them with apples strictly so I could go around saying RAZAPPLE! Ha.

IMG_1817

This crisp bakes up so well, you find yourselves eating bits of the crisp topping with your fingers.. not that we did that or anything…

It makes a stellar addition to breakfast alongside – what else? eggs and kale! – and I could argue that it’s even better the next day. We both liked that the apples retain their integrity – they don’t become a pile of mush, but they’re not crispy either – they’re somewhere in between & are absolutely delicious. This is one of my favorite things that I’ve made lately – simple, delicious, and seasonal. Happy baking!

IMG_1820

Raz-Apple Walnut Crisp

Gluten free & refined sugar free, with an easy dairy free/vegan option. Full of healthy fats and whole grains. Perfect for fall when there’s a glut of late summer berries at the market but apples are starting to be in season… for that matter, frozen raspberries work just fine too. Lightly sweet, tart and perfect for dessert and breakfast. Adapted from Cookie and Kate, here! Yield: 1 8×8 deep pan, serves 2 w/ leftovers for 1, haha…. kidding, only not really! Serves more like 6 normal humans.

  • For dairy free/vegan, sub coconut oil for the butter & non-dairy (coconut would be good!) yogurt for the dairy yogurt; bake as directed

For the filling:

5 largish (or 7 small) Granny Smith apples, cored and sliced into thin wedges*
2 c raspberries (frozen is fine)
scant â…“ cup maple syrup
1/8 c port**
1 tablespoon lemon juice
2 teaspoons arrowroot starch
½ teaspoon ground cinnamon
¼ teaspoon ground allspice

*I just approximate as I slice; I use however many it takes to fill my 2 quart, 8×8 baking dish

**the port is optional but amazing; if you don’t use it, use 1/8c water instead

For the crisp:

1 cup old-fashioned oats (use certified gluten-free oats for a gluten-free crisp)
½ cup firmly packed almond flour
½ cup chopped walnuts
1/4 c unsweetened shredded coconut
1/4 c maple sugar
¼ teaspoon fine sea salt
2 tsp vanilla extract
4 tablespoons unsalted butter, melted
¼ cup plain whole milk Greek yogurt

Preheat the oven to 350.
Slice apples into a deep baking dish, and add raspberries (my dish is 8×8, 2 qt capacity; 9″ square or 9″ deep pie dish would also be fine). In a liquid measuring cup, whisk together the maple and water/port until combined. Add the lemon juice, arrowroot, cinnamon and allspice, and whisk to combine. Pour the mixture over the apples and toss to combine. Bake for 20 minutes.

While the filling is baking, make the crisp. In a mixing bowl, stir together the oats, almond meal, walnuts, shredded coconut, maple sugar and salt. Mix in the vanilla, melted butter and the yogurt. Stir until everything is mixed thoroughly.

Once the filling has baked for 20 minutes, stir it to redistribute evenly in the dish. Plop spoonfuls of the crisp topping evenly over the filling – no need to pack it down. Return the dish to the oven and bake for 25 to 30 more minutes, until the filling is bubbling around the edges and the top is golden.

Let the crisp rest at least 5 to 10 minutes before serving; or do like I did and make it earlier in the day, and have it later. Serve with vanilla ice cream, obviously! Keep leftovers, covered, in the fridge for about five days (yeah right. It would take some kind of major feat to make it last that long; ours was gone in 2 days!) Serve cold alongside breakfast because it’s extra awesome that way.

IMG_1819

Cranberries – not just for sauce!

IMG_1788

Happy almost-Thanksgiving! Hard to believe it’s in less than a week. In keeping with the spirit of all things autumnal and holiday-ish, I bring you a cranberry curd tart! Perfect for dessert but also excellent for breakfast alongside eggs & kale.

IMG_1782

Besides, this color is amazing! Nature is really spectacular when you let her do her thing – no artificial coloring here, obviously!

IMG_1773

This tart is for those who love love love tart things! I really loved the crust – cornmeal and ginger are a match made in heaven.

IMG_1780

In other news, the leaves are gorgeous around here just now, and I move my plants around my apartment to follow the sun. They seem happy about it…

IMG_1739

IMG_1745

I don’t think I have too much more for you today; it’s a mellow Sunday and I’m contentedly chill today.

IMG_1749

Enjoy your holiday week!

IMG_1772

Cranberry Curd Tart on a Cornmeal Ginger Crust

Tart, PINK and perfect for fall / holiday dessert. Gluten free, dairy free and refined sugar free – this is for those who like tart things! The cranberry curd ended up kind of like mousse – see note; if you’d like it sliceable like a proper tart, use a few extra eggs in the curd. The cornmeal ginger crust provides a naturally not-too-sweet complement to the tartness of the curd & puree. Yield: 1 9″ tart, serves 2 ;) kidding – serves 2-6! A Wait are Those Cookies original.

For the crust:

1.5 c almond flour
1/4 c unsweetened shredded coconut
1/2 c cornmeal
heaping 1/4 tsp sea salt
1 tsp ground ginger
1/2 tsp baking soda
2 tsp vanilla extract
2 tbsp pure maple syrup
5 tbsp coconut oil, melted

In a large bowl, stir together almond flour, shredded coconut, cornmeal, sea salt, ginger, and baking soda. Add in vanilla, maple, and melted coconut oil, and stir until completely combined. The dough will look crumbly, but you’ll be able to press it together with your fingers.
Preheat the oven to 350, and lightly grease a pie plate with coconut oil. Press the crust into the plate and up the sides with a spoon or your fingers, creating a smooth edge (or not, your call!). Poke the bottom with a fork a few times, and bake for 15 minutes. Remove and let cool for a few minutes, but leave the oven on.

For the cranberry curd*:

3 cups (12oz) cranberries, rinsed and picked over
1/2 c water
1/4 c maple
juice of 1 lemon
2 whole eggs
2 egg yolks
Pinch of salt
scant 1 tbsp vanilla
3.5 tbsp coconut oil

*mine was on the runnier side, making my tart more like mousse than a set curd tart. Suggest adding another couple of eggs – unless you’re okay with the mousse texture (it was totally fine taste-wise, just didn’t really hold its shape when sliced)

To make the cranberry curd, place the cranberries and water in a saucepan. Cook, covered, over medium-low heat, until you hear the the berries start to pop. Cook, stirring occasionally, until all the berries have burst. Cool slightly, then puree with an immersion or regular blender. Strain the mixture into a bowl or large liquid measuring cup, pushing on the solids to extract as much cranberry puree as possible. Yield is about 1.5 c of puree.

Beat the eggs, egg yolks, maple, and lemon juice together in the top of a double boiler. Whisking constantly, slowly pour in the warm cranberry puree. Add salt and vanilla. Whisk in coconut oil 1 tbsp at a time until melted. Cook over low heat, whisking constantly, until the mixture has thickened and coats the back of a spoon (about 15 minutes). Remove from the heat and let cool. The curd will thicken a little more as it cools – store in an airtight container in the fridge for a week, or freeze for later.

For the cranberry swirl:

Basically, you’re replicating the earlier part of the cranberry curd, prior to actually making curd with it. If you’re smart (unlike me, who decided to do this later), do it all at once, and reserve some of the cranberry puree.

1.5 c cranberries, rinsed & picked over
1/4 c water
2 tsp maple sugar
1 tsp vanilla

Combine cranberries and water and cook as directed above, for the curd, until the cranberries pop. Strain as before, pressing to extract the liquid. Stir in maple sugar and vanilla.

For assembly:

Bake the crust, as directed above (350 for 15, in case you don’t want to scroll back up). Remove and let cool for a few minutes, then pour in curd. Dollop the cranberry swirl in large dollops over the curd, then use a knife or toothpick to swirl everything together. Bake for 15-20 minutes to set the curd, then remove and let cool completely before serving. I prefer to refrigerate mine for at least half a day before serving to further set the curd. Serve with ice cream (obvs!) and extra cranberry puree. Store any leftovers in the fridge, covered.

IMG_1775

I only have (pies!) for you

IMG_1737

Could someone explain to me what happened to October? I blinked, and then… here we are. ALSO it’s already less than two weeks till Thanksgiving?! Um…. wat.

IMG_1738

But regardless… I have PIE!

IMG_1710

And it’s PURPLE pie!

IMG_1708

Because really, how could something like this not make you happy? That color just makes me smile every time. As does the fact that it’s grain & gluten free, dairy free, refined sugar free, vegan & paleo so errrybody can enjoy – because also, despite all the ‘free’ in its name, it is also delicious (NOT taste free. ha!)

IMG_1734

Maybe consider it if you’ve got friends or fam with some dietary stuff and they’re coming for Thanksgiving? I’m 100% sure they’d love you for it.

It’s been raining! I love love love the sound of rain – it so soothing, no matter what kind of day I’m having. Baking when it’s raining is one of my favorite things – I love that even though my apartment’s galley kitchen doesn’t have windows, I have a big window on the wall facing the entrance to the kitchen, which lets in light and rain sound. It’s perfect! Besides, my little one-butt kitchen is exactly the right size for my baking shenanigans.

IMG_1735

In other news, pretty coffee and some opera (shocking, I know…NOT).

IMG_1695

IMG_1696

IMG_1733

I’ve made this pie twice in three days – it’s that good! Full disclosure: the first time I made it, I took the first bite straight out of the pie dish: fork, meet pie. I NEVER do that, since I’m all about the presentation, but you know what? Sometimes it just has to happen.

IMG_1714

IMG_1729

Happy Saturday! I’m loving the beautiful fall weather over here – the leaves are gorgeous, the air is crisp, and I had purple pie, eggs & kale for breakfast with the best company: life is wonderful! Happy baking!

IMG_1709

Purple Sweet Potato Pie on an Almond Coconut Crust

Gluten & grain free, refined sugar free, dairy free, vegan, paleo. Crust is a Wait are Those Cookies original, filling is adapted from The Endless Meal, here! Yield: one 9″ pie, serves 2 or several! ha.

For the crust:

  • 1.75 c almond flour
  • 1 c unsweetened shredded coconut
  • heaping 1/4 tsp sea salt
  • 1/2 tsp baking soda
  • 1 tbsp vanilla extract
  • 1/4 tsp almond extract
  • 2 tbsp pure maple syrup
  • 4 tbsp coconut oil, melted

Preheat the oven to 350, and lightly grease a pie plate with coconut oil.

In a large bowl, stir together almond flour, shredded coconut, sea salt, and baking soda. Add in vanilla, almond extract, maple, and melted coconut oil, and stir until completely combined. The dough will look crumbly, but you’ll be able to press it together with your fingers. Press the crust into the plate and up the sides with a spoon or your fingers, creating a smooth edge (or not, your call!). Poke the bottom with a fork a few times, and bake for 15 minutes. Remove and let cool for a few minutes, but keep the oven on if you’re making the whole thing at once.

For the filling:

  • 2 large purple sweet potatoes, peeled & sliced into 1″ pieces (about 3 cups worth)
  • 3/4 c full fat coconut milk
  • heaping 1/4 c maple syrup
  • 1.5 tbsp tapioca starch*
  • juice of 1/2 a lemon (~1tbsp)
  • 1 tablespoon vanilla extract
  • 1/4 tsp almond extract
  • 2 teaspoons ground cinnamon
  • 1 teaspoon ground ginger
  • heaping 1/4 teaspoon ground nutmeg
  • 3/4 teaspoon fine salt

*full disclosure: I made this twice in three days & totally forgot the tapioca starch the second time. It’s actually not essential – the filling set up fine without it.

While the crust is baking, make the filling!

In a medium saucepan, boil the sweet potato slices until fork tender. Drain and let cool for a few minutes. Add them to a food processor (or high powered blender) and pulse a few times to puree. Add in coconut milk, maple, tapioca, lemon juice, vanilla, and almond extract, and pulse to combine. Add cinnamon, ginger, nutmeg, and sea salt, and pulse until combined. The filling should be thick! Pour/spoon/spatula it into the prepared crust, smooth the top (or not, you do you!), and bake at 350 for about 45 minutes – the crust should be golden brown and the pie should be set, but with just the slightest bit of jiggle in the middle. Remove and let cool completely before serving (preferably with ice cream or whipped cream of choice, either dairy or non dairy). I prefer to make this earlier in the day and refrigerate until serving, to give the filling ample time to set up.

Top with crystalized ginger & extra coconut if desired!

Keep leftovers covered in the fridge – it will last for a few days, provided all of it doesn’t get eaten first!

IMG_1703

IMG_1711