Pictures today, since I’m feeling more visual and less like the chatterbox I usually am.
This. No words needed.
Architecturally glorious, but…
Mother Nature always wins!
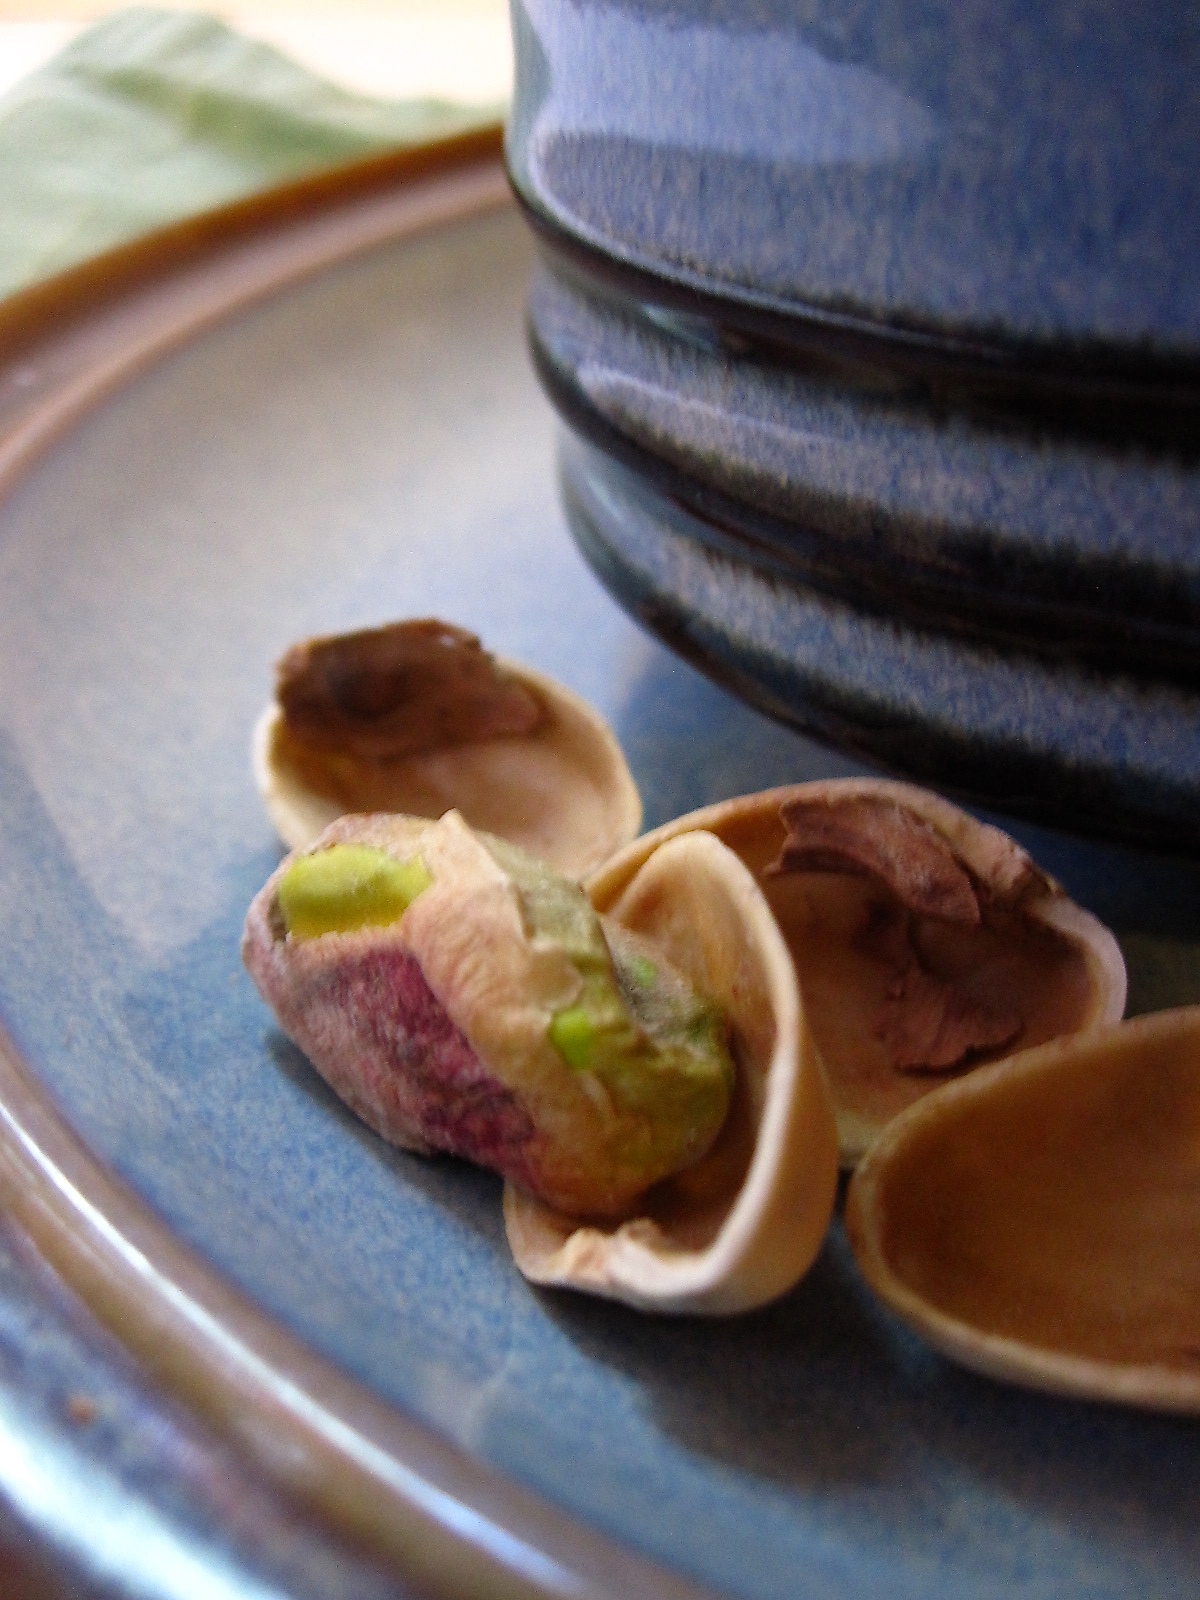
Look! A barley-rice yin-yang!
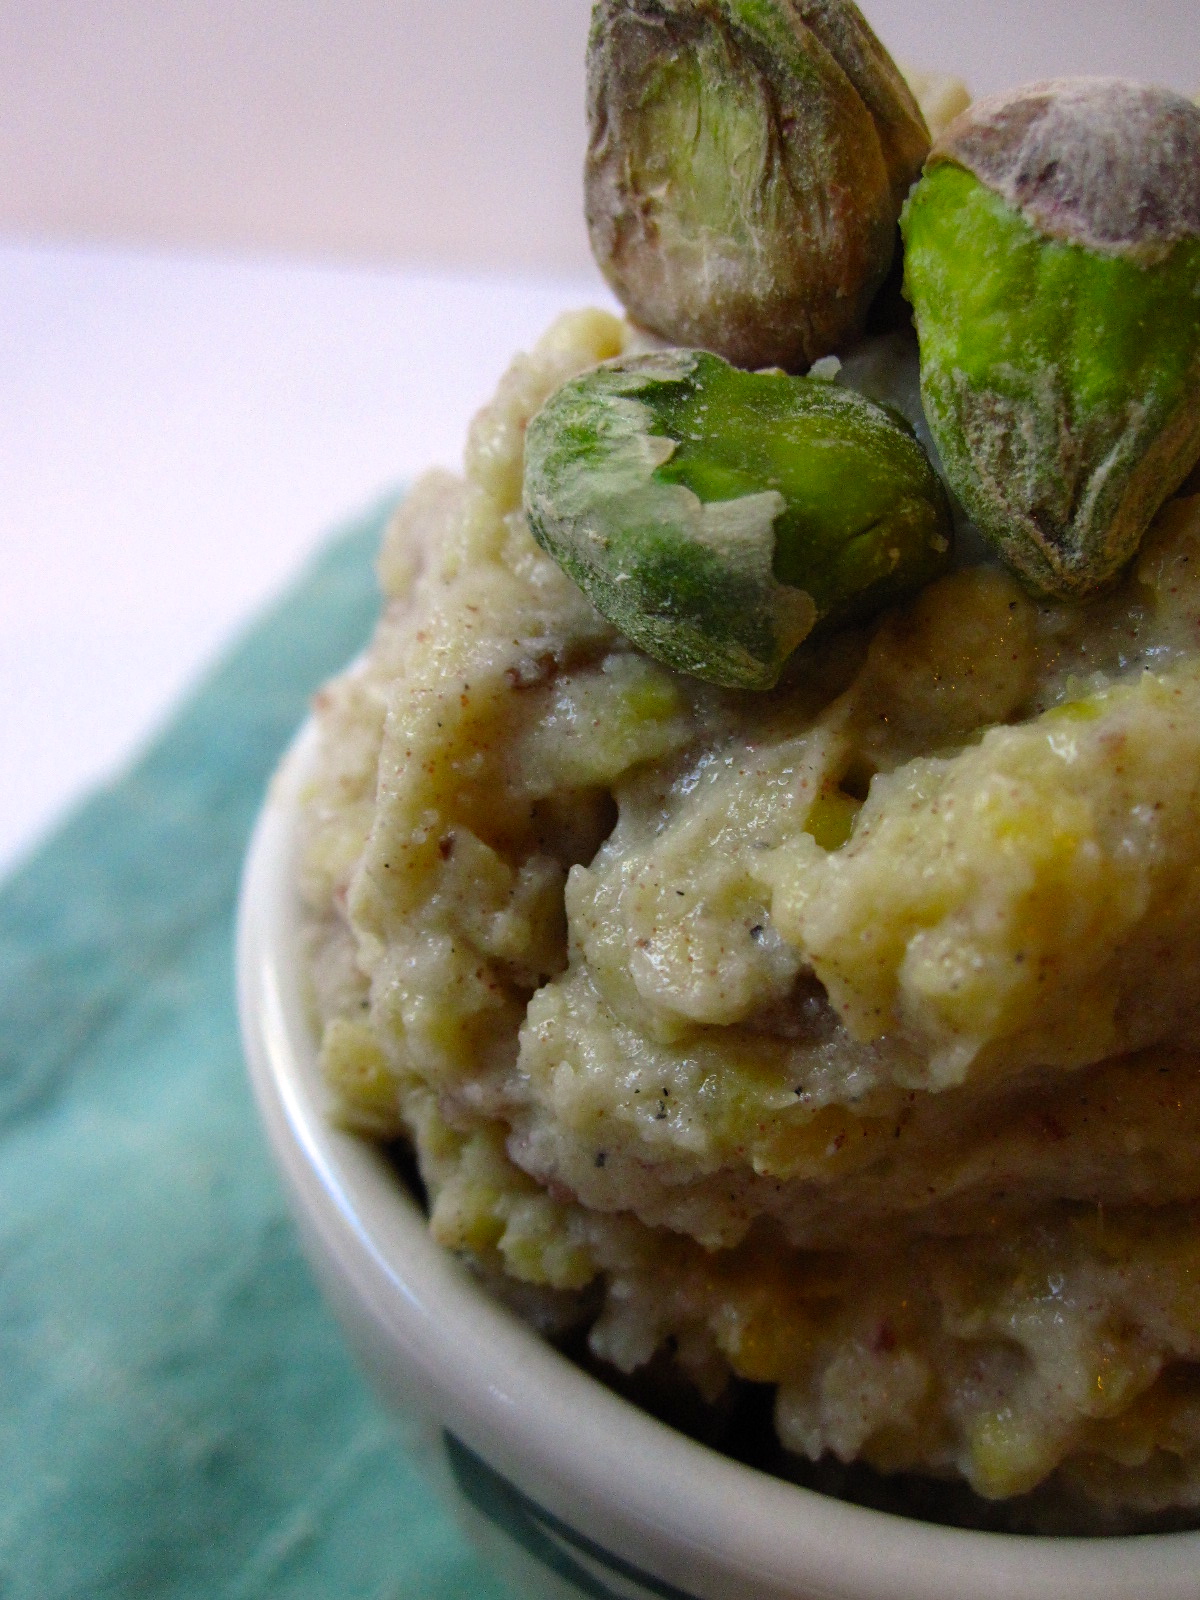
And now the real subject of this post… pudding!!
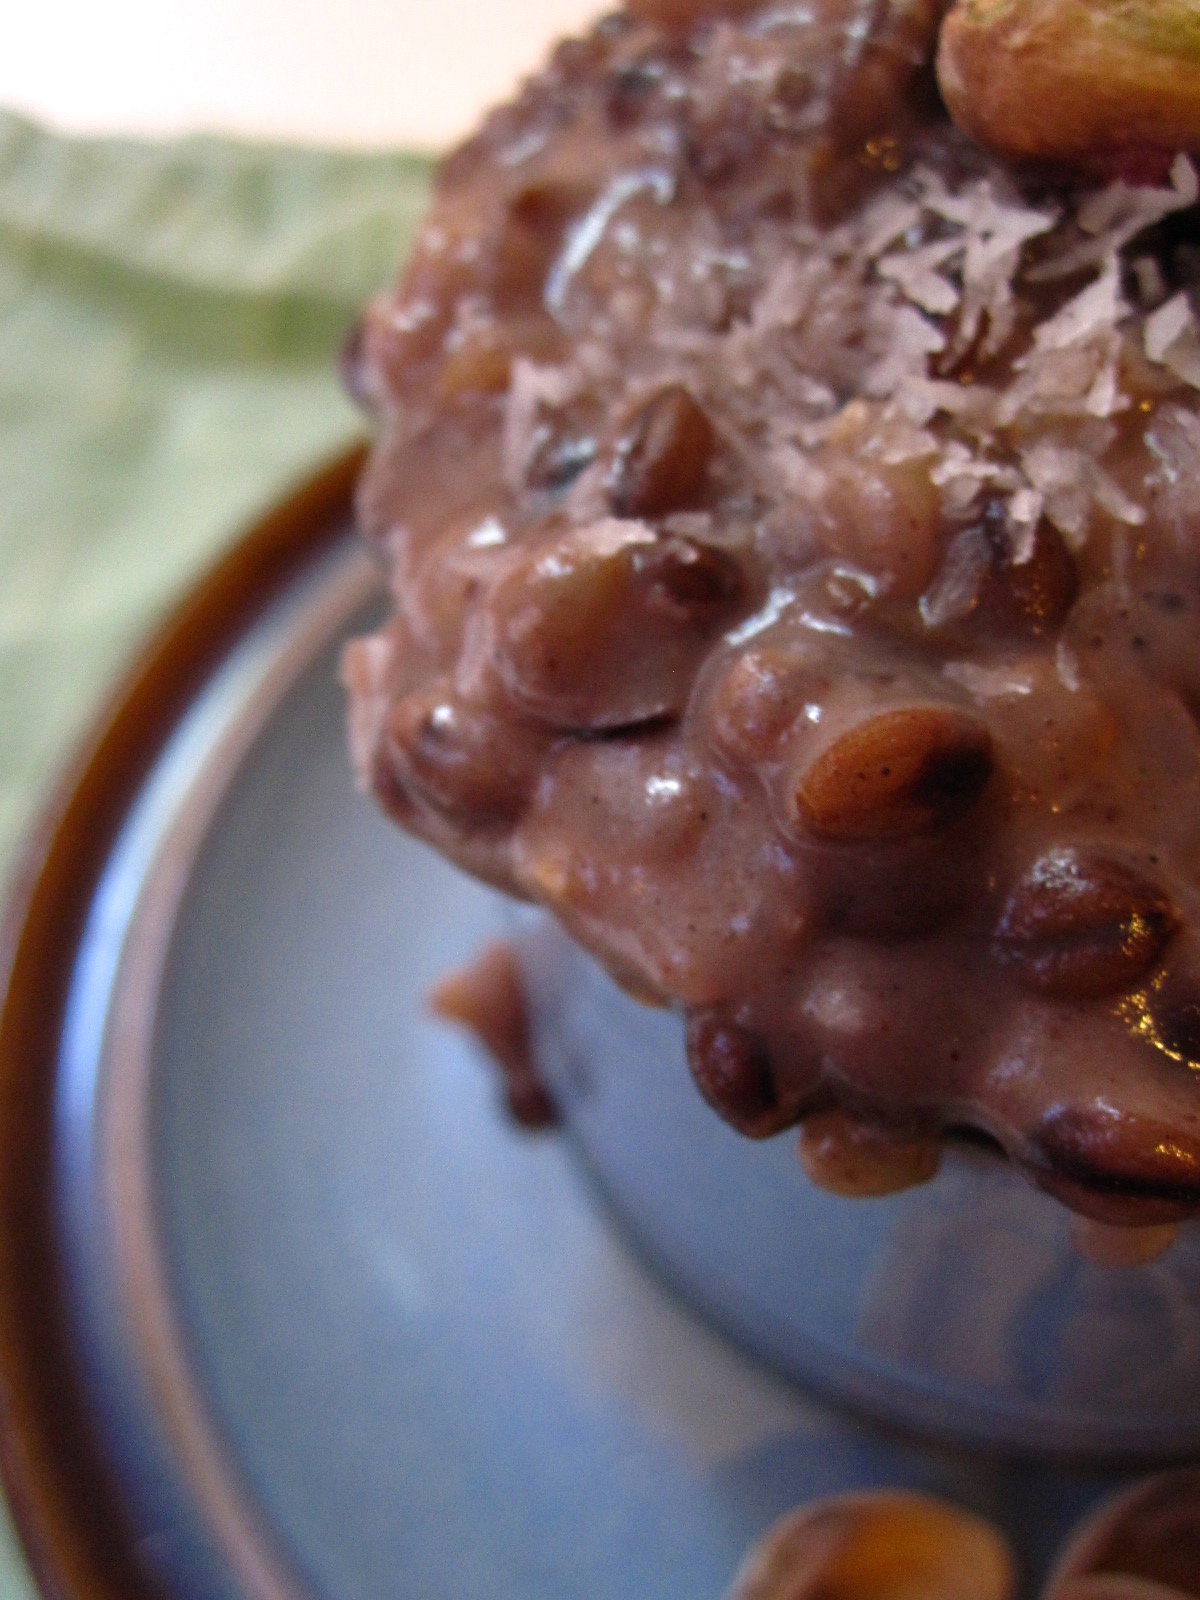
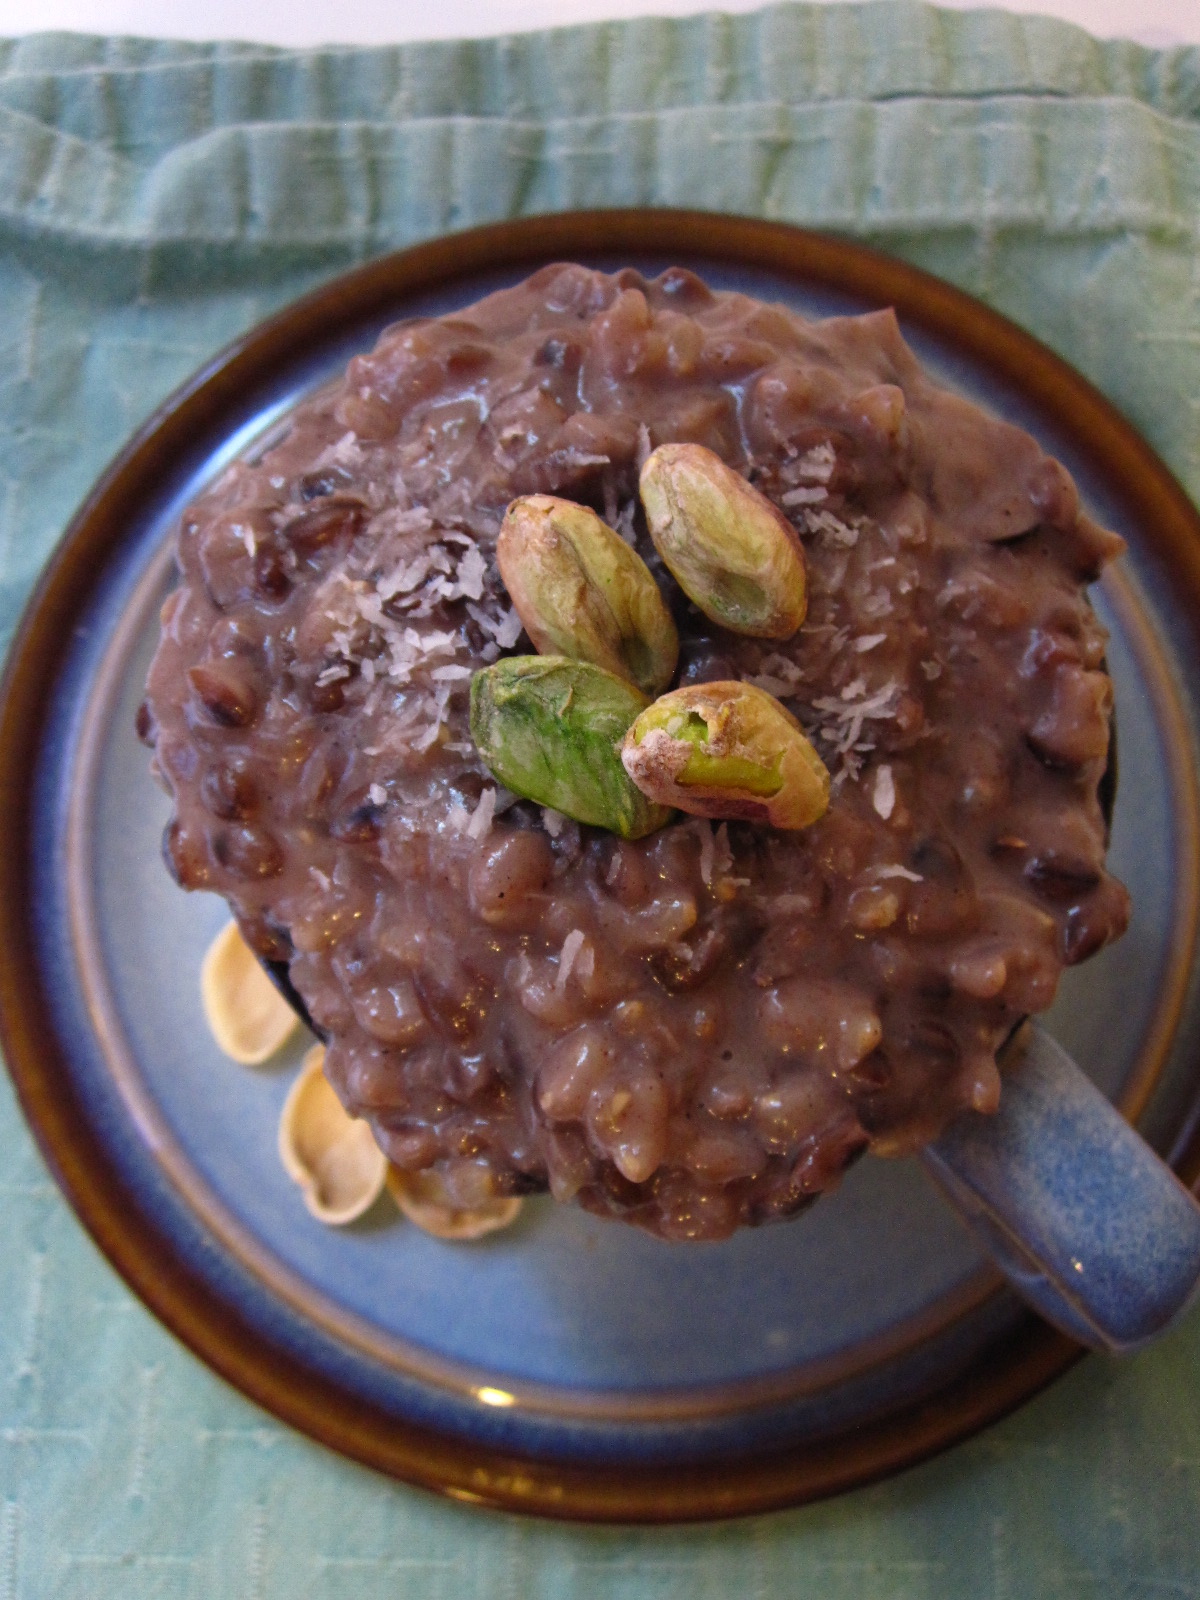
Mmm, pudding. There has been so much pudding in my life lately, this is a trend I’ll be continuing. This one is barley and brown rice (would have been all barley but I was a little short—a fortuitous happening since barley and brown rice go well together!), made with rice milk and coconut milk. I like it for breakfast with more milk added, or dessert with a chopped date or some raw honey (or maple). Kind of whatever floats your boat, any way you eat it, it’s delicious! Comforting in the tummy, warming, and soothing.
Coconut Barley-Brown Rice Pudding
Recipe lightly adapted from The Gouda Life, here! Makes a fairly good-sized vat… I got maybe 5 servings out of it? They were varying sizes though, some were bigger than others.
3/4 c purple barley, rinsed
1/2 c brown rice (mine was kashikiri)
1 c original rice milk
1/2 c water
2 c light coconut milk
2 tsp cinnamon, plus more to taste
2 tsp cardamom, plus more to taste
3 dates, pitted and chopped
2 tsp vanilla extract
shredded unsweetened coconut, for garnish
pistachios, for garnish
In a pot, combine barley, brown rice, rice milk, water, cinnamon, and cardamom. Bring to a boil, then turn down and let simmer until most of the liquid is absorbed. Stir in chopped dates. Once the liquid is mostly gone, add coconut milk 1/4 c at a time, stirring frequently (I found it helpful to stand there with a book and stir…it’s kind of like risotto), adding the next batch after the previous has been mostly absorbed. When all of the coconut milk is added, the barley should be mostly cooked (it should be a little chewy when done). Mine needed a little more time, so I added a bit more rice milk and let it cook longer. I tasted it as I went and added more cinnamon/cardamom or vanilla to taste. Let cool a bit, and top with shredded coconut and pistachios to serve. I liked mine with chopped date or raw honey, but maple is good too!
Not even joking. You know those little seed thingies they put in birdseed mix? Yeah. These things:
That I just ate for breakfast! And youuu thought I couldn’t get any weirder. HA!
These little birdseeds remind me of being in my grandma’s backyard and blowing bubbles… and feeding the birds! And quite often the squirrels… Anyway. I associate millet with sun-drenched afternoons with my gram, eating ice cream and getting soapy bubble stuff all over the dish towel in my lap. And then probably running through the sprinklers! So obviously I’m naturally inclined to like this seed, besides it being totally delicious.
But anyway. Millet is an excellent grain substitute: creamy and kind of nutty tasting, high in manganese, magnesium, and phosphorus. So far I’ve only used it as a breakfast/pudding/dessert thingy, but savory biz is coming soon, just wait. I can’t believe I haven’t eaten this before—it’s like rice pudding but a thousand times better! AND it’s good for you, soooo… why not eat it for every meal?! This one has heart healthy fats from coconut milk, natural sweetness from dates (as well as a boatload of other good bennies like vitamins and minerals), and cardamom has the added benefits of (in Ayurveda theory) of being warming, improving blood circulation to the lungs, and balancing the doshas.
Coconut Millet Pudding
Recipe slightly adapted from Delicious Living, here. As listed below, this one is vegan, gluten free, dairy free, and refined sugar free. Hooray! And… it’s delicious. Obvs. Otherwise I wouldn’t share it with you!
Rustle around and collect the following:
1/2 uncooked millet, rinsed
1 (14oz) can of light coconut milk
3/4 c milk bev (I used Eden Soymilk, which is just soybeans+water)
2 tbsp water
1/4 c medjool dates, chopped
3/4 tsp ground cardamom
dash of sea salt
1 tsp vanilla extract
optional: pistachios for topping
Combine millet, coconut milk, soymilk, water, chopped dates, cardamom, and sea salt in a saucepan. Bring to a boil (Being careful not to let it boil over, oops no of course I don’t speak from experience…), covered, then turn it down to a simmer and let it cook, covered, until millet is fluffy and most of the liquid is absorbed, about 20-30 minutes (mine was more like 20), stirring frequently. Once millet is cooked, remove from heat and stir in vanilla. Top with pistachios for a garnish if desired! Excellent warm or cool.
Okay so actually it’s been about a million years since I made these, but they were too good not to share! So better late than never, riiiiight?
You see, I’ve been mega busy doing awesome things like finding this:
And being up at dawn to witness this (Happy Earth Day today, by the way! Go out and give a tree some love):
Oh. And I spend an inordinate amount of time here. Whole wheat croissant+jasmine green tea = heaven.
And doing other things like attempting to eat as much as I possibly can, whilst being off sugar (yep, that happened. Including dates! Amazing, I know. I’ve added dates back in now, but expect to see natural, non-refined sweeteners on here from now on in baked treats). Trust me though, I feel quite a bit better for having cut processed sugar out nearly completely (special occasions not withstanding! Birthdays. Duhhh).
Busy busy busy.
But don’t worry, still eating ridiculous hippie-type things like eggy pumpkin messes and a mega huge ton of veggies. As per usual, nothing has particularly changed! Except maybe the consumption of avocado and liquid aminos and nutritional yeast has gone up… not that I even remotely thought that first one was even possible! Ha. Power to the AVO!! I’m sure another savory recipe is coming your way soon, watch this space for further developments!
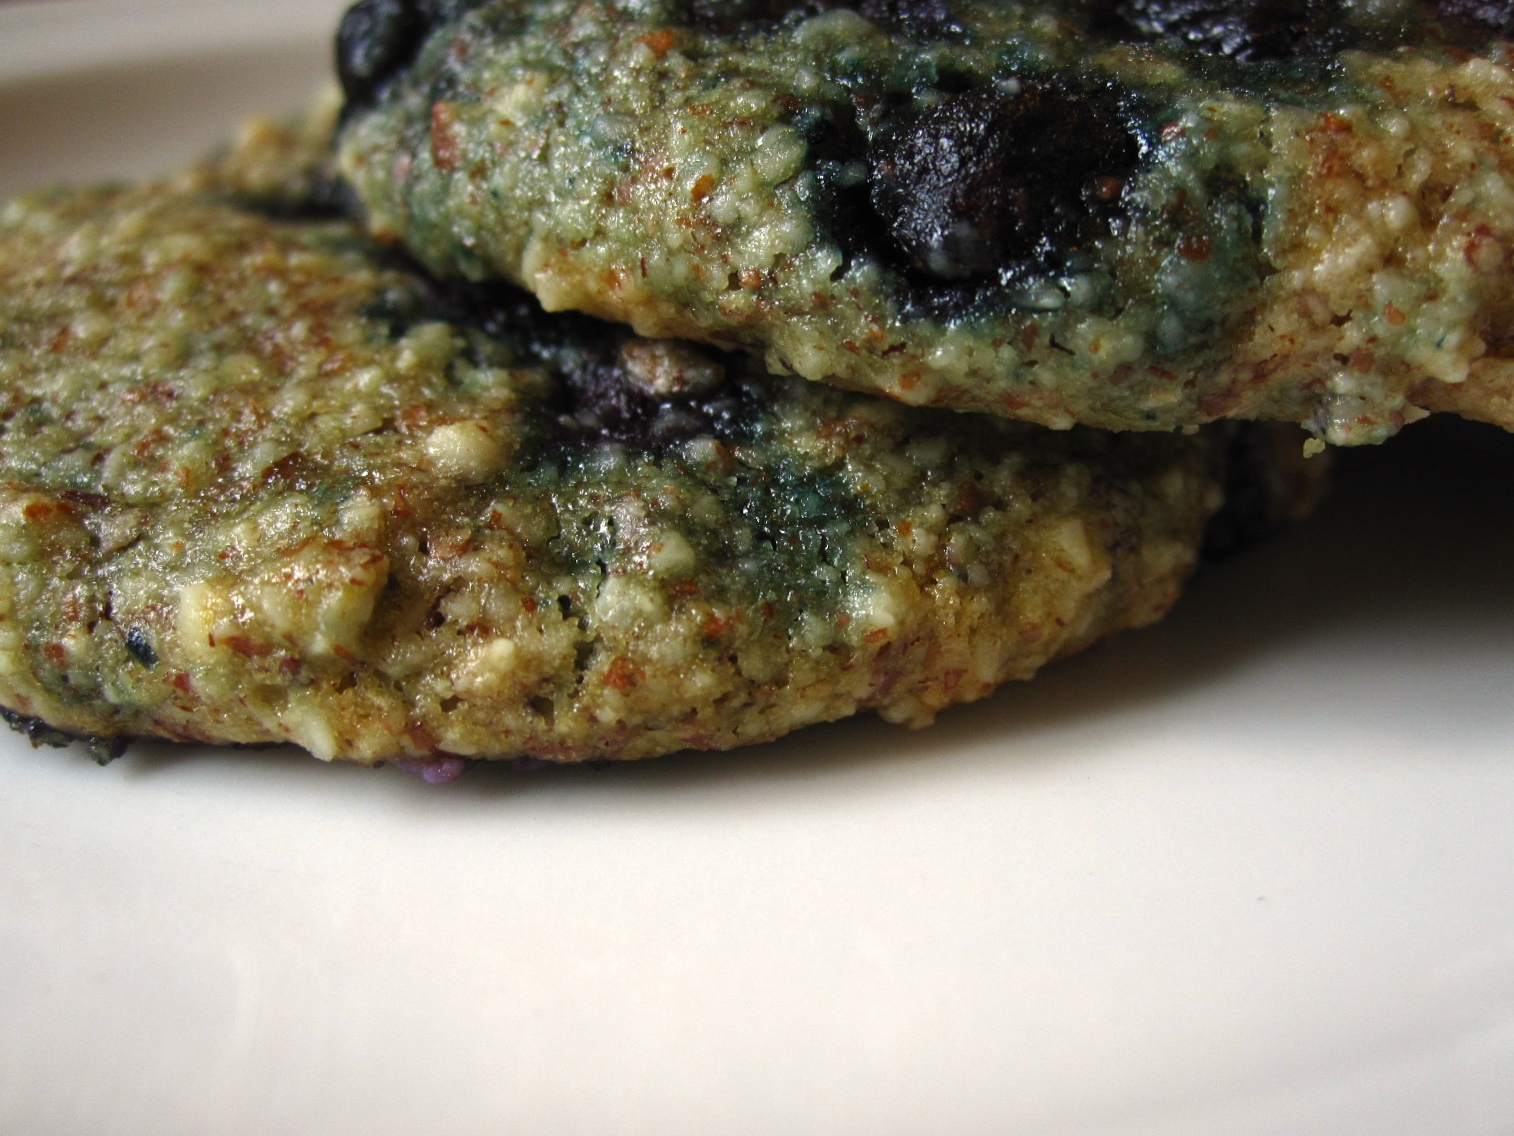
But anyway. Cookies. Long time coming, I made these a few weeks back and they were simple, delicious, and good for you. What’s not to love?
And yes, I know they’re blue. Who *doesn’t* like some blue food now and again?! Especially when it’s naturally occurring… see? It’s kind of like mother nature is throwing a party for you, on your plate. A party of awesome, antioxidant-filled blueness. To which the free radicals in your body are NOT invited, by the way (and after you eat these cookies/blueberries, there will be less nasty free radicals to float around and cause problems anyway! Mother Nature always knows how to throw an awesome party).
Blueberry Almond Coconut Cookies
Yield: about 11-12, mine spread out quite a bit and were on the flatter side. Soft, but delicious. Recipe lightly adapted from Ari’s Menu, here!
Healthy fats [almonds+coconut], antioxidants [blueberries], vegan, and gluten free! Winners all around.
1.5 c almond meal
1/4 tsp baking soda
1 tbsp organic, non GMO cornstarch
dash of salt
1/4 c maple syrup (I use grade B organic)
1/3 c light coconut milk (canned)
1 tsp vanilla extract
1/2 c frozen organic blueberries
Preheat the oven to 375, and line a baking sheet with parchment paper.
In a large bowl, combine almond meal, baking soda, cornstarch, and salt. Add maple, coconut milk, and vanilla, and stir to combine. Gently fold in blueberries (this turns the batter blue. I’m in love). Drop by the spoonful onto your prepared cookie sheet, and bake for 12-14 minutes until set and golden (Mine went a little on the longer side—they’ll still be soft when done, so tap the tops to test them). Let sit for a few minutes (they’re delicate!), then remove to a cooling rack to cool completely. Store in an airtight container in the fridge.
It’s been one of those weeks where you get up and think… do I really have to put clothes on today? Dis.Gust.Ing. Too hot to live, let alone bake. I really am a pacific northwesterner in this regard: hot weather makes me nutty. Today I sort of decided to stick it to the weather and go take a hot yoga class, since I’d been sweating all day anyway. Surprisingly, it was a great idea: maybe there is something to that ayurvedic idea of eating hot foods on a hot day? Huh. Anyway. After said hot yoga class, all I wanted was a dunk in cold water and one of these.
yum.
Yes.
No bake, for the WIN.
The solution for when it’s too hot to do much of anything and turning on the oven (or really even the stove, let’s be real here) turns into a capital offense. I had grilled cheese for dinner last night (although I did go gourmet with some sauteed veggies, ha) since I was so unmotivated to do much of anything except watch other people (i.e. Olympians) be ridiculously fit. Whatever, I made up for it with my yoga today, so there. And with these bars. These are FAB. And healthy, which is a bonus considering most no-bake items seem to involve some form of strange food product like cool-whip. Let’s not go there, shall we? Back to these:
cooooconut
Mmmm. Banana coconut bars on a nutty date crust. Naturally sweet and so frostily delicious. Bonus points for being gluten free and vegan, as well as refined sugar free. You also get a healthy dose of magnesium from the cashews, calcium from the almond butter, healthy medium-chain fatty acids from the coconut, and potassium from the banana. See? It’s like a complete summer meal in a bar (welllll…sort of). Wheee! Squat and gobble to your heart’s content, I won’t tell… even if you do it in a sports bra and running shorts because, like I said, it’s too hot to live or bother to look decent. Or to blog… this is all I got today!
drippy. LOVE.
Vegan Banana-Coconut Bars
I slightly adapted these from the DAMY health blog, here! These are frosty and best when straight out of the freezer. Easy to make, they come together in a snap and set up decently quickly, satisfying all kinds of crazy summer cravings (Besides, they’re healthy to boot!)
Poke around and scrounge up the following:
For the crust:
1/2 c raw cashews
scant 1/2 c unsweetened shredded coconut
1 c pitted dates, chopped into smallish pieces
a tbsp or two of water, if the crust needs a little help to come together
For the topping:
1 ripe banana
scant 1/2 c unsweetened shredded coconut+ some for sprinkling
1 tbsp vanilla extract
1 tbsp maple syrup
1/2 c organic almond butter
1/4 c light coconut milk
look! another one materialized!
In the bowl of a food processor, pulse together cashews, coconut, and date pieces until the dough comes together, with pieces of nuts intact. Add a tablespoon or two of water if it needs a little help. Spread this mixture in the bottom of a lightly greased pan (mine was 9″ square, making thinnish bars), flattening it out as you go. In your food processor once again, blend the topping ingredients, scraping down the sides occasionally, until smooth. Pour the topping on top of your crust, and use a spatula to spread it out evenly. Top with some reserved coconut, and cover with plastic wrap or foil (bonus points for foil, it’s recyclable!). Let set for at least 2ish hours before slicing (it should be firm). Store in the freezer!
Love tasty food. Eat. Feel magically cooler… ohmmmm.
eeeeeatmeeeeeone of the nicer parts of warm weather: these are all from my back yard!
Ohhh my goodness. It is amazing how fast the end of the year is going… how is it already April 17th?! Thesis presentation a week from today? Oh yeeesh. BUT. My advisor approved my final draft, hooray! Which means… I’M FINISHED WITH THE THESIS BEAST! Well, at least finished with the text… minor formatting and image addition notwithstanding. 62 pages of text? Goodness. Up till now, I’d never written that much in my life! And graduation in less than a month?! Almost time to be a real person! Imagine that. Cue ridiculous upheaval, ready… go! At least I’m ready to be finished with school bizz, but definitely not ready to give up the Nerdaerie (Kira and I have been having separation anxiety!). I am excited to move onto something different though :) Onward! Second star to the right, and straight on ’till morning (Since I occasionally resemble Peter Pan, I thought this was appropriate)! I’ll just keep on truckin’ with those diamonds on the soles of my shoes.
BUT. Besides all of that business, time to focus on the present! I’m determined to enjoy my last thesis-free weeks. Staff appreciation dinner at my sorority meant an excuse to bake… so pie happened! I’m a little bored with cakes and cookies, so this was a welcome change. AND it’s healthy. Mostly. Sweet potatoes for Vitamin A and beta carotene, plus coconut for healthy fats. Not to mention cinnamon for stable blood sugar, and nutmeg and ginger for digestive support!
I can tell when I get busy, as blog posts become few and far between. My dinners of late have been economical and rather uninspiring. BUT, lucky for you, I’ve got major baking-itch. So expect to see some new and interesting things coming your way soon. I’m also aware that pantries soon should be emptied, which means I’ll be trying to use up random baking supplies. Oh drat, extra baked goods? What a bummer!
yum.
Sweet Potato-Coconut Pie with Gingersnap Crust
Make one 9″ pie. Only slightly adapted from Whole Foods, here. This pie is delicious and simple, made with stuff I seem to always have around. Besides, it’s an excellent source of Vitamin A and beta carotene from the sweet potatoes, as well as good-fat medium chain fatty acids from the coconut.
crust!
For the crust:
1.25 c crushed gingersnap cookies (I used Anna’s Swedish Ginger thins, as they were easier than fatty gingersnaps to pulverize in the food processor)
1/3 c shredded unsweetened coconut
4 tbsp (1/2 stick) butter (mine happened to be salted), melted
gingers! hehe.
For the pie!
2 mega sweet potatoes
3/4 c light coconut milk
1/2 c brown sugar
3 eggs
1/2 tsp cinnamon
1/4 tsp nutmeg
1/4 tsp salt
//
Preheat the oven to 350.
Pulverize the gingersnaps by the method of your choice. I used my food processor, but I’m sure a rolling pin and a plastic bag would be just as satisfying, if you’re feeling the need to vent. Combine melted butter, gingersnap crumbs, and coconut, and stir until combined. Press this into your pie dish, evenly across the bottom and up the sides. Bake the shell for 15 minutes.
While the shell is baking, deal with the rest. Now, for the sweet potatoes: on account of laziness time constraints, I microwaved the sweet potatoes instead of roasting them. If you microwave them, poke them a few times with a fork, and stick them in for about 7-8 minutes. They should be soft to the touch when they’re done. If roasting (which I’m sure is also delicious), poke them with a fork and place them on a parchment-lined baking sheet. Bake at 400 for 50 minutes. Let both methods cool before peeling the skin off and scooping out the nice orange interior.
Using a food processor (or a blender, as I did, since my food processor is teeny), puree the sweet potato flesh until smooth. Add in coconut milk, brown sugar, eggs, cinnamon, nutmeg, and salt, and blitz until incorporated.
Pour the filling into the prebaked shell, and bake for 50 minutes, or until set in the center (no jiggly!). Mine was perfectly done at 50 minutes. Let cool on a wire rack, and serve or chill. (Btw, side note: this pie cuts very easily, even when slightly warm, extra bonus!).
Once again, the weather gods are totally bonkers. I think they just like to mess with tiny humans for sport. Like, I’m sure they find it hilarious when I go trudging through some nasty weather after class, only to walk into my apartment and have it become immediately sunny. The roof is steaming, haha! Snow? Again? Is this really necessary?? And yesterday it was so incredibly windy, I thought if I wore a hat large enough I might lift off the ground like the Flying Nun (except not a nun. More like a flying Pilates-enthusiast in my yoga pants). Gusts up to 50 miles an hour?! Ridiculous. This weather is even more insane than usual, even by Salem standards. Sheesh.
So what do I do? Make cookies! Natch. When the weather gets icky, baking is always a good strategy. Especially when it leaves you with excellent snacking cookies, healthy AND delicious. Come to the Dark Side. I have cookies! Ha. I was getting irritated by the lack of snacks I had around, so these happened. Besides, I need more things to put lemon curd and biscoff spread on, in order to convey them to my mouth so I don’t feel silly eating them out of the jars. Not that I really let that stop me. But life is more fun with a cookie, obviously.
These have all kinds of healthy benefits! Full of fiber and cholesterol-friendly :) (as in, NO cholesterol, and only healthy fats + plant-based saturated fats, which are okay for those watching cholesterol!) They clock in around about 200 calories, making them a great pre (or post. or both) workout snack. The chia seed has made a cookie comeback, after several weeks (gasp!) of disuse… and we already know all about chia’s crazy antioxidant capacities. These cookies also feature healthy coconut and olive oil fats, as well as unsweetened cocoa powder for more antioxidants! Besides all that, apparently cardamom has great nutritional benefits too! I didn’t know this, but it helps digestion, contains lots of vitamins, minerals, and essential oils, and is another source of antioxidants! Those sneaky free radicals don’t stand a chance.
This recipe supposedly made 28 cookies. Psh. I made 11. Mine are perfectly sized ;) I don’t stint when it comes to cookies, especially when they’re good for me!
eye-level with a cookie. (the best place to be)
Chocolate Chia Cookies
Adapted from Vanilla and Spice, here! These cookies are really tasty: a little like gingerbread, as Kira pointed out. We both really liked the cardamom flavor in them, and they’re soft but chewy on the inside. Mmm. Makes somewhere around 11 or 12 2-3″ cookies.
1.5 c whole wheat pastry flour
somewhere between 1/3 and 1/2 c brown sugar
1 tsp baking powder
1 tsp cinnamon
1 tsp cardamom (seems like a lot, but it’s not overwhelming)
1/2 tsp salt
1/4 c plus 2 tbsp unsweetened cocoa powder
1/4 c chia seeds
1/4 c light coconut milk (any milk bev you have on hand I’m sure is fine, I wanted to use up some leftover coconut milk. I am SO GLAD I did)
1/4 c unsweetened applesauce
1.5 tbsp vanilla extract (yes, that is tablespoons)
1/4 c olive oil
1/3 c chocolate chippies
I like to play with my food!
Preheat the oven to 350, and lightly grease a cookie sheet.
In a large bowl, whisk together all dry ingredients: flour, sugar, baking powder, cinnamon, cardamom, salt, cocoa powder, and chia seeds. In a smaller bowl, whisk together milk bev, applesauce, and vanilla. Add wet into dry, add oil, and then stir to combine. I found I needed to add a few tablespoons of water to make the dough come together. Fold in chocolate chips as you combine wet and dry.
Form into little balls and place on the cookie sheet—I kind of shaped mine and flattened the tops a bit. This dough is really easy to work with, extra bonus! Bake for 12-13 minutes, or until the tops feel firm when lightly touched. Mine were done at 12!
Apparently it’s decided to be sunny this afternoon… I’ll guess I’ll just have to eat my cookies and enjoy it :)
see? there I go again. Cookie towers are more fun than blocks. You get to eat the pieces that fall off!
I’m feeling less than creatively humorous today…It must be on account of all of the holiday sweets I’ve been consuming lately. Oops. Whatever, that’s not stopped me from baking like a crazy! Really, does anything ever stop me? … Correct answer: No.
BUT.
Bring on the healthy (ish) dessert! I win, I win!! Delicious AND nutritious (or hey, I can at least tell myself that, right?!). I sort of needed a break from all of the layer cakes. A short break, mind you, but a break none the less. In comes the tart! This tart is sort of a combination of a rice pudding and a tart crust, but it’s vegan! Which is awesome, as I’d like to get into more vegan baking (I find it intriguing). Besides, I LOVE rice pudding, and this definitely qualifies. It’s also really akin to a sticky rice dessert, which I ALSO LOVE (are we seeing a trend here?!), which therefore also makes it delicious.
On the nutritious side, it has a mostly minimal amount of fat in it—coconut oil is good for you, anyway! It also is made with black rice (sometimes known as Forbidden Rice, as only the emperor of China was allowed to eat it for the benefit of his longevity), which has more of the antioxidant antohcyanin than blueberries! It’s high in fiber, iron, and an excellent source of minerals. AND Kind of can’t go wrong, when I’m eating antioxidants for dessert! No wonder the emperor was so protective of his rice. But the common people have it now, so ha! Besides all that, it is a gorgeous purple color. Which makes my eyes AND my stomach happy. Everyone wins. Including the gremlins that hang out in my stomach, as we know they loooove color.
But wait. There is even more nutritionalness to be found in this dessert! The crust is made with whole grains and cashews (which contain the same oleic acid–monounsaturated fatty acid found in olive oil), and coconut oil, which is insanely good for you (the lauric acid is an antioxidant, among a million other things).
Okaaayyy. Enough with the nutrition lesson. I just really had to convince you how good this is for you… so that you’ll go home and make it. It’s fab, you won’t regret it. And then eat a slice. Or two. Or five. And revel in the fact that you’re making your body happy! It will thank you later :)
mmm, antioxidants
Black Rice Tart
From NeverHomeMaker, original here! (and their blog is fab, check it out!). Makes one tart.
For the crust:
1/3 c raw cashews
1/2 c rolled oats
1/4 c brown sugar
1/4 c coconut oil (because it’s good for youuu!)
1/8 tsp/a pinch of salt
1/2 tsp lavender (we grow our own)
1 tsp vanilla
For the sticky rice
2 c water
1 c black rice, uncooked
1/3 c maple syrup
1 can of coconut milk (I used light from Trader Joe’s and it turned out fine!)
1/3 c unsweetened coconut flakes
Whatcha do!
Preheat the oven to 325, and lightly grease a tart pan (or a pie dish—my tart pan is in Salem, so that’s what I used).
In a food processor, process the cashews and 1/4 c rolled oats until finely ground. Add the rest of the oats, lavender and salt, pulsing to combine. I left some slightly larger chunks. Pour into a medium sized bowl and set aside. In a small saucepan over low heat, melt the coconut oil. Once melted, stir in vanilla and brown sugar, and simmer over a low flame for 2 to 3 minutes. Mine looked weirdly separated/congealed, but turned out fine. Pour the hot syrup over the dry ingredients, and combine thoroughly. Press the crust into your pan of choice, making sure to cover the bottom and go up the sides a ways. Bake for 5 minutes, then let cool. When cool enough, let it set in the refrigerator.
While the crust is cooling, start the water for the rice. When it boils, add rice, cover, and simmer for about 30 minutes, until all the water is absorbed. Add coconut milk, maple syrup, and coconut flakes, and continue to cook until the liquid is absorbed, about 20 minutes more. I stirred continuously (it makes for meditative thinking time, hehe), but I’m not entirely sure this is necessary—occasional stirring would likely be okay. Transfer the pudding to a bowl, and let cool. Chill briefly in the fridge before using. Once chilled, pour the pudding into the tart shell, and chill until serving. I topped mine with more shredded coconut.
It was deeeelicous! Mine had a little trouble coming out of the dish cleanly—my crust was rather sticky. Next time… more coconut oil to grease the dish. It was a bit more like a crumble than a tart slice, but ridiculously tasty nonetheless, so I wasn’t complaining ;)
Look at that cornbread. yeah. You know you want some!
I’m in full holiday-mode now.
Well, kind of.
I’ve put myself on Christmas music lockdown. I have a really irrational urge to listen to it, but I’m resisting. December 1st is the acceptable time to start listening. Tell that to Pandora. Trying to sabotage my lockdown, yeeesh… But really, the Nutcracker is obviously not JUST Christmas music, teeheehee!
Anyway. Besides settling into holidayish time, I can feel myself going into hibernation mode. Not my fault, since Salem has decided that night will fall around 4:30 pm. Or maybe 4:10 today, as I look out the window… Winter weather makes me want to curl up and eat. All this cold weather and dark starts turning me into a bear. Wait. Do bears do yoga and pilates? Okay. Maybe not a bear. A troll? Yeah. Probably. Do trolls hibernate? Maybe they style their really cool hair during the winter months?
…
This is getting ridiculous. Apparently my brain has gone on holiday without notifying me. I’d be the last to know, I’m sure. I think all that theories studying has gone to my head… but at least the midterm is done and the paper is nearly there (assisted by copious amounts of the bread that this post features). Besides turning into a bear/troll in the winter, I start wanting things like soup. And baked goods. Ha. As if. In what season do I NOT want baked goods?! NONE. How silly life would be without tasty baked treats. Booooring. Besides, the gremlins would get antsy!
SO!
Let’s get on with the purpose of this post. Sorry for the long hiatus between posts… The eating last week wasn’t cooperating on photogenic levels.
This soup is immensely satisfying on a hibernating troll level. Or on anyone’s level, really… It’s creamy and thick–rich without being terrifyingly bad for you. It also pairs well with cornbread (what doesn’t?!). I’m sure it would also be deeeelicious with a baguette, were you to have one lurking around. The soup is fairly basic, and uses things typically found in your (ok, my) pantry. It has a pretty short ingredient list, which is a plus when you desperately want soup!
I also decided it was time for the world to see my “It’s Willamette, Damn it!” bowl… You see, people have penchant for mispronouncing the name of my school. In fact, it’s the most mispronounced in the contiguous United States. And it rhymes with damn it. So see? It’s an easy way to remember, for those of you who like to say “Will-uh-met”. NO. It’s Willamette, damn it!
See? I've even puffy-painted it, so that people can get it right!
Coconut Sweet Potato Soup (Bisque?)
Adapted from here! Serves… 3 girls. With leftovers.
Peruse your pantry, and acquire:
2 monster sweet potatoes, peeled and sliced
4 cups of water, plus 1.5 tbsp
1 can of unsweetened light coconut milk
1 tbsp brown sugar
a hefty sprinkle of cinnamon, nutmeg, and ginger
1.5 tbsp cornstarch
salt and pepper, to taste
red pepper flakes, also to taste (spicy soup=cleared sinuses, hoorayy!)
Bring the water in a soooop pot to a boil. Add your sliced sweet potatoes, and reduce to a simmer. Simmer for about 20 minutes, making sure the water doesn’t boil away. Mash the sweet potatoes in the pot (with that potato masher that you insisted that you didn’t need, but have subsequently used about 3 times. Thank you, mutti! And your mutti-skills, that decree that you are ALWAYS right), and add the can of coconut milk, brown sugar, and cinnamon/nutmeg/ginger. Simmer for about another 15 minutes, until it begins to thicken. In a small bowl, add cornstarch and remaining water, and stir into a thick paste. Add the cornstarch and red pepper flakes to the soup, and cook for another five-ish minutes. (I may have added a bit more cornstarch to get it to thicken faster… the soup was still delicious, and I was HUNGRY). Use a blender (or an immersion blender, if you’re one of THOSE lucky ducks), and puree the soup in batches. Return the soup to the pot, and season to taste with salt, pepper, or more spice or red pepper if desired. I’m sure it would be lovely with shredded coconut on top, but I wasn’t on the ball enough for that…
Eat with this!!
Sandy’s Cornbread!
Given to me by an awesome lady who I used to work with (and who is now fully enjoying retirement!), this is a very tasty yogurt-based cornbread. I adapted it a bit from the original recipe, mostly to include whole wheat flour (as we know… I don’t have all-purpose!). I made a half batch of this for Abby, Kira, and I, but I’ll include the full recipe here.
8 oz lowfat plain yogurt (1 cup)
1/4 c olive or canola oil
1 egg
1 c whole wheat pastry flour
1 c cornmeal
scant 1/4 c brown sugar
1/2 tsp baking soda
1/2 tsp salt
Preheat the oven to 400. Lightly grease an 8″ or 9″ pan.
Whisk together yogurt, egg, and oil. Combine dry ingredients, add wet to dry, and mix well. Pour into prepared pan, and bake for about 20 minutes.
If you halve the recipe, the batter fits into a 6.5″ pan, and is done a bit past 15 minutes. I occasionally have trouble with the center of cornbread being done all the way through in the small pans—check it to be sure.
I think the cornbread is about to take a dive off the handle...