All Things Autumnal

E62EA0D4-4925-4B5C-B678-9A7C5A95ED92

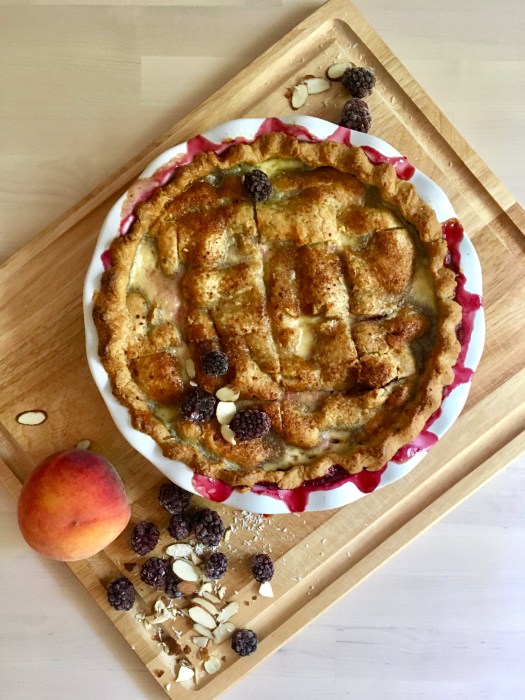
Hi friends, happy Monday!

25C7AF3D-7699-4DF1-924D-4195344C0BFA

I have a rustic, easy galette for you today – sometimes even I need a break from tarts ;) Besides, I LOVE galettes to highlight seasonal fruit. They’re unfussy, quick to throw together, and can accommodate a variety of random pantry ingredients and dietary needs/preferences. Basically, they’re just a win all around. Not to mention they make a superb breakfast the next day! Or snack, or basically whatever.

D52FF9F2-3EB0-4884-8B8F-41AC491E0EA7

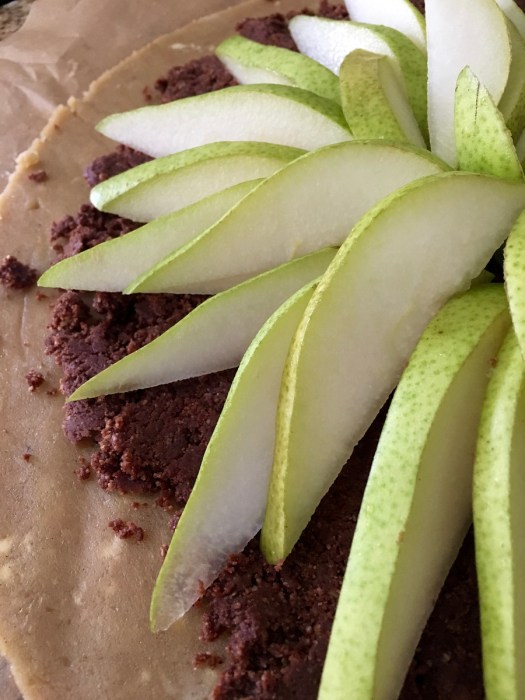
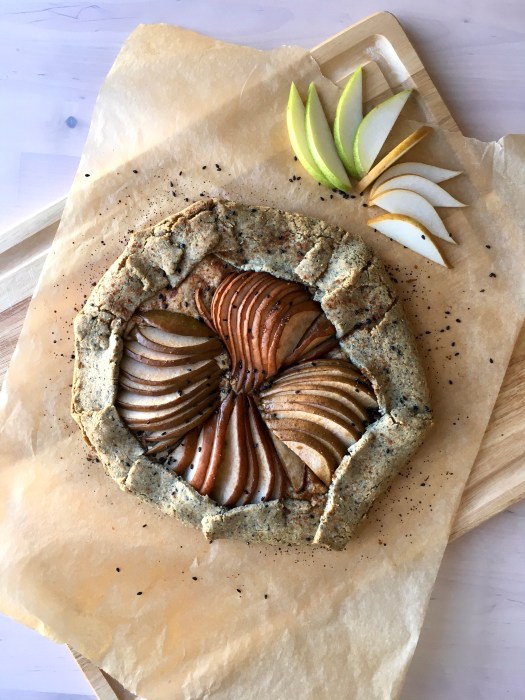
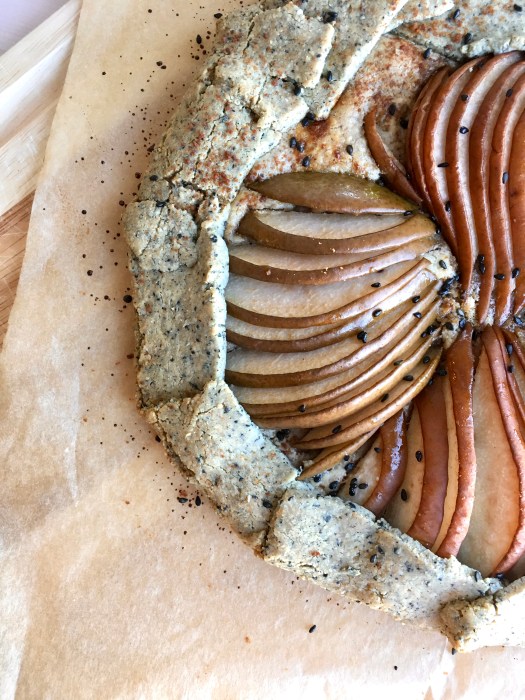
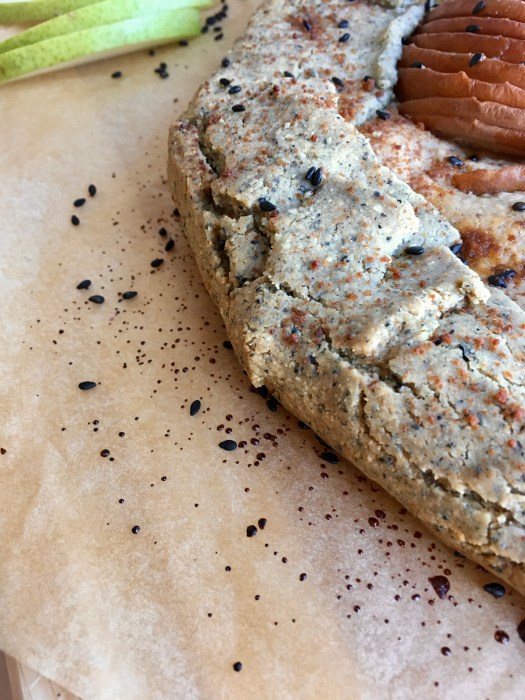
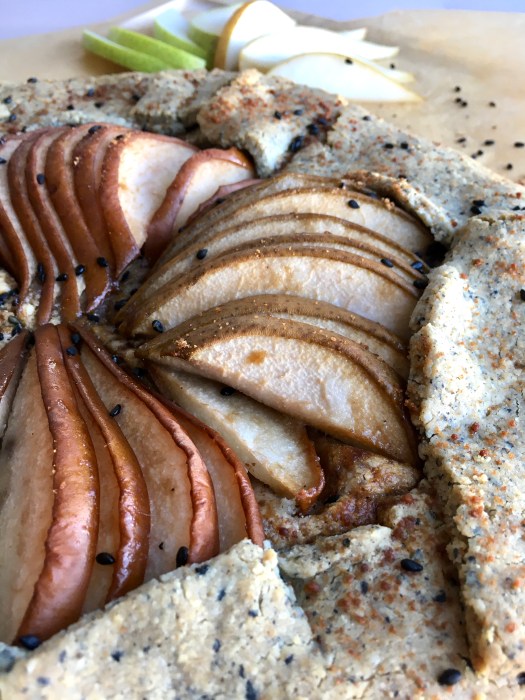
This one features the oh-so-autumnal pears (d’Anjou and Bosc, two favorites of mine) coupled with all things sesame. I’m having a moment with black sesame lately and I’ve been itching to do more things with it, so here it is making an appearance in galette dough. I love the warm grey color the dough ends up being – much of it bakes out, but you’ll see a little of it in the photos still.

F8539770-970B-45D7-BD39-817C839771CC

Tahini, almond and pears are made for each other anyway, so this is an easy sell. As usual, C and I ate it with ice cream for dessert and then again the following morning with coffee as a post-climbing snack (tried NOT to finish the remaining half in one sitting – accomplished this only to some degree).

74CB0A45-9EAE-4AE7-ADAC-88C45973CEA4

The time change has happened! I do kind of like cuddling up in the evenings this time of year – it makes me feel like it’s holiday time. Then again, I really like walking home from work in the daylight so that’s a mild bummer – just means I have to walk to work instead.

8F2E63AA-55BE-4EB8-9890-F75AF037555B

I had a succulent potting party with the fam yesterday! Check out these cute little guys planted in my gram’s best friend’s china. More plant friends!

385DE50F-43D5-444F-B5FB-0842629E801C

67855E27-B902-4BB4-BC4A-A43333832DD7

I hope your week goes smoothly – I’m just about ready for another weekend, not sure about you guys but that one went by way too fast.

83D2FB1F-FFF5-4250-BB8A-471CBE3EEB9C

Pear, Tahini and Black Sesame Galette

Nutty, lightly sweet and perfect for fall.  Gluten and grain free, refined sugar free, paleoish. Could be lactose free if you use ghee instead of butter! Yield: 1 galette, serves several. A Wait are those Cookies original.

For the galette dough:

1.5 c almond flour (not meal; you want the finer flour variety)
1/2 c tapioca flour
1/4 tsp fine sea salt
1/4 c black sesame seeds, lightly toasted and crushed*
6 tbsp salted butter, chopped (or ghee)
1 egg**
1 tbsp vanilla extract

*lightly toast the sesame seeds over medium heat for a few minutes, shaking the pan frequently. crush the warm seeds in a mortar before adding them to the food processor
**alternately you can use a flax egg with very similar results (3tbsp water + 1 tbsp ground flaxseed)

In a food processor or high-power blender (I used a food processor), pulse almond flour, tapioca starch, salt, ground sesame seeds and butter to combine until it looks like coarse meal. Add in egg and vanilla extract and pulse just until combined. Turn out onto a piece of plastic wrap, shape into a disk and chill in the fridge for at least an hour, or up to overnight.

For the filling:
2 pears, sliced thinly (I used d’Anjou and Bosc)
1/4 c tahini
pinch of sea salt
1/4 c unsalted almond butter
1/2 tsp almond extract
1 tbsp vanilla
2 tbsp maple syrup

In a small bowl, whisk together tahini, sea salt, almond butter, extracts and maple. Set aside.

Once the dough has chilled, preheat the oven to 375. Roll out the dough between two pieces of parchment paper, keeping the circle to about 1/4″ thickness. Peel off the top piece of parchment, and slide the rolled out dough on its parchment onto a baking sheet. Top with the tahini and almond butter filling in the center, leaving a border of dough around the edges, and add the pears. Begin folding up the sides, creasing them together as you go – if the dough rips, that’s okay (you can crimp the cracks back together; remember: galettes are forgiving and rustic!); you can use the bottom piece of parchment to help fold up the sides.

Dot the pears with butter and sprinkle dough with a little coconut sugar. Bake for 35-40 minutes until edges are golden brown — mine came out just fine at 35 minutes, so check accordingly.

Let cool for a few minutes on the baking sheet, then carefully slide the whole galette onto a cooling rack to let it cool completely. Serve with your fave ice cream or whatever of choice! Keeps well covered in foil on the counter or in the fridge.

19EFBE36-0101-4841-8A2E-543E09CCBB03

A figgin’ awesome tart (and some bad puns)

IMG_0053

Hello and happy weekend!

fullsizeoutput_1db2

We’re having beautiful fall weather over here today – it’s starting to cool down during the days (which I love) and the nights have been appropriately chilly. As such, I wanted to get on the last of fig season before they’re gone from the markets!

See fig. 1:

hahah see what I did there!! Figs?! Fig. 1?! Bahaha. Alright, I’ll stop torturing you… moving on.

fullsizeoutput_1da1

This tart is basically breakfast disguised as dessert. It has barely any added sweetener (maple) and it’s made of yogurt and eggs! C and I both LOVED the crust – I mean, we’re suckers for anything cornmeal anyway, but the combination of cornmeal and rosemary is just perfectly savory against the yogurt custard. I have a thing for rosemary in desserts anyway, so that was a given for me!

fullsizeoutput_1d9e

We had it both for dessert and breakfast (of course) – I loved it with ice cream, but it is equally delicious alongside eggs and kale for breakfast.

fullsizeoutput_1dbb

fullsizeoutput_1dbe

A few photos, just because they’re pretty, and I like to keep my little corner of the internet as visually appealing as possible! There is a lot out there these days – let’s keep this little spot happy.

fullsizeoutput_1db8

fullsizeoutput_1dc3

I can’t wait to get into the fall produce! I have some late season peaches that I froze and I feel I need to use, but apples and pumpkin are calling my name… we’ll see what sounds good by the time next weekend rolls around. In the meantime, I highly suggest you make this! It’s a very lowkey dessert – the filling comes together in about three minutes, and the whole thing (from crust to finish) takes just over 30 minutes in the oven.

fullsizeoutput_1da6

fullsizeoutput_1d9c

I love this time of year – the shorter days, earlier nights, and crispy air make me want to curl up at home with a good book and something in the oven.

fullsizeoutput_1da0

Yogurt Custard Tart on a Rosemary Cornmeal Crust

Lightly sweet – this is basically breakfast! The filling is made of greek yogurt and eggs with a bit of vanilla and almond extracts. The crust is wonderfully savory, with the cornmeal and rosemary – a perfect compliment to the custardy filling. It only requires just over 30 minutes in the oven, so it’s ideal for those times when you need a quick dessert – just make sure to let it set before slicing. Yield: 1 9″ tart. Serves: up to 8. The crust is a Wait are Those Cookies original; the filling is adapted from Food52, here.

For the crust:

1.5 c almond flour
1/4 c unsweetened shredded coconut
1/2 c cornmeal
heaping 1/4 tsp sea salt
1/2 tsp baking soda
2 tsp vanilla extract
1.5 tbsp pure maple syrup
7 tbsp coconut oil, melted
1 tbsp finely chopped rosemary

In a large bowl, stir together almond flour, shredded coconut, cornmeal, sea salt, and baking soda. Add in vanilla, maple, melted coconut oil, and rosemary, and stir until completely combined. The dough will look crumbly, but you’ll be able to press it together with your fingers.
Preheat the oven to 350, and lightly grease a pie plate with coconut oil. Press the crust into the plate and up the sides with a spoon or your fingers, creating a smooth edge (or not, your call!). Poke the bottom with a fork a few times, and bake for 15 minutes. Remove and let cool for a few minutes.

For the filling:
3 eggs
2 tsp pure vanilla extract
1/4 tsp almond extract
2 tbsp maple syrup
1.5 c (340 grams/12 ounces) plain full fat Greek yogurt
1 egg yolk, whisked with a tiny pinch of salt

In a medium bowl whisk the eggs and vanilla. Whisk in the yogurt. (The order in which the ingredients are mixed makes a difference in the smoothness of the filling, so it’s yogurt into eggs rather than eggs into yogurt!) When the crust is ready, remove it from the oven and turn the temperature down to 300°F. Brush the bottom of the crust with just enough of the beaten egg yolk to make a thin (moisture-proofing) coating. Return the crust to the oven for 1 minute to set the yolk. Remove the crust from the oven again. Scrape the filling into the hot crust and spread it evenly. Return the tart to the oven and bake until the filling is set around the edges but, when the pan is nudged, quivers like soft Jell-O in the center, 20-25 minutes. Check often in the last few minutes, as over-baking isn’t fun.

Cool the tart completely, in the pan, on a rack. Refrigerate if not serving within 3 hours. Top with figs, pomegranates, candied ginger, rosemary springs – anything that suits your fancy!

Store leftovers covered in plastic wrap in the fridge; keeps well overnight.

fullsizeoutput_1da8

Behold, fave human’s vision of the tart’s perfect angle:

fullsizeoutput_1dc4

fullsizeoutput_1db5

Birthday Pandowdy!

IMG_0834

I had a birthday!

fullsizeoutput_1c30

It was lovely – C and I hiked, went to the symphony for some Stravinsky and ate a bunch of good things (like matcha verbena ice cream omg yum) and this thing! He also gave me some beautiful flowers – all around it was a wonderful birthday!

fullsizeoutput_1c4e

fullsizeoutput_1c53

fullsizeoutput_1c5b

fullsizeoutput_1c05

fullsizeoutput_1c5c

fullsizeoutput_1c56

fullsizeoutput_1bf3

fullsizeoutput_1c5a

Of course, true to form, I made my own birthday dessert! No surprises there, I don’t think. I haven’t had much of a chance to bake (other than a wedding cake, which was SO fun) lately, so it felt good to get this out – I’m overdue!

fullsizeoutput_1c6e

Besides, I love pandowdies – they are pie’s unfussy cousin! So very easy, and so fun. Another excuse to play with your food! Cutting up the crust and flooding it with cream is my favorite part – it’s simultaneously soothing and satisfying.

fullsizeoutput_1c2e

I sliced and froze a bunch of peaches over the last month while they were at their peak – frozen peaches do really well in this, as long as you don’t thaw them first – which makes for even easier baking, since you just toss them in some lemon zest and a few other things and go! The only bit of this that requires more planning is the crust refrigeration, but it can be made the night before or just an hour before, so you have some flexibility.

fullsizeoutput_1c42

I highly recommend this for breakfast after hiking – it’s filling and delicious without being overly heavy. Pair it with some whole milk (not like I speak from experience or anything!) and go to town. Whole grain, refined sugar free – as C said, this is no namby pamby fruit situation! We’re just into the tail end of peach season – enjoy it while it lasts!

fullsizeoutput_1c34

Enjoy the rest of your week!

fullsizeoutput_1c32

Swamped Peach and Blackberry Pandowdy

No namby pamby fruit here! This is a very fruit-foward dessert, so make it with the ripest, most perfect fruit you can find! Best for late summer/early autumn peaches. Whole wheat, refined sugar free goodness. Pandowdies are the unfussy cousin of pie – no bottom crust nonsense here! Yield: 1 9″ pandowdy, serves 6-8.

For the crust:

1.25 c whole wheat pastry flour
1/4 c cornmeal
1 tsp sea salt
zest of 1 lemon
9 tbsp unsalted butter, cubed into small pieces
3-5 tbsp ice water

Add whole wheat flour, cornmeal, sea salt, and lemon zest to a large bowl and stir to combine. Add in butter, toss to coat, and use your fingers or a pastry cutter to cut in the butter until a coarse mixture forms and the butter chunks are the size of peas (I prefer to use my fingers for this since I a) like the feeling of having my hands in flour and b) have greater control over butter-chunk sizing). Add ice water 1 tbsp at a time until the dough just begins to hold together when pinched between two fingers. It’ll look a little crumbly, but that’s fine.

Toss the dough out onto a clean counter or wax paper (I prefer the counter method; less fuss), and use a bench scraper to gather the dough into a rough rectangle. Using the heel of your hand, smear the last fourth of dough away from you, against the counter. Repeat until you smear all the dough (see? playing with your food!), then gather the dough back into a rectangle and repeat, smearing it all away from you. The dough should be cohesive by this point, so gather it up into a disc, wrap in plastic, and stick it in the fridge for at least an hour, or up to overnight.

For the filling:

3 c peaches, sliced*
1.5 c blackberries*
1 tsp vanilla
1/4 tsp almond extract
1.5 tbsp arrowroot starch
juice & zest of 1 lemon
1 tbsp maple syrup
egg white & 1 tbsp coconut sugar for glaze

1 egg yolk
3/4 c heavy cream
1 tsp vanilla

*I used some that I had frozen earlier; if you do as well, bake them straight from frozen instead of letting them thaw beforehand

In a large bowl, combine the peaches and blackberries. Add 1 tsp vanilla, arrowroot, lemon juice, and maple, and toss to combine. Pour all this goodness into your pie plate or skillet of choice – 9″ pie plates are fine as long as they’re the deeper variety; a 10″ cast iron skillet would also work well.

Preheat the oven to 400. Roll out the dough to be roughly circular (no need to be perfect here, like I said – pandowdies are pie’s unfussy cousin), and lift the dough onto the fruit. Tuck in the edges, leaving a rim of dough between the edge of the pie dish and the fruit – I crimped mine because I’m an overachiever and I also had extra dough, but no need to do that. Make a few slits for steam to vent, brush the top with egg white and dust with coconut sugar. Pop the whole beautiful thing into the oven for 40 minutes; best if you line the rack beneath with foil or a large baking sheet – the juices runneth over!

In a liquid measuring cup with a spout, measure the cream, beat in the egg yolk and 1 tsp vanilla, and let it sit at room temp.

Once you hit the 40 minute mark, take the pandowdy out, and use a sharp knife to break up the crust, thus ‘dowdy-ing’ its looks (now begins the really fun part). Carefully pour the cream into the new breaks in the crust, filling each – some of the cream will pool under the crust, and some will sneak out on top, which is fine. Just be careful not to drown the whole crust! Go slow, and fill each vent/break. Stick the pandowdy back in the oven, and bake for another 10 minutes, until the cream is just set and barely jiggles in the center. Let cool completely before serving; it will be gloriously juicy and delicious so might I suggest serving it in bowls? Ice cream is… optional, sort of, if you’re out of cream; otherwise, this can be served even swampier with extra cream poured over the top. You do you!

Store any leftovers (who are you) covered in the fridge, but make sure to save some for breakfast. You’ll thank me later!

fullsizeoutput_1c1a

fullsizeoutput_1c66

Pears and cranberries: the perfect pair

IMG_1884

So normally, I would tell you that this makes great dessert but you should save some and eat it for breakfast, blah blah…

fullsizeoutput_e20

But really, this time, I’m going to throw that out the window and tell you to just straight up make this for breakfast. You really won’t be sorry – it’s mostly fruit anyway! Hiding under a whole grain, gluten free cream biscuit – what more do you want for breakfast?! I concede that we added eggs, kale, cholula & coffee, and it was a stellar combination, but you do you of course.

This is one of those homely-but-delicious desserts that doesn’t win any awards in the looks department but is undeniably amazing and should be made and loved immediately!

fullsizeoutput_e3c

I really love this for an autumn-winter breakfast-dessert: the cranberries and pears are a perfect pairing; the cornmeal cream biscuits are hands-down one of my favorite things on this planet (I am not alone in this, either); and the whole thing is just so seasonal!

fullsizeoutput_e24

I leave the skins on the pears, both because I enjoy when my fruit desserts have more texture & body, but also because fiber is good for you! The cranberries soften but still retain their shape and eating them is quite fun, since they pop when you bite them!

fullsizeoutput_e27

fullsizeoutput_e3a

Let’s see. Besides eating this for a stellar breakfast, other things of note lately…

Beautiful skies!

fullsizeoutput_e2d

The worst opera we’ve both ever seen, but in the best company with some awesome seats so it was worth it… as an excellent learning experience and unforgettable evening ;)

fullsizeoutput_e30

fullsizeoutput_e31

Can anyone else believe December starts tomorrow?! I can’t. Where did the fall months go?? Not that I’m particularly sorry, I do love festive holiday time and all the baking that goes along with it.

fullsizeoutput_e28

I highly recommend you throw the rule book out the window and make this for breakfast. I am behind you 100% on the wisdom of this action. Happy eating!

fullsizeoutput_e2b

fullsizeoutput_e29

Pear and Cranberry Cobbler with Cornmeal Cream Biscuits and Ginger

Gluten free, whole grain and refined sugar free! The fruit makes an amazing complement to the cornmeal cream biscuits, which are personally one of my absolute favorite things. Easy to make, the most time consuming bit of this is chopping up the pears. But you don’t even have to peel them, so that bit is even easier! Very lightly sweetened, this is perfect for those who love seasonal, fruity desserts. Adapted from both of my earlier cream biscuit cobblers, here & here.

For the filling:

4-7 Bartlett & Anjou pears (about 2 pounds), peeled, cored and sliced into small bite-sized pieces*
1 cup fresh cranberries
1/4 c maple
2 tbsp port
2 tablespoons arrowroot starch
juice of 1 lemon
1 tsp vanilla
½ teaspoon ground ginger
¼ teaspoon cinnamon

*I used about 6; shrinkage will happen to a point so don’t be afraid to use a little more than you would think

For the cobbler:

3/4 cup fine cornmeal
1/2 cup oat flour
1/3 cup brown rice flour, slightly heaping
1 tablespoons maple (or coconut) sugar
1 1/2 teaspoons baking powder
3/4 teaspoon kosher salt
1 tsp vanilla
1 1/2 cups heavy cream

Crystalized ginger, chopped; for topping – optional but delicious

Preheat the oven to 375°F. Grease a deep 9-inch square baking dish or deep 9-inch pie pan with butter (I prefer the deepness of the 9″ square – mine is a 2qt baker & it holds tons of fruit!). Cut up pears into large chunks and toss them into the buttered baking dish. Add cranberries and toss to combine. Whisk the maple, port, arrowroot, lemon juice, ginger, and cinnamon together, pour over the fruit, and toss to coat.

Combine cornmeal, oat flour, rice flour, sugar, baking powder, and salt in a medium bowl and whisk to combine. Pour in the cream and vanilla, stirring until just combined; the dough will be very wet. Scoop the dough into 8-ish blobs onto the fruit filling. Sprinkle with maple or coconut sugar if desired. Bake until the fruit bubbles and the juices thicken, and the topping is browned and cooked through, 45-55 minutes. Typically I test the biscuit done-ness by sticking a knife between two of them to see if the bottom is done – you’ll know if it isn’t, it will look raw. Stick it back in for about 10 minutes if you find that – mine is typically perfectly done at 55 minutes.

Serve with vanilla ice cream or more cream and chopped crystalized ginger; leftovers keep well, covered, in the fridge for a few days.

fullsizeoutput_e21

Breakfast disguised as dessert

IMG_1823

Ahh, the post-thanksgiving stupor….

IMG_1804

Just kidding! No such thing. First thing Friday morning was jazzercise, of course; I hate sitting still for too long. Thanksgiving itself was full of family and laughter & lots of croquet (ha!) – and of course, food. I was asked to bring the cornmeal apple & ginger cake that I made a few weeks ago; I made it with fresh ginger this time instead of crystallized, and I’m happy to report it’s amazing both ways.

IMG_1811

But for the days after Thanksgiving, a fruit-heavy, non-pie dessert was definitely required.

Perfect mornings look like this:

IMG_1807

Plus, I discovred a glut of late-season raspberries at the market a while back and pounced on them, knowing I’d want to pair them with apples strictly so I could go around saying RAZAPPLE! Ha.

IMG_1817

This crisp bakes up so well, you find yourselves eating bits of the crisp topping with your fingers.. not that we did that or anything…

It makes a stellar addition to breakfast alongside – what else? eggs and kale! – and I could argue that it’s even better the next day. We both liked that the apples retain their integrity – they don’t become a pile of mush, but they’re not crispy either – they’re somewhere in between & are absolutely delicious. This is one of my favorite things that I’ve made lately – simple, delicious, and seasonal. Happy baking!

IMG_1820

Raz-Apple Walnut Crisp

Gluten free & refined sugar free, with an easy dairy free/vegan option. Full of healthy fats and whole grains. Perfect for fall when there’s a glut of late summer berries at the market but apples are starting to be in season… for that matter, frozen raspberries work just fine too. Lightly sweet, tart and perfect for dessert and breakfast. Adapted from Cookie and Kate, here! Yield: 1 8×8 deep pan, serves 2 w/ leftovers for 1, haha…. kidding, only not really! Serves more like 6 normal humans.

  • For dairy free/vegan, sub coconut oil for the butter & non-dairy (coconut would be good!) yogurt for the dairy yogurt; bake as directed

For the filling:

5 largish (or 7 small) Granny Smith apples, cored and sliced into thin wedges*
2 c raspberries (frozen is fine)
scant â…“ cup maple syrup
1/8 c port**
1 tablespoon lemon juice
2 teaspoons arrowroot starch
½ teaspoon ground cinnamon
¼ teaspoon ground allspice

*I just approximate as I slice; I use however many it takes to fill my 2 quart, 8×8 baking dish

**the port is optional but amazing; if you don’t use it, use 1/8c water instead

For the crisp:

1 cup old-fashioned oats (use certified gluten-free oats for a gluten-free crisp)
½ cup firmly packed almond flour
½ cup chopped walnuts
1/4 c unsweetened shredded coconut
1/4 c maple sugar
¼ teaspoon fine sea salt
2 tsp vanilla extract
4 tablespoons unsalted butter, melted
¼ cup plain whole milk Greek yogurt

Preheat the oven to 350.
Slice apples into a deep baking dish, and add raspberries (my dish is 8×8, 2 qt capacity; 9″ square or 9″ deep pie dish would also be fine). In a liquid measuring cup, whisk together the maple and water/port until combined. Add the lemon juice, arrowroot, cinnamon and allspice, and whisk to combine. Pour the mixture over the apples and toss to combine. Bake for 20 minutes.

While the filling is baking, make the crisp. In a mixing bowl, stir together the oats, almond meal, walnuts, shredded coconut, maple sugar and salt. Mix in the vanilla, melted butter and the yogurt. Stir until everything is mixed thoroughly.

Once the filling has baked for 20 minutes, stir it to redistribute evenly in the dish. Plop spoonfuls of the crisp topping evenly over the filling – no need to pack it down. Return the dish to the oven and bake for 25 to 30 more minutes, until the filling is bubbling around the edges and the top is golden.

Let the crisp rest at least 5 to 10 minutes before serving; or do like I did and make it earlier in the day, and have it later. Serve with vanilla ice cream, obviously! Keep leftovers, covered, in the fridge for about five days (yeah right. It would take some kind of major feat to make it last that long; ours was gone in 2 days!) Serve cold alongside breakfast because it’s extra awesome that way.

IMG_1819

Cranberries – not just for sauce!

IMG_1788

Happy almost-Thanksgiving! Hard to believe it’s in less than a week. In keeping with the spirit of all things autumnal and holiday-ish, I bring you a cranberry curd tart! Perfect for dessert but also excellent for breakfast alongside eggs & kale.

IMG_1782

Besides, this color is amazing! Nature is really spectacular when you let her do her thing – no artificial coloring here, obviously!

IMG_1773

This tart is for those who love love love tart things! I really loved the crust – cornmeal and ginger are a match made in heaven.

IMG_1780

In other news, the leaves are gorgeous around here just now, and I move my plants around my apartment to follow the sun. They seem happy about it…

IMG_1739

IMG_1745

I don’t think I have too much more for you today; it’s a mellow Sunday and I’m contentedly chill today.

IMG_1749

Enjoy your holiday week!

IMG_1772

Cranberry Curd Tart on a Cornmeal Ginger Crust

Tart, PINK and perfect for fall / holiday dessert. Gluten free, dairy free and refined sugar free – this is for those who like tart things! The cranberry curd ended up kind of like mousse – see note; if you’d like it sliceable like a proper tart, use a few extra eggs in the curd. The cornmeal ginger crust provides a naturally not-too-sweet complement to the tartness of the curd & puree. Yield: 1 9″ tart, serves 2 ;) kidding – serves 2-6! A Wait are Those Cookies original.

For the crust:

1.5 c almond flour
1/4 c unsweetened shredded coconut
1/2 c cornmeal
heaping 1/4 tsp sea salt
1 tsp ground ginger
1/2 tsp baking soda
2 tsp vanilla extract
2 tbsp pure maple syrup
5 tbsp coconut oil, melted

In a large bowl, stir together almond flour, shredded coconut, cornmeal, sea salt, ginger, and baking soda. Add in vanilla, maple, and melted coconut oil, and stir until completely combined. The dough will look crumbly, but you’ll be able to press it together with your fingers.
Preheat the oven to 350, and lightly grease a pie plate with coconut oil. Press the crust into the plate and up the sides with a spoon or your fingers, creating a smooth edge (or not, your call!). Poke the bottom with a fork a few times, and bake for 15 minutes. Remove and let cool for a few minutes, but leave the oven on.

For the cranberry curd*:

3 cups (12oz) cranberries, rinsed and picked over
1/2 c water
1/4 c maple
juice of 1 lemon
2 whole eggs
2 egg yolks
Pinch of salt
scant 1 tbsp vanilla
3.5 tbsp coconut oil

*mine was on the runnier side, making my tart more like mousse than a set curd tart. Suggest adding another couple of eggs – unless you’re okay with the mousse texture (it was totally fine taste-wise, just didn’t really hold its shape when sliced)

To make the cranberry curd, place the cranberries and water in a saucepan. Cook, covered, over medium-low heat, until you hear the the berries start to pop. Cook, stirring occasionally, until all the berries have burst. Cool slightly, then puree with an immersion or regular blender. Strain the mixture into a bowl or large liquid measuring cup, pushing on the solids to extract as much cranberry puree as possible. Yield is about 1.5 c of puree.

Beat the eggs, egg yolks, maple, and lemon juice together in the top of a double boiler. Whisking constantly, slowly pour in the warm cranberry puree. Add salt and vanilla. Whisk in coconut oil 1 tbsp at a time until melted. Cook over low heat, whisking constantly, until the mixture has thickened and coats the back of a spoon (about 15 minutes). Remove from the heat and let cool. The curd will thicken a little more as it cools – store in an airtight container in the fridge for a week, or freeze for later.

For the cranberry swirl:

Basically, you’re replicating the earlier part of the cranberry curd, prior to actually making curd with it. If you’re smart (unlike me, who decided to do this later), do it all at once, and reserve some of the cranberry puree.

1.5 c cranberries, rinsed & picked over
1/4 c water
2 tsp maple sugar
1 tsp vanilla

Combine cranberries and water and cook as directed above, for the curd, until the cranberries pop. Strain as before, pressing to extract the liquid. Stir in maple sugar and vanilla.

For assembly:

Bake the crust, as directed above (350 for 15, in case you don’t want to scroll back up). Remove and let cool for a few minutes, then pour in curd. Dollop the cranberry swirl in large dollops over the curd, then use a knife or toothpick to swirl everything together. Bake for 15-20 minutes to set the curd, then remove and let cool completely before serving. I prefer to refrigerate mine for at least half a day before serving to further set the curd. Serve with ice cream (obvs!) and extra cranberry puree. Store any leftovers in the fridge, covered.

IMG_1775

Appropriately autumnal baking

IMG_1677

There is something so soothing about early morning baking. I don’t necessarily choose to bake at 6:30a, but when a workout and work have to happen before I can deliver & eat dessert, baking by necessity becomes an early morning activity. That being said, though, it’s a very meditative way to spend a morning, especially when it’s still dark outside.

IMG_3170

Of course, then of course there’s that moment when you go to put socks on and somehow find some crystallized ginger stuck to your foot… um… no comment.

IMG_1654

It also gives me a great sense of productivity to know I’ve created something before I even leave the house that day – and then add a workout and a highly productive work day and by 6p I feel extraordinary accomplished.

IMG_1656

IMG_3171

And THEN I get to eat cake! Ha. Win win, all around. Besides, coming back into my apartment after work, I’m greeted with a waft of OMG THIS CAKE SMELLS AMAZING – always a good sign.

IMG_3168

IMG_1663

This cake was well loved by both of us – it is definitely going on the to-make-again list – and I have high standards for that list! The cornmeal/polenta give it great texture – it’s a cross somewhere between cake and cornbread, in the best way possible. It’s amazing with ice cream for dessert, and equally so alongside eggs and kale for breakfast – see exhibit A below.

IMG_3173

Besides that, just in case you needed proof as to how loved this cake was, see exhibit B:

IMG_3177

No crumbs. One (large) slice left – that is after a stint of very productive yard work & leaf raking – that cake had NO chance.

IMG_1656

I can’t believe it’s already November. What happened to October?! Happy autumn!

IMG_1653

Apple Ginger Polenta Cake

Gluten free, refined sugar free, and dairy free. Lightly sweet, sort of like a cross between cake and cornbread – perfect for dessert (served with ice cream!) and breakfast alongside eggs and leafy green things. Yield: 1 8″ cake, serves… um… 2! Ha.

1 c almond meal
2/3 c yellow corn meal (I used medium grind)
1/3 c rice flour
2 tsp baking powder
Heaping 1/4 tsp sea salt
1/4 c extra virgin olive oil
2 eggs
1/6 c maple sugar
1/6 maple syrup
2 tsp vanilla
2 Granny Smith apples
1/3 c crystallized ginger chunks, chopped*

*I have also made this with fresh ginger and it’s equally amazing; finely mince peeled, fresh ginger root and add to the batter. The quantity is up to you – I love ginger, so I used a knob probably about 1.5″ long

Preheat the oven to 350, and line an 8″ cake pan with parchment paper, or do like I did and use strips of parchment paper for easy removal. Be sure to grease the pan first though to prevent any stickage.

In a large bowl, whisk the eggs with the maple sugar and maple syrup until soft and fluffy. Add in olive oil and vanilla. In a smaller bowl, whisk together almond flour, polenta, rice flour, and baking powder. Stir dry into wet. Cut one and a half apples into cubes and thinly slice remaining half. Add the apple cubes and chopped ginger and stir until just combined. Pour the cake batter into the prepared pan, and smooth it out a bit.

Arrange a few apple slices on top of the cake, sprinkle with a bit of maple (or coconut) sugar. Bake at 350F for 40 minutes. Check the cake after 35 minutes; mine was perfect at 40. If the top of the cake is browning too quickly during baking, you can always tent it with a sheet of tinfoil.

I stuck mine in the fridge for a few hours of storage, which didn’t hurt it at all. It keeps well on the counter overnight (covered with foil), and makes a ridiculously amazing addition to breakfast the next day!

IMG_1631

IMG_1632
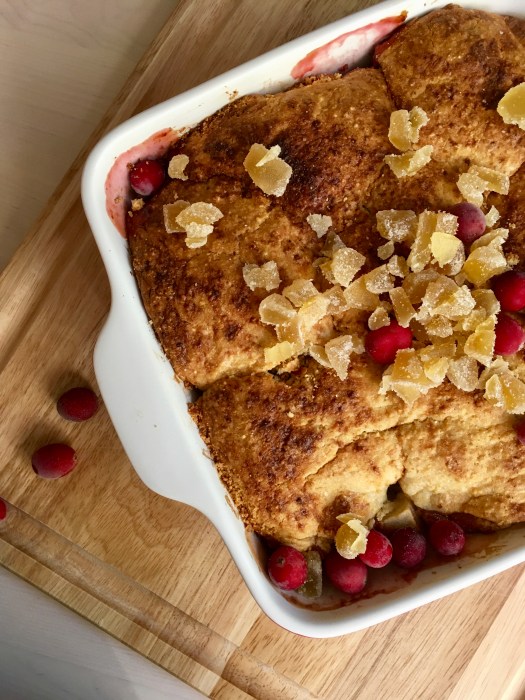
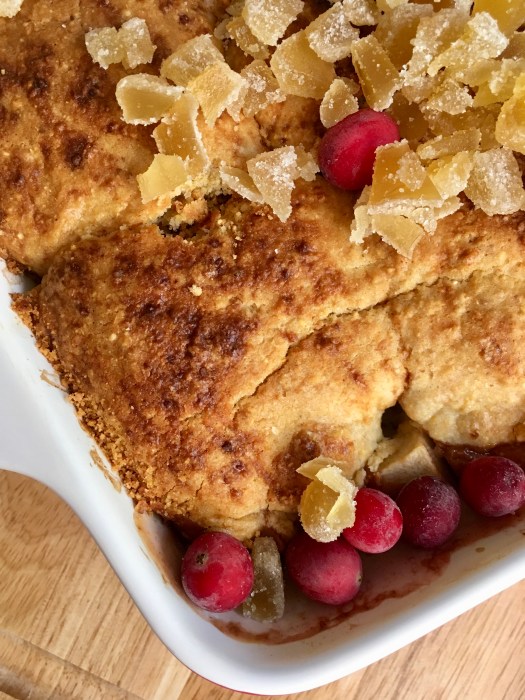
Early morning mis en place…

IMG_1637

Galette for breakfast: guaranteed to improve your election day experience

img_5117

Galette and pears and hazelnuts and dark chocolate and November!

img_5107-x3

I love fall because it means pears are EVERYWHERE and I love pears so this just feels like a win-win situation. Besides that, throw in some dark chocolate hazelnut filling and put all that goodness in a cardamom crust? Sign me up. And then eat it for dessert with ice cream and then for breakfast with (what else) eggs and kale and sourdough toast? Yeeessssss please thanks.

img_5101-x3

Let’s see, what else… today is election day! Did you vote?! I voted absentee ages ago and didn’t get a sticker… they should send stickers with the ballots!

And the time changed, woohooo for not having to get up in the dark anymore! I miss the extra daylight hours but I’d rather not go to work when it’s still dark out… Jessie and I enjoyed our extra hour of snuggles:

img_5089

Pretty skies lately!

img_5111img_5091

Annnnnd I’ve been drawing again, shocker I know. I just read a study that says making art reduces cortisol levels! Which is awesome and I think I subconsciously knew that because drawing always gets me into the flow state, pretty much without fail.

img_5110-x3

But anyway, back to galette!

img_5094-x3

This sounds complicated but totally isn’t. The crust is forgiving and easy to work with, and the filling comes together in a snap. Also, unlike the last time I made galette and crammed a truckload of blueberries into it, this one is far more structurally sound since pears are a little easier to wrangle than blueberries.

img_5097-x3

Give yourself a break from watching those election returns and gaze on this instead. I guarantee it’ll lower your cortisol levels ;) 

img_5109-x3

Pear Galette with Dark Chocolate Hazelnut Filling and Cardamom Crust

Grain free, gluten free, paleo and refined sugar free. Yay! There is butter, though a sub for coconut oil might definitely be possible (if you try it, tell me how it goes!). Yield: 1 galette, serving sizes are up to your discretion ;) A Wait are those Cookies original!

img_5096-x3

For the crust:

  • 1.5 c almond flour
  • 1/2 c tapioca starch
  • 1/4 tsp fine sea salt
  • 1 tbsp coconut sugar
  • 3/4 tsp ground cardamom
  • 1 egg
  • 6 tbsp salted butter, chopped
  • 2 tsp vanilla extract

In a food processor or high-power blender (I used a Vitamix), pulse almond flour, tapioca starch, cardamom, salt, and butter, and pulse to combine until it looks like coarse meal. Add in egg, coconut sugar, and vanilla extract and pulse just until combined. Turn out onto a piece of plastic wrap, shape into a disk and chill in the fridge for at least an hour, or up to overnight.

For the dark chocolate hazelnut filling*:

  • 1 c roasted hazelnuts, skins mostly removed (reserve a few for topping purposes if you want!)
  • 3 tbsp raw cacao powder
  • pinch of sea salt
  • 1.5-2 tbsp pure maple syrup
  • 1 tsp vanilla extract

* measurements are approximate! Adjust as necessary to suit your tastebuds :)

Blend hazelnuts in a vitamix or high power blender / food processor until a nut butter consistency forms (it’s okay for it to be on the chunkier side; mine wasn’t completely smooth). Add cacao powder, sea salt, maple, and vanilla and pulse until combined. This can be made up to a week ahead — just store it in an airtight jar in the fridge!

For the galette:

  • 1 crust
  • most or all of the hazelnut spread
  • 2 pears, thinly sliced (I used d’Anjou; Bosc would also be good) — you can peel them if you want, I chose not to
  • 1 egg, lightly beaten
  • 2 tbsp coconut sugar, divided
  • 1 tbsp salted butter, melted
  • extra hazelnuts for topping, if desired!

Preheat the oven to 375.

Roll out the dough between two pieces of parchment paper, keeping the circle to about 1/4″ thickness. Peel off the top piece of parchment, and slide the rolled out dough on its parchment onto a baking sheet. If you’re feeling extra artistic or motivated, cut some extra dough off the edge of the circle and cut leaf shapes out of it because… I’m an overachiever and it’s FALL! YAY! Anyway… moving on.

Spread the hazelnut paste carefully over the dough circle, leaving about a 2″ border from the edge — I found that the back of a spoon worked nicely for this (Try not to move it around too much, just press it into place so that the bottom dough stays intact). Spread the sliced pears in a fan shape if you’re feeling fancy, or just toss them all in there (I’m definitely not going to judge!). Begin folding up the sides, creasing them together as you go – if the dough is cracking, that’s okay (you can crimp the cracks back together; remember: galettes are forgiving and rustic!); you can use the bottom piece of parchment to help fold up the sides. Stick the leaves on the edges if you went that route. Brush the pears with the melted butter, and top with 1 tbsp of coconut sugar. Brush the dough with the beaten egg (I like a pastry brush for this), and sprinkle with the remaining tablespoon of coconut sugar.

Bake for 35-40 minutes (mine was perfectly done at 35, so check accordingly), until the dough is firm to the touch and golden brown. Let cool on the baking sheet for a few minutes, then slide the whole piece of parchment paper and galette onto a cooling rack to cool completely (or serve immediately!). Eat with some kind of vanilla ice cream thing (dairy or not) because… you should!

Leftovers keep covered at room temp for about… 1 day. Because it will be gone by then anyway so you won’t even have to worry. Promise!

img_5102-x3

Sometimes, dessert just needs to be an unashamedly sloppy, delicious mess

fullsizerender-5

This tart is a lesson in what dessert sometimes should be: an aesthetically pleasing, sloppy, delicious mess. Because sometimes dessert should just be eaten out of the pan it was baked or assembled in, with two spoons and happy grins. Or, you could attempt civilized plating (as I did) when you consume it for dessert, with a hasty decant into bowls topped with ice cream. Which is perfectly acceptable. Until the next morning when you peek at the custard tart that’s been hangin’ in the fridge overnight and notice that the custard has decided to attempt an escape outside its proscribed bounds, at which point you decide to eat it out of the pan with spoons. Wise and delicious decision!

img_4940-2

fullsizerender-2

Sometimes, you need a less than perfect dessert. Messy, delicious and less than perfect is exactly what this tart is. You’ve been warned! Indulge accordingly.

fullsizerender-7

In other news, I completed another year on this earthplane, and celebrated accordingly at Gary Danko! Nowhere else am I going to sit down to a four course dinner with two desserts. Shockingly, I didn’t even need a wheelbarrow to leave…. I consider this a success all around. Thanks to everyone who made my birthday weekend such fun! Y’all are so rad.

img_4931

Hmm, what else. It’s officially autumn! Which means apples, scarves, boots, and pumpkin. And baking. Except that the Bay has decided to have a heat wave these last few days, which means baking is totally off the table until it gets back down into the 80s, at least. Since when do I wear a dress and no jacket in San Francisco all evening?! Since never… until yesterday! Reason number one to eat messy, cool, creamy dessert that can be had with minimal baking and heating of the kitchen!

fullsizerender-4

More drawing! A wee bit of dome practice with the beautiful San Francisco city hall.

img_4937-2

Nighttime cityscapes are so beautiful.

img_4953-2

But back to the food!

This tart presents beautifully but once cut, devolves into a sloppy, delicious mess. But, fear not! Just grab a spoon and eat it straight from the pan. Messy and delicious, just how dessert should be.

img_4954

Maple Custard Apple Tart with Almond Crust

Lightly sweet, creamy and an appropriate amount of crust. Refined sugar free, grain free, gluten free, paleo & dairy free with one small swap (coconut oil for butter in the crust). Yield: 1 10″ pie pan of the deep variety; serves as many as you feel like sharing with. Recipe adapted from Hip Foodie Mom, here!

fullsizerender-3

For the crust:

  • 2.5 c almond flour
  • scant 1/4 tsp fine sea salt
  • 2 tbsp coconut sugar
  • 4 tbsp salted butter (or coconut oil), melted
  • 1 runneth-over tsp vanilla
  • 1 egg white

For the custard:

  • 1.5 c coconut milk (mine was light; use whatever you have)
  • 6 egg yolks
  • 1/2 c pure maple syrup
  • 1/4 c tapioca starch
  • 1/2 tsp fine sea salt
  • 2 tsp vanilla extract

For the apple topping:

  • 2 apples, finely sliced
  • 3 tbsp raspberry jam, thinned with a bit of water and lemon juice

Because the custard needs to sit and chill in the fridge after cooling for at least 2 hours, I made this a day ahead and let it hang out in the fridge overnight. The crust only takes about 15 minutes to bake, so the tart itself comes together quite quickly.

Preheat the oven to 400 and lightly grease a 9 or 10″ deep pie plate with coconut oil or butter. For the crust: in a large mixing bowl, stir together almond flour, salt, and coconut sugar. Add in melted butter or coconut oil, vanilla, and egg white, and stir until combined — I found it more fun and more efficient to use my hands at the end. Press the dough into the bottom of your pie plate of choice, poke the bottom a few times with a fork, and bake for 15 minutes. The crust should be lightly browned. Remove from the oven and let cool completely.

For the custard: in a medium saucepan, heat the coconut milk over medium, until small bubbles begin forming along the egg whites. In a medium bowl, whisk together egg yolks, maple, tapioca starch, and salt. Slowly temper the eggs by pouring the hot coconut milk into the egg bowl in a thin stream, whisking constantly until all the milk is incorporated. Pour this whole bowl of goodness back into the pot that was previously holding the coconut milk, and cook over medium-low heat, whisking constantly, until the custard begins bubble and thicken (you’ll know. it’ll go from watery to thick enough that your whisk makes tracks). Remove from heat, stir in the vanilla, and let sit until cool. Give it a good stir, and store in an airtight container in the fridge if you made it ahead.

Pour the custard into the completely cooled crust. Thinly slice 2 apples of choice, and drop them in a bowl of lemon water to prevent browning while slicing. In a small bowl, thin the raspberry jam with a few tbsp of water and lemon juice (I used the leftover from my apple-soaking water). Fan the apple slices across the surface of the custard, brush with the raspberry jam mixture to prevent excess browning. Cover and refrigerate if not eating immediately!

Keeps well overnight in the fridge, covered, but don’t expect it to stay in one piece! The custard is runny — best advice (and I definitely put this into practice) is to just eat it with a spoon, straight out of the pie plate. For breakfast! Keep any leftovers in an airtight container in the fridge.

fullsizerender-8

I am the Queen of Orange!

it's hiding... can you tell what it is?!

Yet another orange dish.

Who’s surprised?

Yeah. Didn’t think so. That’s okay though, you’ll thank me later,  just wait.

Besides, it’s fall! What do you expect?! I’m trying to be more of a seasonal eater. And by this I mean I want my insides to resemble the fall color which has exploded all over trees in Salem, and caused them all to look like they’re on fire… Then I really would be a seasonal eater, so there! Instead of having technicolored insides on account of sprinkles, I can have autumn-inspired innards! Teehee. I am the Queen of ORANGE!

Actually, when I say Queen of Orange, I’m rather reminded of William of Orange, and England’s Glorious Revolution in 1688. And no, I did not look any of those facts up… I am in fact a history nerd to the max, and those fab factoids were actually pulled out of AP European history brain from waaaay back when in sophomore year of high school. Yeeeahh. That’s right. I could also list you quite a bit of British royal genealogy… but I’ll save you the boredom ;) You’ll just have to trust me. Anywayyy. Back to the food, which is why you’re here, right?!

This is how much I love squash:

Like, A LOT. Fat, roundy orange squash. Or alternatively, butternut and acorn are good too… Which are not exactly roundy and fat, more like tan and elongated, or green and oddly lumpy, respectively. Whatever, to each his or her own squashiness, right?!

Because Kira and I realllyyyy love squash, we decided to make a new dish tonight… risotto! BUT. Because I’m a health nut, we made a healthy one. Hooraayyy!! But SO delicious, don’t get me wrong. Mmmmm. This risotto is actually made with barley, not rice. (Would that make it  barley-otto? Or barlotto?) Which is quite a bit more nutrient dense than rice, for the win! In fact, barley is realllyyy good for you: lots of soluble and insoluble fiber, which is handy for a number of things (including lowering blood cholesterol!), as well as vitamins, minerals, and antioxidants. It also has eight amino acids and has is low on the Glycemic index, which is good for blood sugar. Wheeee, whole grains!

Barley seems to be another of those foods that I apparently imprinted on as a small child (hmm… tofu and barley. can you say hippie-granola?! Jeez, no wonder I wear Birkenstocks all the time). Barley cereal was my FAVORITE when I was pretty little— I distinctly remember my mom going to a specific store, where she knew an employee who would get me my special barley cereal. Apparently we could only get it there… I do remember him being awfully nice, hehe. And my mutti was wonderful to go get the cereal for me!  I guess I never really grew out of the barley phase, as I LOVED this dish.

Like I said, you’ll thank me for the orangeness later :)

Butternut Squash and Barley Risotto (or Barlotto)

Serves… a lot? We made half and still have lots of leftovers. I’ll provide the measures we used. Adapted from here!

Acquire this business:

  • 1 butternut squash, cubed and roasted
  • 1 tablespoon olive oil
  • Salt
  • Pepper
  • 2 cups low-sodium chicken or vegetable broth
  • 2 cups water
  • 1/2 onion, minced
  • 1 thingy of garlic (I prefer the handy frozen squares from Trader Joe’s! It eliminates silly mincing and squishing)
  • 3/4 cups whole grain barley (I bought mine in bulk from Whole Foods)
  • 1/2 cup dry white wine
  • 3/8 cups grated Parmesan
  • awkward baggie of frozen peas
  • 1 teaspoon minced fresh sage
  • a judicious sprinkle of nutmeg

How to procure tastiness and gastronomical delight:

Firstly.

Roastify your b-nut squash! Preheat your oven to 450. Peel the squashling, and deseed it with a spoooon. Cubify it. Toss the cublets with a good glug of olive oil, salt, and peppahhh. Roastify the cublets for about 30 minutes, stirring onceish. When removing them from the oven, try not to get blasted with a huge puff of ridiculously hot steam. Seriously oven, I do NOT need that extreme of a facial. Set aside until needed.

Secondly.

In a smallish pan of some sort, bring the broth and water to a simmer, then lower heat just enough to keep it toasty. In a saute pan, saute the onion in olive oil. Cover and cook on medium until onion is softening, about 8-10 minutes. Add in garlic. Add barley, and let it toast for about 4 minutes over medium heat. Stir in wine, and continue stirring until it has been absorbed.

Now prepare to stir for the rest of your life.

At least you’ll have tasty risotto!

Add about a third of the broth/water, and half of your squashlets. Stir/simmer until absorbed, about 20 minutes. Continue to add liquid, stir, and simmer until the liquid is absorbed. This probably took Kira and I about a half hour, to have all the broth be absorbed and the barley to be cooked through.

Off the heat, stir in the remaining squash (assuming you left some out, not a big deal if you don’t want to), peas (another babyhood fave… what can I say, I was a gastronomically advanced child), parmesan, sage, and nutmeg. Salt and pepper to taste. Garnish with fresh basil (of course).

Enjoy the gastronomically delightful orangeness!