Swampy Pandowdy. Need I say more?!

IMG_1014

Can I just say that I’ve recently discovered swamp pie, and I will never be the same again.

IMG_0972

IMG_0992

Sometimes, the messiest food is by far the best food, and the less-aesthetic desserts are actually the tastiest. And sometimes, they have ridiculous names and it just gets better and better!

Ugly and strange sounding, but delicious. I promise. Would I lead you wrong in the dessert department? I think not.

IMG_0983

Let’s talk verbiage for a minute…

Swamp.

IMG_0997

Best word ever. And also, hilarious (and slightly unappealing I suppose, if you’re normal… unlike me) connotations when we’re talking about food. Side note, I was Bride of Swamp Thing for Halloween one year, and I think it might be one of my more inspired costumes to date.

IMG_0999

Typically, it’s pies that are swamped (i.e. have cream poured into them so not only are you getting pie, but you’re also getting this delicious mash up of cream and custard and pie and all the goodness, all at once), but since I’d never made a pandowdy, I decided to swamp that instead.

IMG_0996

Swampy pandowdy.

What a great combination of words!!! Swampy pandowdy. Which sounds potentially unappealing but I promise it isn’t.

Pandowdies are basically pie’s less fussy cousin. Or maybe they could be considered pie’s artsy, bohemian cousin who comes to visit once a year, bakes, does art things and wears colorful, ridiculous jewelry and lots of scarves and… omg that’s me! I’ve apparently found my spirit food. Or food totem? As in, if I was a food, I’d be a pandowdy. Low maintenance, boho weirdo… that sounds about right. Actually, I’d probably be a swampy pandowdy because that’s even weirder and more awesome. But, y’all like me for my weirdness, right?! So it’s fine. I’m at peace with having my spirit food be a swampy pandowdy.

IMG_0989

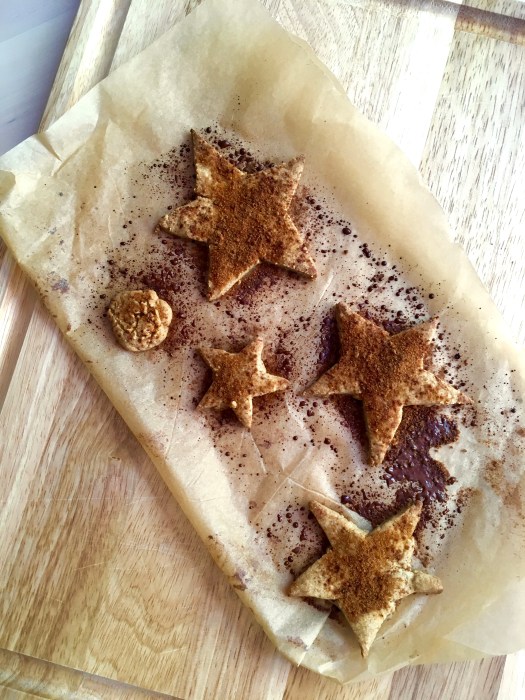
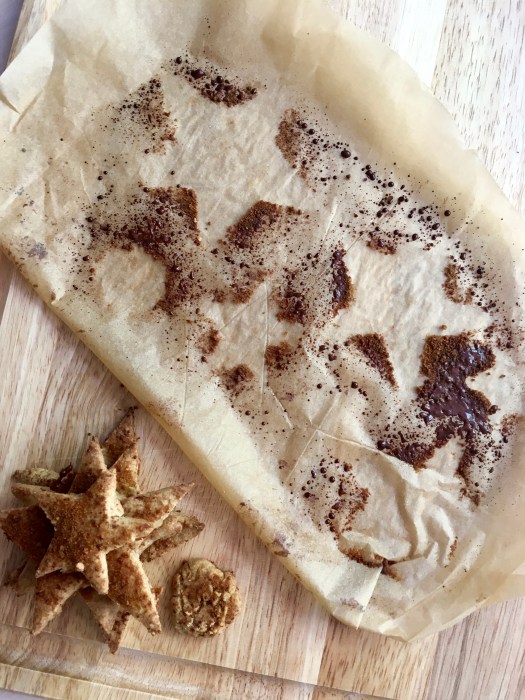
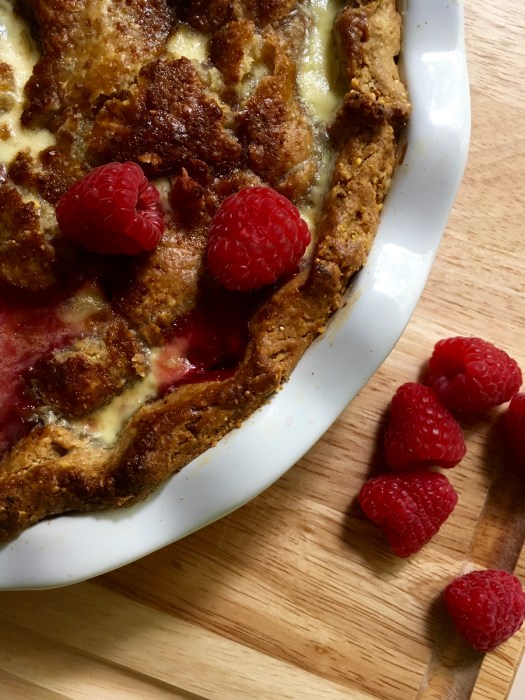
Though the origin of the word is technically unknown, I’ve read the theory is that pandowdies apparently get their name from “dowdy-ing” its looks by mucking up the crust. I just enjoy playing with my food, so you’re not going to hear any complaints from this corner.

IMG_0976

AND THEN not only that, but you get to pour a bunch of cream in there, which is an experiment in and of itself if/when you realize you don’t actually own a funnel, and careful pouring is going to have to do.

IMG_0974

It’s fun! It’s delicious and makes great dessert and breakfast (especially breakfast). And there are great words involved…

Happy pandowdy-ing!

IMG_0987

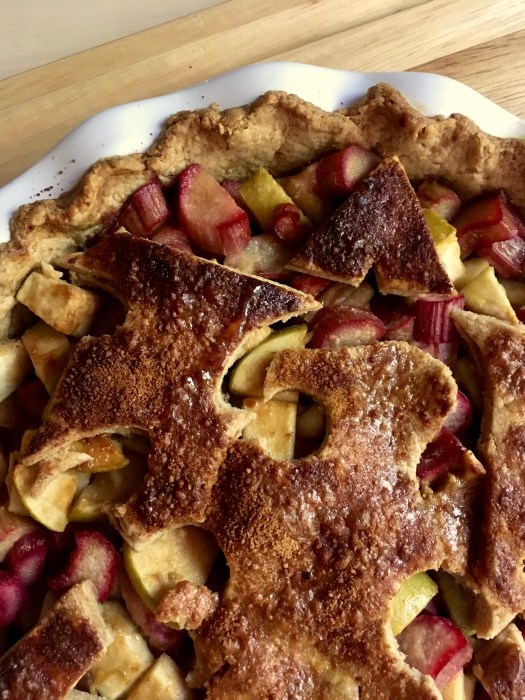
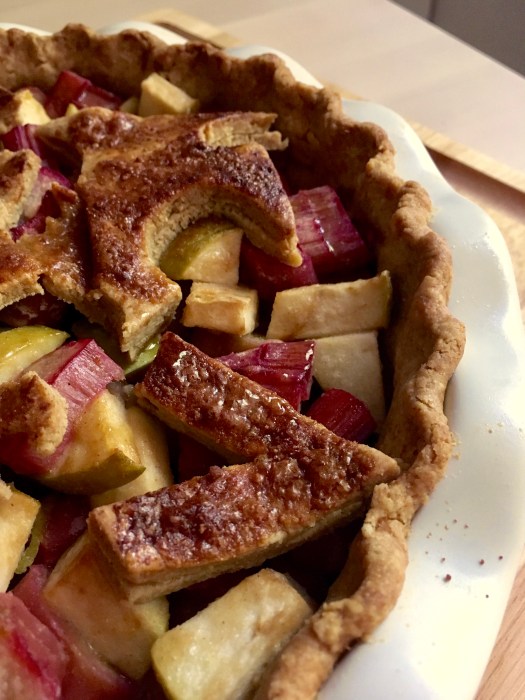
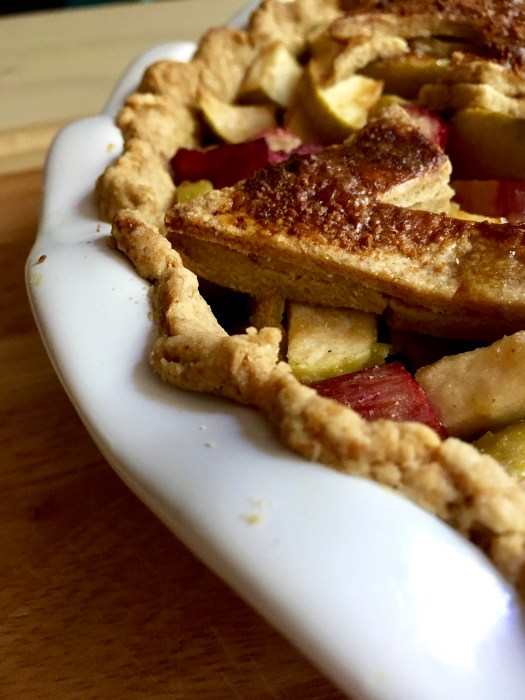
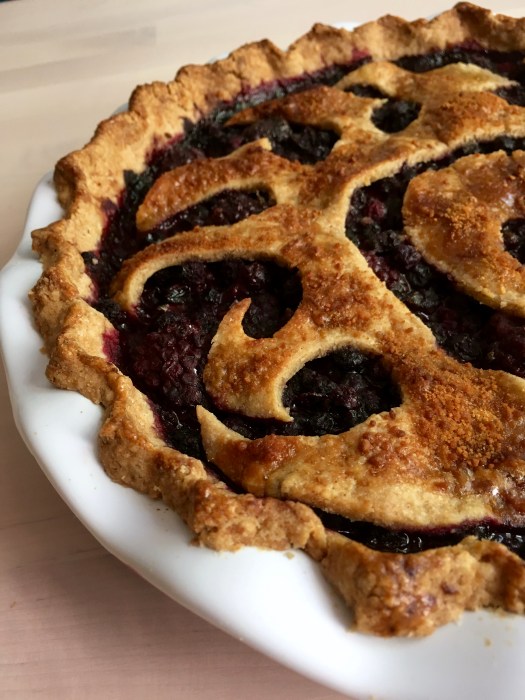
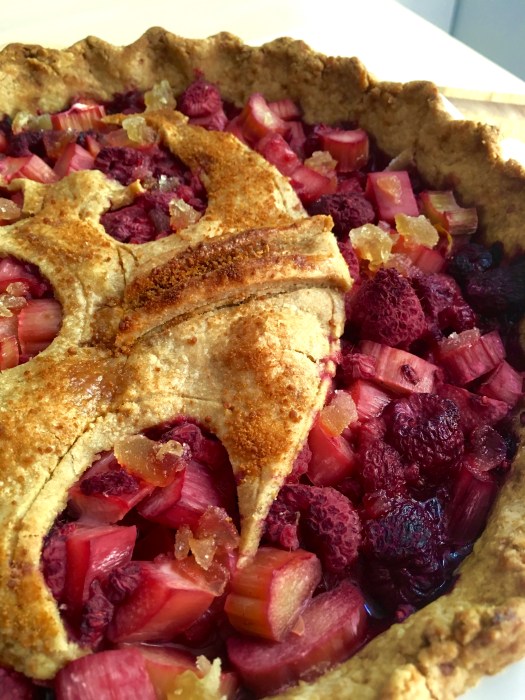
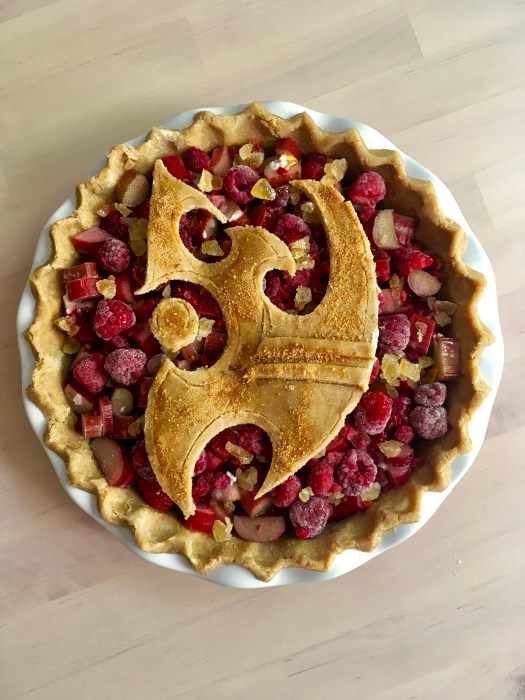
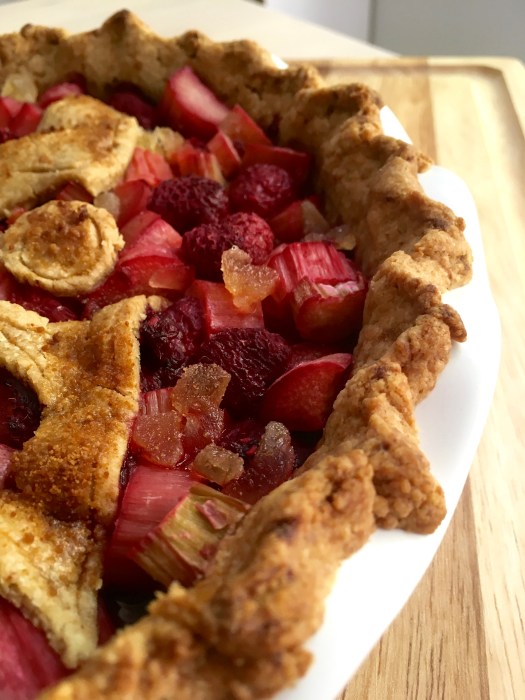
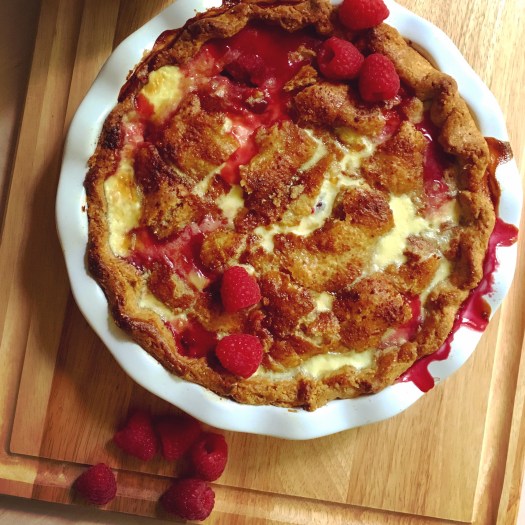
Cherry, Peach and Raspberry Swampy Pandowdy

Refined sugar free, lightly sweet, whole grain, and perfect for the late summer stone fruit season! I’m all over the stone fruit lately… Pandowdies are like pies, only way less fussy and much more messy and fun. They’re kind of like pie’s artistic, bohemian cousin (that’ll be me, later in life… oh wait. It probably already is) – only a top crust, and you get to mess it up and play with your food! Besides that, I love love love cream, so what better excuse to eat some than to flood your pie? Swamp pies are a thing. Also, I love the name. Pandowdy crust lightly adapted from Food52, here and the swamp business is adapted also from Food52, here! I didn’t do much to the crust, the recipe was pretty much perfect as is. Yield: 1 9″ pandowdy, serves… several. 2 if you eat it for breakfast too ;)

IMG_0977

For the crust:

  • 1.25 c whole wheat pastry flour
  • 1/4 c cornmeal
  • 1 tsp sea salt
  • zest of 1 meyer lemon
  • 9 tbsp unsalted butter, cubed into small pieces
  • 3-5 tbsp ice water

Add whole wheat flour, cornmeal, sea salt, and lemon zest to a large bowl and stir to combine. Add in butter, toss to coat, and use your fingers or a pastry cutter to cut in the butter until a coarse mixture forms and the butter chunks are the size of peas (I prefer to use my fingers for this since I a) like the feeling of having my hands in flour and b) have greater control over butter-chunk sizing). Add ice water 1 tbsp at a time until the dough just begins to hold together when pinched between two fingers. It’ll look a little crumbly, but that’s fine.

Toss the dough out onto a clean counter or wax paper (I prefer the counter method; less fuss), and use a bench scraper to gather the dough into a rough rectangle. Using the heel of your hand, smear the last fourth of dough away from you, against the counter. Repeat until you smear all the dough (see? playing with your food!), then gather the dough back into a rectangle and repeat, smearing it all away from you. The dough should be cohesive by this point, so gather it up into a disc, wrap in plastic, and stick it in the fridge for at least an hour, or up to overnight.

For the filling:

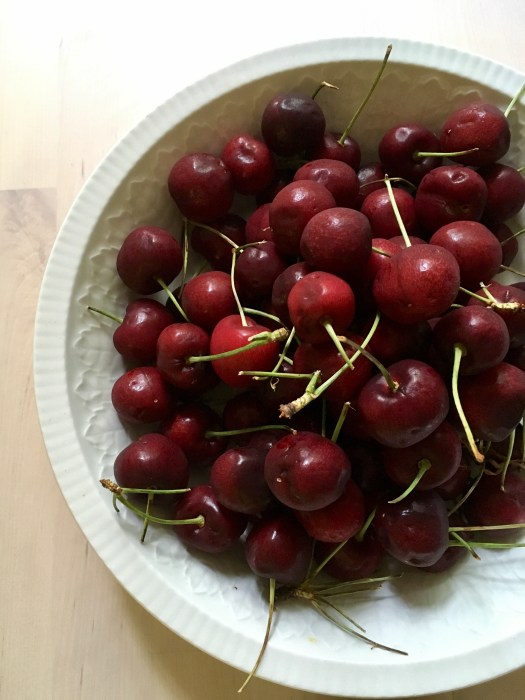
  • 3 c cherries (mine were Bing cherries; I think Ranier would be awesome here too)
  • 2 c peaches, sliced
  • 1.5 c raspberries*
  • 1 tsp vanilla extract
  • 1 tbsp arrowroot starch
  • 1 tbsp meyer lemon juice
  • scant 1/4 c maple syrup
  • egg white & 1 tbsp coconut sugar for glaze
  • 1 egg yolk
  • 3/4 c heavy cream

*I used some that had been frozen; if you do as well, bake them straight from frozen instead of letting them thaw beforehand

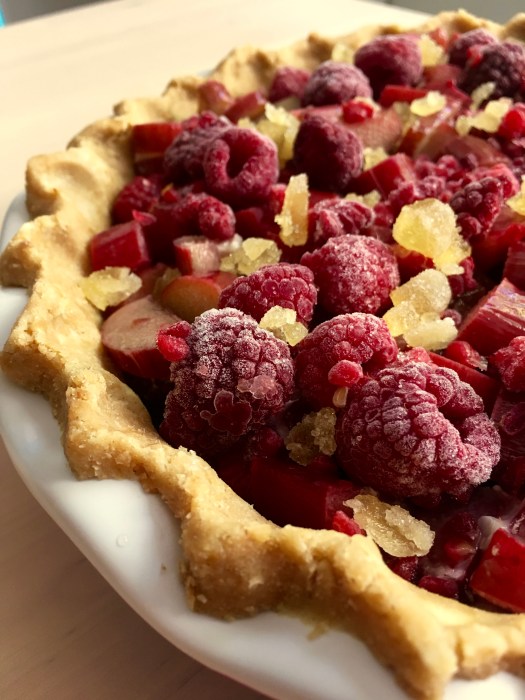
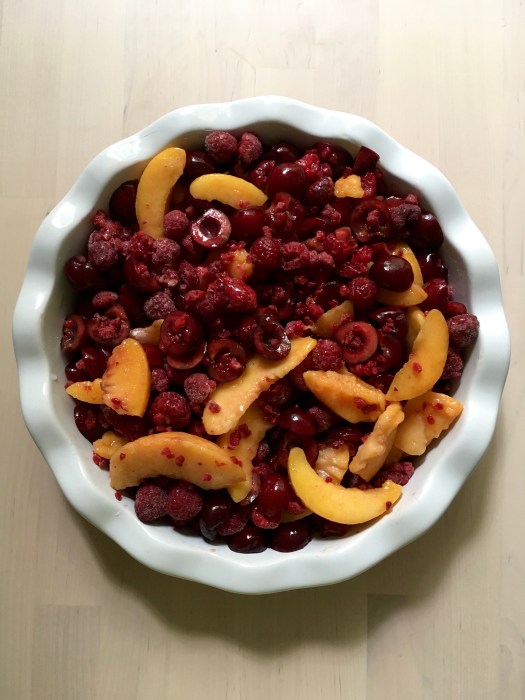
In a large bowl, combine the cherries, peaches and raspberries. Add vanilla, arrowroot, lemon juice, and maple, and toss to combine. Pour all this goodness into your pie plate or skillet of choice – 9″ pie plates are fine as long as they’re the deeper variety; a 10″ cast iron skillet would also work well.

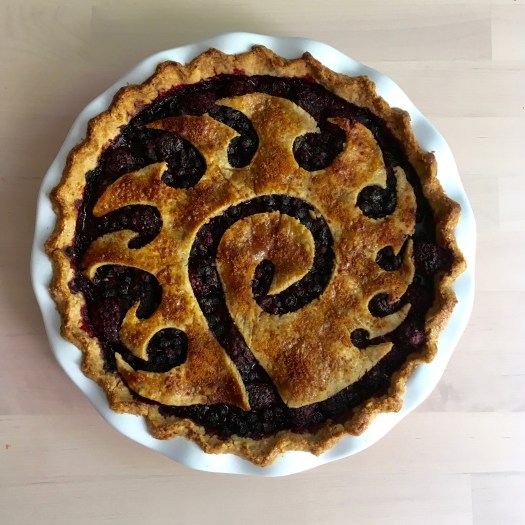
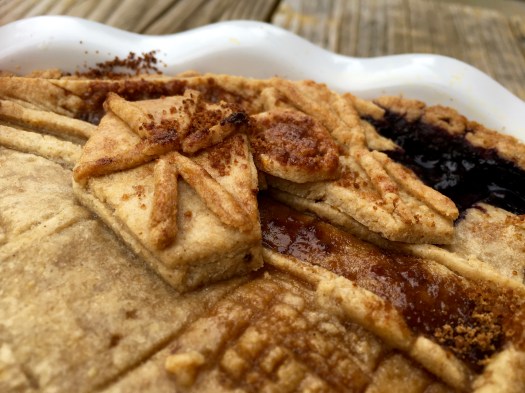
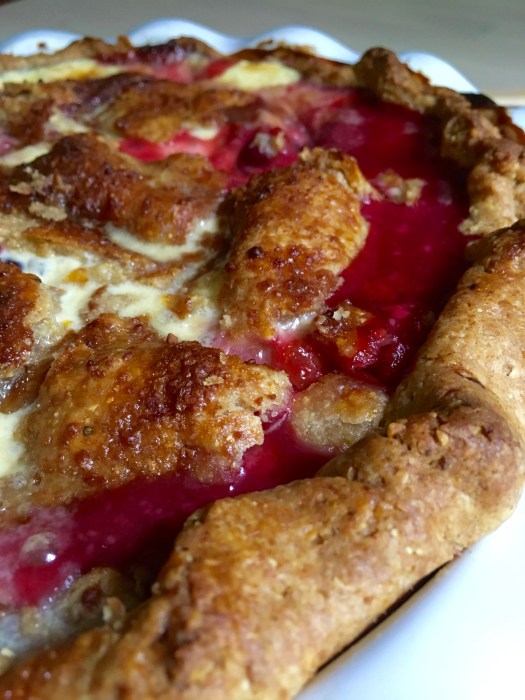
Preheat the oven to 400. Once the dough has chilled, roll it out to be roughly circular (no need to be perfect here, like I said – pandowdies are pie’s unfussy cousin), and lift the dough onto the fruit. Tuck in the edges, leaving a rim of dough between the edge of the pie dish and the fruit – I crimped mine because I’m an overachiever and I also had extra dough, but no need to do that. Make a few slits for steam to vent, brush the top with egg white and dust with coconut sugar. Pop the whole beautiful thing into the oven for 40 minutes; best if you line the rack beneath with foil or a large baking sheet – the juices runneth over! In a liquid measuring cup with a spout, measure the cream and let it sit at room temp.

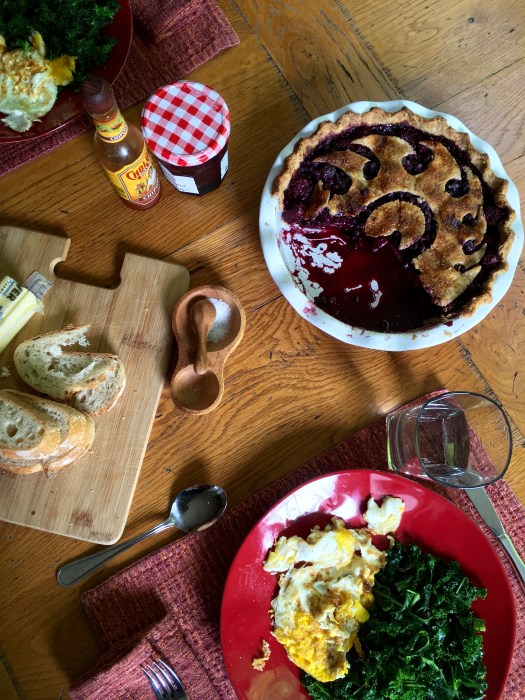
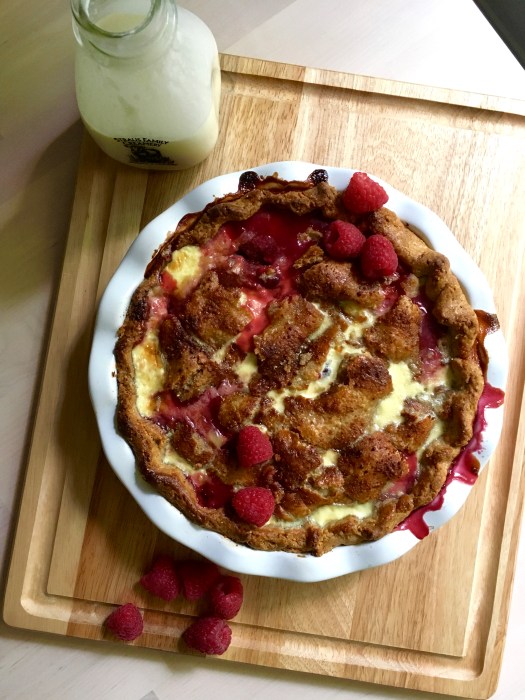
Once you hit the 40 minute mark, take the pandowdy out, and use a sharp knife to break up the crust, thus ‘dowdy-ing’ its looks (now begins the really fun part). Carefully pour the cream into the new breaks in the crust, filling each – some of the cream will pool under the crust, and some will sneak out on top, which is fine. Just be careful not to drown the whole crust! Go slow, and fill each vent/break. Stick the pandowdy back in the oven, and bake for another 10 minutes, until the cream is just set and barely jiggles in the center. Let cool completely before serving; it will be gloriously juicy and delicious so might I suggest serving it in bowls? Ice cream is… optional, sort of, if you’re out of cream; otherwise, this can be served even swampier with extra cream poured over the top. You do you!

Store any leftovers (who are you) covered in the fridge, but make sure to save some for breakfast. You’ll thank me later!

IMG_0999

Trifecta Complete: Terran Pie!

IMG_0583

I had to finish the trifecta, of course. Terran Pie!

Appropriately earthy, so I think the Terrans would approve. AND delicious, so I approve – I love rhubarb, and it pairs so well with apples.

IMG_0548

My pie crust game is going strong over here! It feels great to be able to make pie and not sweat the crust. Besides, it’s June now (how did that happen?!) which is summer and official pie season. Though I will say there will be a pie break over here for the time being, time to do new things!

IMG_0546

In other news… I saw the Mountain Play this weekend! So fun: a round-trip 8+ mile hike with ~1750 of elevation gain to get to the amphitheater –  I definitely earned my pie! (besides that, we did all the uphill on the hike in – 4.2 miles essentially all uphill in 1.5 hours. BEAST MODE. No big deal) The Mountain Play was awesome – great show, great weather, and lovely company!

IMG_0552

IMG_0555

IMG_0566

IMG_0567

All things considered, a great weekend. And there was nerdy pie. Which makes it all the better.

IMG_0570

Sometimes… you just need to play with your food:

IMG_0582

IMG_0575

Earthy, whole wheat crust filled with tart rhubarb and granny smith apples – the tart-pie lover’s dream. I haven’t had an apple pie in ages so this was a welcome change. The lemon shines through too, adding brightness that balances out the sweetness of the maple. Barely sweet, mostly tart – this pie is for those who love their fruit.

IMG_0549

Happy Monday!

IMG_0539

Rhubarb Apple Pie on Whole Wheat Crust

A Wait are Those Cookies original! Whole wheat and refined sugar free. Tart, for those who don’t shy away from a little tart in their desserts – the rhubarb and the apple play so nicely off each other, and the maple adds just enough sweetness without diminishing the flavor of the fruit. Yield: 1 deep 9″ pie. Serves: 2… I kid. Sort of.

For the pie crust:

  • 2.25 c whole wheat pastry flour
  • scant 2 tbsp coconut sugar
  • 1/2 tsp baking powder
  • 1/4 tsp fine sea salt
  • 1/3 c unsalted butter
  • 1/3 c vegetable shortening
  • 5-6 tbsp ice water

For the filling:

  • 4 c chopped rhubarb*
  • 2 granny smith apples, chopped
  • 1/4 c maple syrup
  • zest and juice of 2 meyer lemons
  • 1/3 c whole wheat pastry flour
  • 2 tsp vanilla extract
  • pinch of sea salt

*I baked straight from frozen; fresh would also be fine

For finishing: 1-2 tbsp butter, 1 egg for egg wash

To make the crust: in a large bowl, whisk together pastry flour, coconut sugar, baking powder, and salt. Cut in shortening and butter either with your fingers or a pastry cutter until a coarse mixture forms and the butter chunks are the size of peas. Make a well in the center of the dough and add in the ice water one tablespoon at a time – mix as little as possible when incorporating the water to avoid overworking the dough. Once it will stick together, you’re good to go. Divide it into two even pieces, wrap in plastic wrap or a ziploc and chill for at least 10 minutes or up to overnight. You can also chill the dough for about 5-6 hours or overnight in the ball, then roll it out and chill it, shaped, in the pie dish. I discovered that works quite well – make filling & bake straight from the fridge.

While the dough is chilling, put together the filling. In a large bowl, toss together rhubarb, granny smith apples, maple, lemon juice + zest, whole wheat flour, vanilla, and salt. Let sit for at least 10 minutes — easiest to do this while you roll out the pie dough.

Once the dough is chilled, roll it out between two pieces of parchment or on marble, whatever you have – I like parchment for easy removal. Aim for about 1/8″ thickness, and lay the bottom crust into a pie dish. Shape it with your fingers, evening out the top as per your pie plate or design you want — this crust will make a double crusted pie, so keep that in mind. Toss in filling goodness and dot fruit filling with butter.

If you want to get fancy and get all Terran-pie Starcraft nerdy (you must construct additional pylons!)…

Cut out templates (thick paper or thin cardboard work nicely) for the Terran crest. Have egg wash and coconut sugar handy (I used a beaten egg). Use the templates to cut out the top crust shape, then use a chopstick or a knife to make the surface lines. Brush everything with egg wash to make it stick. Sprinkle coconut sugar where contrast is desired. Once finished, carefully lay top crust over the filling. Bake at 450 for 10 minutes, then 350 for 35-40 until the filling is bubbling and the crust is golden brown (*note, apples & rhubarb might look a little dry on top, but the pie will be done and delicious, I promise!) Remove from the oven when done and let sit to cool for at least an hour, preferably more so that the filling will set. Serve warm or at room temp, and store any leftovers overnight on the counter, loosely covered, or in the fridge for longer (assuming it lasts that long). Pie can be made a day in advance if needed and reheated briefly in a 375 oven to crisp the crust and warm the filling – 10/15 minutes. The pie filling will firm up if stored in the fridge overnight, making slicing easier. Sometimes I actually prefer to make pie a day ahead, since it reheats in the oven beautifully and the filling sets up so nicely overnight.

IMG_0538

IMG_0542

You must construct additional pie-lons to defeat the Swarm!

IMG_0520

I just can’t stop with the Starcraft pie situation over here…

We are the Swarm… Numberless, Merciless {when it comes to pie}

IMG_0527

Besides, I like Zerg best so I couldn’t very well not do a Zerg pie… and of course it had to be dark purple, obviously.

IMG_0522

IMG_0528

Besides that, I know I’ve broken my unofficial rule of not repeating myself in two subsequent posts, but…. it’s PIE. So… it’s fine. And it’s my blog anyway so why do I have these stupid rules for myself?! As a very wise man once said, who would refuse pie?! Exactly.

IMG_0530

I’ve never put mint in pie prior to this, but I like it! It’s very unusual – the berries are still the dominant flavor, but the mint keeps popping in there to keep you on your toes. It adds an unexpected bit of freshness to the berries, and it smells SO good. I don’t think I breathed while I was doing the top crust…

IMG_0490

IMG_0516

Let’s see, what else is new…

Opera night lions! Opening night at Rigoletto was fantastic, of course.

IMG_0532

And a balanced breakfast, because pie definitely counts as a fruit serving.

IMG_0534

Patting myself on the back over here for the structural stability of this pie – appropriate amount of thickener = appropriate amount of juices! Plus, no soggy bottom crust. Mission accomplished.

IMG_0535

It’s June – the beginning of the summer fruit season — make pie, be happy! But… beware the swarm…

IMG_0524

Wild Blueberry, Blackberry & Mint {Zerg} Pie on Whole Wheat Crust

A Wait are those Cookies original! Yield: 1 9″ pie, serves 2 (ha) – 6. Refined sugar free and whole wheat, plus lots of antioxidants! Mint adds an unexpected freshness to an otherwise basic berry pie.

IMG_0529

For the pie crust:

  • 2.25 c whole wheat pastry flour
  • 3 tbsp coconut sugar
  • 1/2 tsp baking powder
  • 1/4 tsp fine sea salt
  • 1/3 c unsalted butter
  • 1/3 c vegetable shortening
  • 5-6 tbsp ice water

For the filling:

  • 2.5 c wild blueberries*
  • 2 c blackberries*
  • 2 tbsp chopped fresh mint
  • 1/4 c maple syrup
  • 1/3 c whole wheat flour
  • 2 tsp vanilla extract
  • zest and juice of 1 meyer lemon (or regular)

*I baked straight from frozen; fresh would also be fine; use enough berries to fill your pie plate

For finishing: 1-2 tbsp butter, 1 egg for egg wash

To make the crust: in a large bowl, whisk together pastry flour, coconut sugar, baking powder, and salt. Cut in shortening and butter either with your fingers or a pastry cutter until a coarse mixture forms and the butter chunks are the size of peas. Make a well in the center of the dough and add in the ice water one tablespoon at a time – mix as little as possible when incorporating the water to avoid overworking the dough. Once it will stick together, you’re good to go. Divide it into two even pieces, wrap in plastic wrap or a ziploc and chill for at least 10 minutes or up to overnight.

While the dough is chilling, put together the filling. In a large bowl, toss together blueberries, blackberries, mint, maple, whole wheat flour, vanilla, and lemon juice + zest. Let sit for at least 10 minutes — easiest to do this while you roll out the pie dough.

Once the dough is chilled, roll it out between two pieces of parchment or on marble, whatever you have – I like parchment for easy removal. Aim for about 1/8″ thickness, and lay the bottom crust into a lightly greased pie dish. Shape it with your fingers, evening out the top as per your pie plate or design you want — this crust will make a double crusted pie, so keep that in mind. Toss in filling goodness and dot with butter.

If you want to get fancy and get all Zerg-pie Starcraft nerdy (you must construct additional pylons!)…

Cut out templates (thick paper or thin cardboard work nicely) for the Zerg crest. Have egg wash and coconut sugar handy (I use a beaten egg + 1 tbsp water). Use the templates to cut out the top crust shape, then use a chopstick or a knife to make the surface lines. Brush everything with egg wash to make it stick. Sprinkle coconut sugar where contrast is desired. Once finished, carefully lay top crust over the filling. Bake at 450 for 10 minutes, then 350 for 35-40 until the filling is bubbling and the crust is golden brown. Remove from the oven when done and let sit to cool for at least an hour, preferably more so that the filling will set. Serve warm or at room temp, and store any leftovers overnight on the counter, loosely covered, or in the fridge for longer (assuming it lasts that long). Pie can be made a day in advance if needed and reheated briefly in a 375 oven to crisp the crust and warm the filling – 10/15 minutes. The pie filling will firm up if stored in the fridge overnight, making slicing easier.

IMG_0523

Must construct additional Pie-Lons!

IMG_0476

Protoss Pie! For all those who love Starcraft, this one’s for you! I’d say it ranks right up there in nerd-pie’s last incarnation, the Death Star pie that made an appearance a few months ago (see post here!). I LOVE making pies with personality, it’s much more fun than a standard crust (and then you can make pie-lon jokes all night long!)

IMG_0477

I love early morning baking, especially in the summer (it’s also practical since who in their right mind is going to turn on the oven once it’s over 80 outside? Not this girl). The feeling of my bare feet on the kitchen floor (yes, I am one of those barefoot bakers — I hate wearing shoes in the house and I just try not to drop anything sharp), the feeling of my hands wrist-deep in flour, butter, and fruit – such a soothing combination. There is something about pie that makes me feel more connected to my heritage, more than any other desserts I make. Which is odd, given that I don’t associate pie with any of my relatives — cookies were my gram’s thing! I guess it’s something about pie itself – it’s old, it’s timeless, and it’s simple. AND it’s delicious, obviously.

IMG_0479

That being said, I am finally at peace with pie dough! It’s taken some time, but pie dough and I have become friends. I think pie dough can sense fear… which means that as soon as you embrace it, it works for you! At least most of the time ;)

IMG_0471

IMG_0456

Pie is such a perfect, simple dessert. Ideal for overflowing seasonal produce, dessert and obviously breakfast – pie is textbook dessert-for-breakfast food. I have to say, this might be my favorite pie that I’ve ever made – I LOVE rhubarb, and it really shines here: tart but sweet, with a gingery kick. Ideal with some vanilla ice cream of choice – because pie is made to be eaten a la mode, obviously (with a side of pie-crust cookies made from scraps because… overachiever)

IMG_0480

IMG_0485

Other life things – SF series & succulents!

IMG_0463

IMG_0465

Must construct moar pylons! (or make that pie-lons, hahahah see what I did there?! I’m so impressed with myself)

IMG_0470

Eat pie. Be nerdy!

IMG_0482

IMG_0475

Rhubarb Raspberry Ginger Pie

Whole wheat and refined sugar free, lightly sweetened with maple and coconut sugar. Perfect for highlighting spring produce, especially rhubarb. Not too sweet & appropriately tart with a gingery kick. Yield: 1 9″ pie. A Wait are Those Cookies original!

IMG_0473

For the pie crust:

  • 2.25 c whole wheat pastry flour
  • 3 tbsp coconut sugar
  • 1/2 tsp baking powder
  • 1/4 tsp fine sea salt
  • 1/3 c unsalted butter
  • 1/3 c vegetable shortening
  • 5-6 tbsp ice water

For the filling:

  • 5 c rhubarb, chopped*
  • 1 c raspberries*
  • 1/4 c maple syrup
  • 1/4 c arrowroot starch
  • zest of 1 meyer lemon
  • juice of 1 meyer lemon (or regular)
  • 1/4 c candied ginger, chopped

*I baked straight from frozen; fresh would also be fine

For finishing: 1-2 tbsp butter, 1 egg for egg wash

To make the crust: in a large bowl, whisk together pastry flour, coconut sugar, baking powder, and salt. Cut in shortening and butter either with your fingers or a pastry cutter until a coarse mixture forms and the butter chunks are the size of peas. Make a well in the center of the dough and add in the ice water one tablespoon at a time – mix as little as possible when incorporating the water to avoid overworking the dough. Once it will stick together, you’re good to go. Divide it into two even pieces, wrap in plastic wrap and chill for at least 10 minutes and up to an hour.

While the dough is chilling, put together the filling. In a large bowl, toss together rhubarb, raspberries, maple syrup, arrowroot, lemon zest and juice, and candied ginger. Let sit for at least 10 minutes — easiest to do this while you roll out the pie dough.

Once the dough is chilled, roll it out between two pieces of parchment or on marble, whatever you have – I like parchment for easy removal. Aim for about 1/8″ thickness, and lay the bottom crust into a lightly greased pie dish. Shape it with your fingers, evening out the top as per your pie plate or design you want — this crust will make a double crusted pie, so keep that in mind. Toss in rhubarb filling goodness and dot with butter.

If you want to get fancy and get all Protoss-pie Starcraft nerdy (you must construct additional pylons!)…

Cut out templates (thick paper or thin cardboard work nicely) for the Protoss crest. Have egg wash and coconut sugar handy (I use a beaten egg + 1 tbsp water). Use the templates to cut out the top crust shape, then use a chopstick or a knife to make the surface lines. Roll out thin pieces of dough for the details, and brush everything with egg wash to make it stick. Sprinkle coconut sugar where contrast is desired. Once finished, carefully lay top crust over the rhubarb filling. Bake at 450 for 10 minutes, then 350 for 35-40 until the filling is bubbling and the crust is golden brown. Remove from the oven when done and let sit to cool for at least an hour, preferably more so that the filling will set. Serve warm or at room temp, and store any leftovers overnight on the counter, loosely covered, or in the fridge for longer (assuming it lasts that long). Pie can be made a day in advance if needed and reheated briefly in a 375 oven to crisp the crust and warm the filling – 10/15 minutes. The pie filling will firm up if stored in the fridge overnight, making slicing easier.

IMG_0484

IMG_0478

Shortcakes for spring! (and for breakfast. and dessert)

April already?! Wow. That went fast. And for being April, the strawberries are looking quite delicious — and surprisingly are so! I guess they’re technically in season somewhere. I do try to eat local, but shortcakes really call for strawberries and these looked especially delicious, so I’m not complaining…

I had a request for chocolate, so of course I was going to work that in — I’ve never made chocolate shortcakes before now but I highly recommend them.

Let’s see, life things lately…

Happy 16th birthday to this little nugget! She just gets more adorable every day.

Further progress on the SF series! This one is located at 2020 California Street.

More flowers! In this case, March showers seem to have brought April flowers…

But back to this hot mess. Dessert! It doesn’t photograph especially well but I promise it’s delicious.

I prefer my shortcakes on the not-so-sweet side, so that a) I can eat them with ice cream and not send myself into a sugar coma (even if it is unrefined sugar!) and b) they really highlight the berries. As such, these shortcakes are really more biscuit-y than cake-y, but that’s only if you eat them plain! Load them up with all of the other goodies and they have a perfect sweet-not too sweet balance. Especially the caramel two ways. Don’t skip that!

Highly recommended for dessert AND for breakfast: whole grains, no refined sugar & healthy fats, what’s not to like? Excellent with eggs & salad, of course I speak from experience. Happy shortcake-ing!

Chocolate Shortcakes with Strawberries, Coconut Cream, Maple Almond Caramel and Chocolate Caramel

Whole wheat, refined sugar free, dairy free/vegan option (replace butter with coconut oil & buttermilk w/ coconut buttermilk – see note). Lightly sweet shortcakes with fresh berries and coconut cream… plus caramel two ways because, why not? Shortcakes adapted from the cakes I made previously with peach filling, here. If you choose to go the coconut cream route, make sure you refrigerate the can overnight. A Wait are those Cookies original! Yield: 6 shortcakes + extra caramel (or maybe not, depending on how liberally it gets poured… no judgement here)

For the shortcakes:

  • 1 c + 1 tbsp whole wheat pastry flour
  • 3 tbsp cacao powder
  • 2 tsp baking powder
  • 1/2 tsp baking soda
  • 1 tsp fine sea salt
  • 2 tbsp coconut sugar
  • 4 tbsp chilled unsalted butter, cut into smallish pieces (or coconut oil for dairy free – make sure it’s chilled & solid)*
  • 3/4 c buttermilk*
  • 1/3 c extra dark chocolate chips

*if you’re not concerned about being dairy free/vegan, go ahead and use regular buttermilk & butter. I used 1 c (canned) coconut milk + 1 tbsp lemon juice as I was out of buttermilk

Preheat the oven to 450, and line a baking sheet with parchment paper.

In a large bowl, whisk together flour, cacao powder, baking powder and soda, salt, and coconut sugar. Cut in the butter using your fingertips (my preferred method) or a pastry cutter, until things start looking like coarse cornmeal and the butter is distributed evenlyish. Make a well in the center (look! You get to play with your food!), pour in the buttermilk, then use a spoon or spatula to stir it all together, until just combined (do try not to over mix). Stir in chocolate chips. Divide the dough into six little balls, flatten slightly and place on the baking sheet. Bake for just about 13-15 minutes, until the tops are firm and lightly browned. Let cool slightly on a rack before serving.

While the cakes are baking, make the caramel sauce:

For the caramel sauce (two ways!)

  • 1/3 c coconut oil
  • 1/2 c unsalted, creamy almond butter
  • 1/3 c pure maple syrup
  • 1/2 tsp sea salt
  • 1 runneth-over tsp vanilla extract
  • scant 1/4 c dark chocolate chips

In a small saucepan over medium, heat coconut oil, almond butter, maple, and sea salt over medium until all are melted and incorporated. This shouldn’t take more than a minute or two, which is excellent for instant gratification. Turn off the heat and stir in vanilla. Pour half the warm caramel into a heat-safe jar, and stir the chocolate chips into the remaining half still in the saucepan. They should melt as you stir, but you can turn the heat back on if necessary to melt them completely. Store the chocolate caramel in a separate jar. Serve warm or cold.

For assembly! The best part.

  • 1 can full-fat coconut milk, refrigerated overnight
  • 1 tsp vanilla
  • copious amounts of strawberries

Open the refrigerated can of coconut milk, and scrape out the solid cream into a large bowl. With an electric mixer, beat until smooth, then beat in vanilla.

Serve shortcakes sliced in half (to maximize cake square footage), topped with coconut cream, strawberries, caramel drizzle, and extra ice cream. Because, ice cream! Obviously. Also makes excellent breakfast, sans ice cream (or not, you do you!) Store any leftover shortcakes covered on the counter overnight or in the fridge.

Come to the Dark Side… I have pie.

img_5622

Pie! Such a perfect food. Especially when it resembles… the Death Star! Because why have plain pie when you could show off your nerdiness to the world? I almost didn’t want to eat this… but I did.

img_5610

Pie crust used to intimidate me, which is pretty stupid given that it’s basically just flour and water and butter… yet I think sometimes the simplest things end up being the trickiest (in life and in baking!). But pie is also a fairly forgiving food, and will love you endlessly if you learn to make it with the confidence it deserves.

img_5611

I think I’m finally at that point — this one felt great! I am quite pleased with the way it came out both in looks and taste… the sci-fi nerd is strong in me ;) I think the key with pie crust is not to let on that it makes you nervous! It can probably sense that, ha! Maybe with its pie crust force powers…

img_5609

Thank goodness pie is so delicious – it makes all the potential crust shenanigans worthwhile.

img_5607

In other news, another drawing for the series!

img_5603

Anndddd…. the first skiing of the season! Wheeeee!!! And what great skiing it was. More to come, that’s for sure.

img_1810-2

img_5593

img_5592

But for now, pie. Because often the simplest things in life are the most enjoyable, especially leftover pie for breakfast in good company! Nothing better.

img_5617

Wild Blueberry Pie with Whole Wheat Dark Side Crust

Refined sugar free and whole wheat! Naturally sweetened with coconut sugar. Crust recipe yields a double crusted pie, enough for a Death Star of your own making if you so choose. Crust recipe lightly adapted from Carolyn McCuaig (thanks Carolyn, if you’re reading this!)

img_5616

For the crust:

  • 2.25 c whole wheat pastry flour
  • 2 tbsp coconut sugar
  • 1/4 tsp fine sea salt
  • 1/2 tsp baking powder
  • zest of one lemon
  • 1/3 c vegetable shortening
  • 1/3 c butter (mine was salted), cut into chunks
  • 5-7 tbsp ice water

For the filling:

  • 4 c wild blueberries, or enough to heapingly fill your pie plate (frozen is fine)
  • juice of one lemon
  • 1/4 c coconut sugar
  • 1/3 c whole wheat pastry flour

For finishing: 1-2 tbsp butter, 1 egg for egg wash

To make the crust: in a large bowl, whisk together pastry flour, coconut sugar, salt, baking powder, and lemon zest. Cut in shortening and butter either with your fingers or a pastry cutter until a coarse mixture forms and the butter chunks are the size of peas. Make a well in the center of the dough and add in the ice water one tablespoon at a time – mix as little as possible when incorporating the water to avoid overworking the dough. Once it will stick together, you’re good to go. Divide it into two even pieces, wrap in plastic wrap and chill for at least 10 minutes and up to an hour.

While the dough is chilling, put together the filling. Toss blueberries, lemon juice, coconut sugar and flour in a large bowl.

Once the dough is chilled, roll it out between two pieces of parchment or on marble, whatever you have – I like parchment for easy removal. Aim for about 1/8″ thickness, and lay the bottom crust into a lightly greased pie dish. Shape it with your fingers, evening out the top as per your pie plate or design you want — this crust will make a double crusted pie, so keep that in mind. Toss in blueberry filling goodness and dot with butter.

If you want to get fancy and do the Death Star…

Cut out templates (thick paper or thin cardboard work nicely) for the Death Star and a TIE fighter. Have egg wash and coconut sugar handy (I use a beaten egg + 1 tbsp water). Use the templates to cut out the top crust shape, then use a chopstick or a knife to make the surface lines. Roll out thin pieces of dough for the details, and brush everything with egg wash to make it stick. Sprinkle coconut sugar where contrast is desired. Once finished, carefully lay top crust over the blueberry filling — there is no real need to seal the edges. Bake at 450 for 10 minutes, then 350 for 35-40 until the filling is bubbling and the crust is golden brown. Remove from the oven when done and let sit to cool for at least an hour, preferably more so that the filling will set. Serve warm or at room temp, and store any leftovers overnight on the counter, loosely covered, or in the fridge for longer (assuming it lasts that long). Pie can be made a day in advance if needed and reheated briefly in a 375 oven to crisp the crust and warm the filling – 10/15 minutes. The pie filling will firm up if stored in the fridge overnight, making slicing easier.

img_5613

Ode to Cake

Happy Eater! I mean… Easter.

IMG_4035

IMG_4033

And yes. I have absolutely no excuse for the dearth of posts, minus the fact that grad school owns my life for another 10 weeks (how is it possible that I graduate in 10 weeks… can someone explain this?!). At which point I will hopefully get back to posting on a semi-regular basis… Until then…. we’ll just see. But I’ve missed my invisible internet friends! I hope you’re all doing just wonderfully.

IMG_4030

To tide us over, here is an ode to cake. This is the same whole wheat banana cake with dark chocolate ganache that I’ve made umpteen billion times because it’s basically the most perfect banana cake I know. It’s not vegan, or grain free or even gluten free, but for what it is, I love it. It’s also large enough to feed a crowd, which was called for in this particular sitch.

IMG_4032

IMG_4036

IMG_4038

I’ve made this for birthdays of loved ones, thank you-s for advisors, and welcome home presents for besties. It’s a winner: silky chocolate ganache surrounding soft, not too sweet, not too dense but just dense enough banana cake. This particular iteration is refined sugar free, sweetened with a combination of date sugar and coconut sugar. Perfect for a mid afternoon Easter treat, no post-cake nap necessary. The link to the original post is here.

IMG_4037

In other news…

Sunbathing adorable Jessie.

IMG_3999

Flowers.

IMG_4024

Perfect avo.

IMG_3942

It’s good to be back! Enjoy the rest of your weekend — I hope it has a treat in it somewhere!

IMG_4031

IMG_4034

Bring on the avalanche of holiday baking

IMG_3572

SO!

IMG_3573

Holiday baking because NO MORE FINALS, wheeeeee!!!!! I literally don’t know what to do with myself. I constantly have this feeling that there is something I need to be doing, or turning in, or preparing for… or wait. NO. I’m done!

IMG_3574

So brownies! Also because work potluck + holiday season called for dessert. But of course I had to put my own spin on them, so they are whole wheat and made with unrefined sugar (sucanat! It’s making a resurgence in my baked goods because there happened to be some left in the pantry… end of finals = dislike of expending extra effort on anything except maybe jazzercise…which also includes going to the store and swimming upstream though the holiday masses. No thanks, unless I’m out of something I absolutely can’t live without)

IMG_3588

These brownies are spectac! We already know I’m ludicrously picky about brownies but these totally make the cut. Dense, fudgy but with a crackly crust, chewy edges, chunks of chocolate… all things a brownie should be. And the port soaked dates are just fun and festive — I don’t NOT drink but I don’t drink either, as most of you know, but I will occasionally have a glass of good port if it’s on offer, and it is literally amazing in brownies.

IMG_3589

One final doodle to usher in your weekend. Happy Saturday!

IMG_3571

Fudgy Whole Wheat Brownies with Port Soaked Dates

Fudgy, dense, dark and deeply chocolatey. Because who doesn’t want a little death by chocolate now and then? The port soaked dates add a little extra je ne sais quoi. Whole wheat, {less} refined sugar… and good for your soul around this time of year. Adapted from the awesome blog Sis. Boom. [Blog!], here! Yield: 1 8 by 8 pan, so somewhere between 9 and 36 brownies, depending on how much death by chocolate you want.

IMG_3575

  • 3 tbsp good port
  • 1 tbsp water
  • 1/2 c chopped dates
  • 5 tbsp salted butter, cut into smallish chunks
  • 6 oz extra dark chocolate, chopped (I used chips for ease; 73%)
  • slightly heaping 1/2 c sucanat (or coconut sugar)
  • 2 eggs, cold
  • scant 1/4 tsp fine sea salt
  • 1/3 c whole wheat pastry flour
  • 4 oz extra dark chocolate chips (again, 73%)

Preheat the oven to 325, and line an 8 by 8 pan with foil. Butter the foil (trust me. you think you can skip this, and be lazy like me, but don’t do it. consider yourself warned).

In a small saucepan, combine port and water and bring to just boiling, add dates, and cook until most of the liquid has evaporated and the dates are soft (just a few minutes). Set aside. In a double boiler, melt butter and 6 oz of chocolate until the chocolate is just melted, then remove from heat and stir to fully incorporate (the butter should also be fully melted by the time you finish stirring).

Whisk in sugar until fully incorporated (the batter will look a little gritty and that’s okay), then each egg one at a time, stirring until the batter looks glossy. Stir in salt.

Transfer to a larger bowl if your double boiler is small like mine, then carefully whisk in the flour until just barely incorporated. Toss in 4 oz of dark chocolate chips + port soaked dates + any port left in the pan, and stir together. Scrape batter into prepared pan, and bake for 35 minutes. A tester should come out just barely clean and the top will be shiny.

Let cool for a few minutes in the pan, then grab the foil and lift the whole thing out onto a cooling rack to cool completely. Slice and serve! Keeps well over night on the counter back in the original pan, covered with foil.

IMG_3586
Matching socks are overrated.

Any excuse for a cake

IMG_2588

So! Fourth of July! Always fun in the dessert department, because who doesn’t love an excuse for a celebration-type of dessert. And hold the phone, is it possible that I put something up here that isn’t a bar?! …. *pin drops* No. can’t be.

But it is!

IMG_2587

Shocking.

A CAKE! And a layered one at that, because really, if you’re going to make a cake, why not go big?

IMG_2582

And despite it giving me much grief in the assembly (hot weather and butter-based icing are not really the best of friends), it did turn out rather pretty— Props to E’s mom Jana for the cute little flags! This is a pretty simple cake to put together as well, as the lemon curd can be made ahead of time, and the buttercream comes together in about five seconds.

IMG_2580

IMG_2579

This is the first time I’ve made a fun dessert in quite a while… as I mentioned before a few posts back, I’ve been having quite the run of stomach issues lately, and have been attempting to figure out why my digestive system seems to hate me so much of late. Rude. Still no concrete answers, sigh… but one day at a time. I’ve been experimenting with reduced / no gluten,  though the jury is still out on that one. Well actually, jury is still out, period. So, cake. Because I don’t seem to feel much worse when I do eat it, and it was the Fourth! Celebrations should ensue.

IMG_2578

Apologies for the huge gaps between my posts these days… life has been crazy the last few months and isn’t really getting much calmer (in fact, I start grad school in less than a month, so I don’t expect to be able to keep regular posts coming. We’ll see how things shake out!) E and I move in to our apartment the first week of September, so maybe after that things will get a little more normal. We’ll see, nothing is ever normal around here (because normal = boring. ha)

IMG_2585

Whole Wheat Lemon Cake with Lemon Curd and Vanilla Buttercream

Whole grains, healthy fats, and CAKE. Winner, winner. A lightly sweet, lightly lemony cake is complemented by a rich but not too decadent vanilla buttercream, and tart homemade lemon curd. The cake itself is refined sugar free, but there is powdered sugar in the frosting. If you have the time, definitely make homemade lemon curd. It is eons better than the stuff you can buy in the store, and about ten zillion times cheaper. Yield: a 2 layer, 9″ cake + enough buttercream for the filling and the top. I preferred a naked cake look for this one, as it was hot and nobody really wants a mega glut of frosting when it’s over 90 outside… the cake is light but very satisfying, and doesn’t make you feel like you need a nap afterwards! Cake adapted from I Bake, He Shoots, here!

IMG_2576

For the cake:

  • 2.5 c + 4 tbsp whole wheat pastry flour
  • 1/2 tsp baking soda
  • 1.5 tsp baking powder
  • scant 1 tsp fine sea salt
  • 1 c coconut sugar, divided
  • 1 c avocado oil
  • 2 tsp vanilla extract
  • 2 eggs
  • 1.5 c buttermilk
  • 4 tbsp fresh lemon juice
  • zest of two medium/good-sized lemons

For the frosting:

  • 1 stick of salted butter
  • 2 c powdered sugar
  • 1 tsp vanilla extract
  • 2 tbsp lemon curd

Lemon curd is the same recipe I used about three years ago (but with regular lemons instead of meyer this time); my recipe is here. Yield is about 1-1.5 c. You won’t use it all for the cake, unless you use the extra to top the individual slices. I used some in the buttercream, and some on the top. I suggest making it the day before, and just letting it hang out in a jar in the fridge overnight.

Raspberries, for garnish.

For the cake: preheat the oven to 325, and lightly grease+flour two 9″ cake pans.

In a medium bowl, whisk together whole wheat flour, baking soda, and sea salt. Set aside.

In a smaller bowl, mash together the lemon zest and 2 tbsp coconut sugar, until fragrant. Set aside. In a large bowl, use an electric mixer to combine remaining sugar, avocado oil, and eggs. Beat until lighter (though because of the coconut sugar, it won’t significantly lighten) and fluffy, about 4-5 minutes. Add in lemon zest + sugar mixture. Combine buttermilk, vanilla, and lemon juice (I like using a liquid measure for easy pouring). Alternating dry ingredients and wet, add them to the larger bowl with the sugar/oil/eggs, starting and ending with flour. Do not overmix. Pour the batter into the prepared pans, and bake for 30-35 minutes—the tops should spring back when touched lightly, and a tester should come out clean.

Let cool in the pans for 10 minutes before turning out onto a cooling rack to cool completely.

For the buttercream:

In a large bowl, use an electric mixer to beat softened butter, powdered sugar, and vanilla until smooth. Add in 2 tbsp of lemon curd, and beat briefly to combine.

Frost the cooled cake as desired — I did a layer of buttercream/curd in the center, and topped the cake with the majority of the buttercream + another layer of lemon curd. Be careful of the cake sliding — my kitchen was hot so I ended up skewering the cake for transport, and letting it set up in the fridge for several hours prior to serving. Garnish with raspberries or another berry of your choice! Serve with extra lemon curd, because it’s basically the food of the gods..

Store covered cake in the fridge, assuming you have any leftovers!

IMG_2581

And then I ate a lot of brunch

IMG_1809

HAPPY NEW YEAR!

I have this feeling 2015 is going to be RAD.

IMG_1801

Because it is. Because 15 is a nicely odd number, and also… It just is. Rad!!!

Also, a ton of brunch was consumed in this house in the last 24 hours. And because New Years = brunch (along with cabbage+bacon, cornbread and black eyed peas for good luck, natch… to be consumed in several hours), I thought I would do sharezies with my fave waffle recipe and the uuuuhhmaaazing brownies E and I made and ate to celebrate.

IMG_1800

IMG_1811

IMG_1810

I had a fab New Years! E and I did exactly what we wanted to, which was a lot of nothing. And eating. Like tortilla pizzas and brownies and ice cream! And we fell asleep at 10:30, sorry we’re not sorry. AND made brownies. Which were spectacular. And were devoured under a massive pile of Strauss ice cream because it is essentially the best thing ever and also I can’t buy it because if I do, I go through the pint like a beast.

IMG_1816

IMG_1820

SO anyway. I don’t make resolutions for the new year, but I hereby declare that this one is going to be sparkly and glittery and fabulous and rad. All at the same time. Happy 2015!

IMG_1805

IMG_1812

Let’s ring in the New Year properly, shall we? Recipes for New Year’s healthified indulgences:

IMG_1813

Whole Wheat Waffles

Lightly sweet waffles made completely with whole wheat flour and barely any oil for a healthier take on a typical brunch staple (because HELLO who doesn’t love waffles?!). These are perfect with an apple blueberry compote, or some other kind of fruit. I prefer them with almond butter or salted butter and fruit compote and pure maple syrup, but I think these could easily go a savory route with some egg and cheese? Probs. Maybe that will be dinner later this week…
Recipe adapted from Eating Well, here. Yield is about 6 or 7 in my round waffle maker. Whole grain and vegetarian.

  •  2 c whole wheat pastry flour
  • 1.5 tsp baking powder
  • 1/4 tsp baking soda
  • 1/2 tsp fine sea salt
  • 2 c lowfat buttermilk
  • 1 large egg, separated
  • 1 tbsp avocado oil
  • 1 tbsp vanilla extract
  • 2 egg whites

In a large bowl, whisk together whole wheat flour, baking powder, baking soda, and salt. In a smaller bowl, whisk together buttermilk, egg yolk, avo oil, and vanilla. Stir wet into dry until just incorporated. In a grease-free mixing bowl (I always use stainless for this), beat the three egg whites until stiff and glossy. Whisk 1/4 of the beaten egg whites into the batter, then fold in the rest using a rubber spatula. Ladle the appropriate amount of batter into your waffle iron, according to the mandates of your specific waffle iron god, and cook accordingly. These come out of mine perfectly at 6 minutes. Store them temporarily in a warming drawer in a single layer on a cooling rack to prevent them from getting soggy if you’re not eating them immediately.

IMG_1814

 Deep, Dark, Flourless Brownies

Grain free, flour free, refined sugar free, and FULL OF CHOCOLATE. Basically, these are all you need. I like my brownies just this side of fudgy, with a crackly top and a salty bite. I also prefer mine dark and full of chocolate, instead of overly sweet. So… if dark chocolate is your thing… you need these. Immediately.
Recipe adapted from Running With Spoons, here!

  • 6 tbsp coconut oil
  • 4 oz extra dark chocolate [mine was 77%]
  • 2 oz dark chocolate [mine was 63%]
  • 2 eggs
  • 1/4 c coconut sugar, NOT packed
  • 2 tsp vanilla extract
  • 1/4 c unsweetened cocoa powder
  • 3 tbsp arrowroot starch
  • 1/4 tsp fine sea salt
  • a handful of extra dark chocolate chips

Preheat the oven to 350, and line an 8 by 8 pan with foil, leaving extra hanging over two sides of the pan for easy removal.

In a saucepan over med-low, melt coconut oil+extra dark chocolate+dark chocolate until smooth, stirring occasionally (you can also do this in the microwave, stirring at 30 sec intervals if you are feeling supremely lazy). In a biggish bowl, use an electric mixer to beat the eggs, coconut sugar, and vanilla until pale and smooth, about 2 minutes. After that’s all good, beat in the coconut oil-chocolate goodness until incorporated. In a small bowl, combine cocoa powder, arrowroot powder, and sea salt; then slowly use the mixer to beat that into the rest of the mix. Don’t overmix, just make sure there aren’t any pockets of cocoa powder. The batter should be thick and smooth. Stir in the extra chocolate chips. Spread the batter into the prepared pan, and bake for just about 25 minutes, until a tester comes out clean [mine was perfect at 25]. Let cool in the pan for about 10 minutes, then use the foil to lift them out to a cooling rack to cool completely. Or serve them warm with ice cream and eat immediately, for a happy gastronomical moment {I highly recommend this}. Store leftovers (WHAT leftovers?!) covered in foil at room temp.

IMG_1818

IMG_1803