Nature’s ombré: blood oranges!

fullsizeoutput_14aa

Happy spring! I really can’t believe it’s almost April.

fullsizeoutput_14af

IMG_2745

Aside from my car blowing a tire on the bridge in the pouring rain (why is it that car trouble always comes in multiples?), things are pretty spring-like over here, especially today – the weather is cool, sunny and beautiful.

fullsizeoutput_14bb

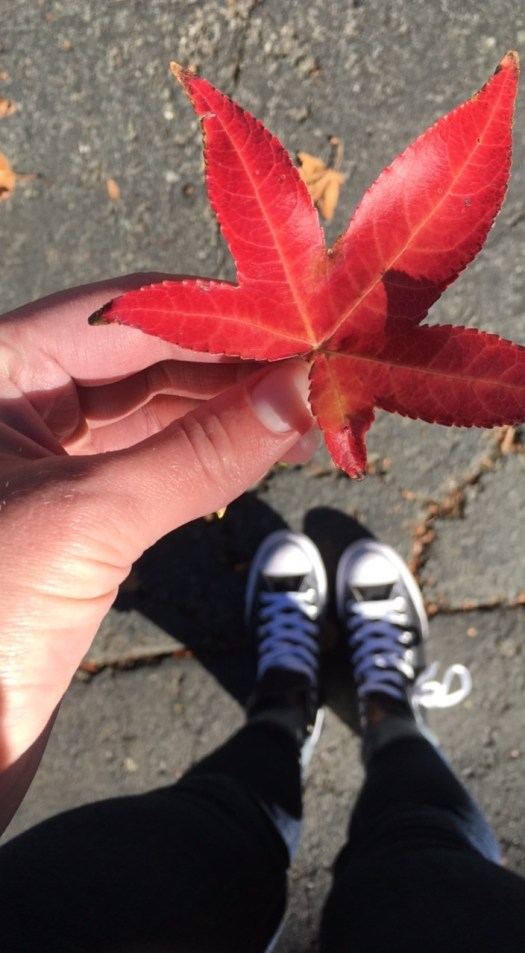
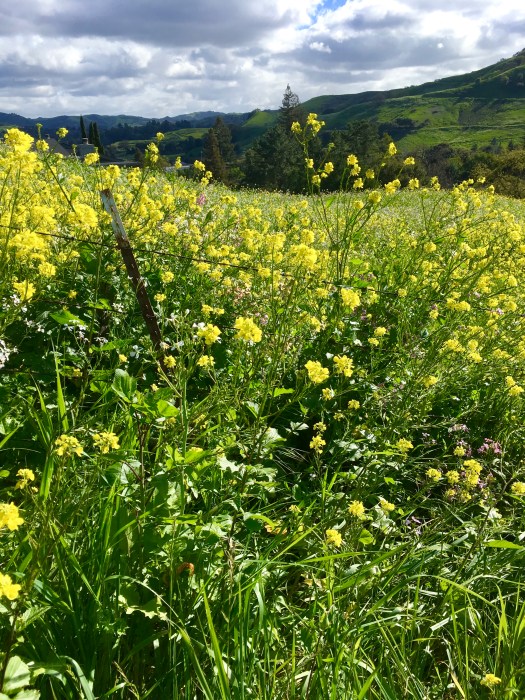
We got in a great ridge hike yesterday, despite some really aggressive ridge top wind; the clouds were beautiful and we only got hit with a bit of light drizzle. The colors of everything were so gorgeous – not sure my photos do it justice!

fullsizeoutput_14c2

fullsizeoutput_14c7

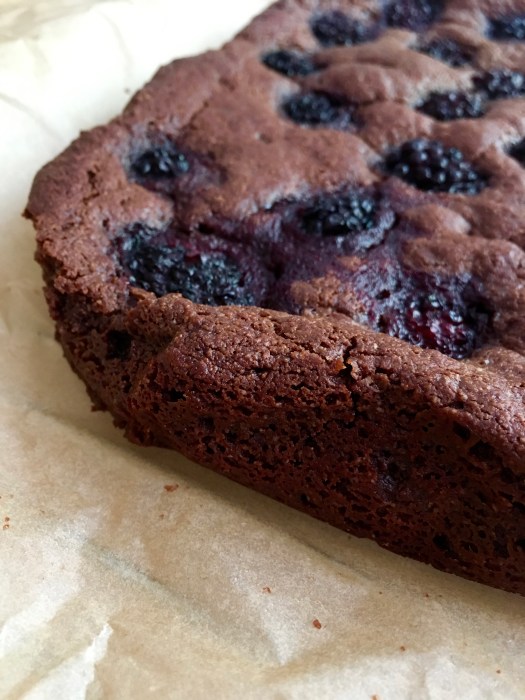
What a great weekend – quality time with fave human, hiking & healthy dessert! And pizza. Because, well, because pizza! Ha. Everything in moderation, including moderation.

fullsizeoutput_14ae

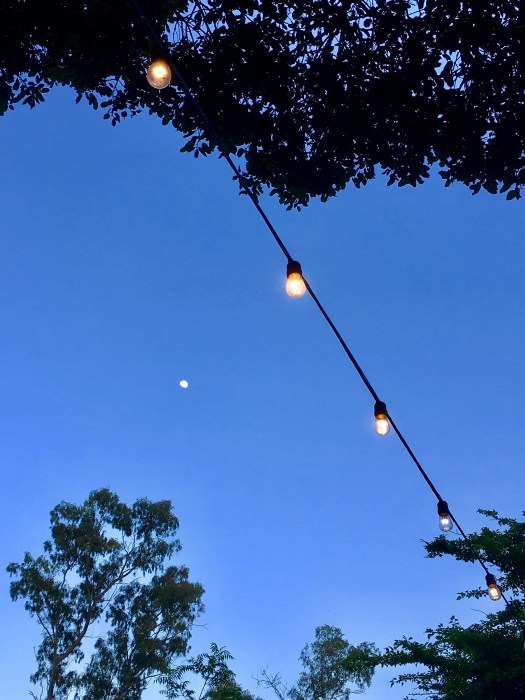
In other news, the skies have been beautiful lately.

fullsizeoutput_1482

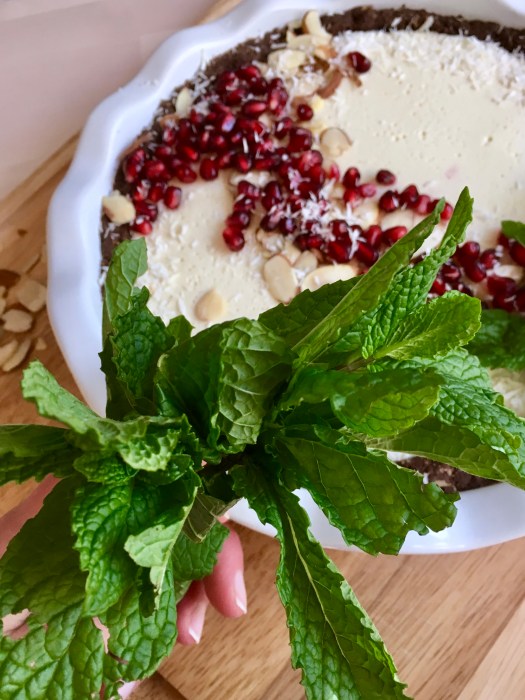
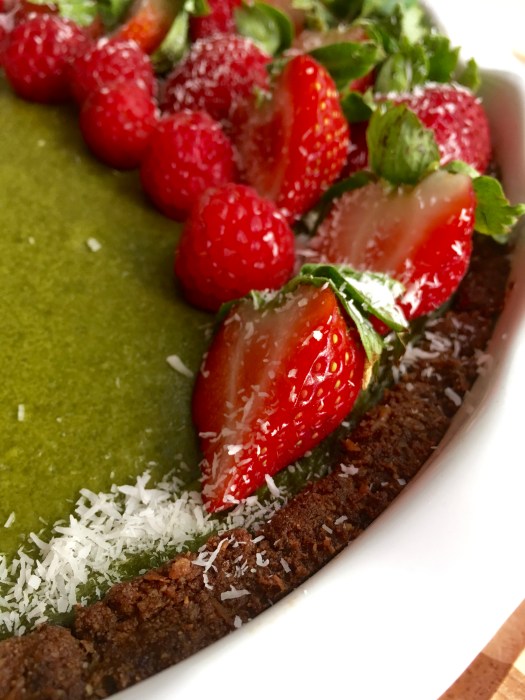
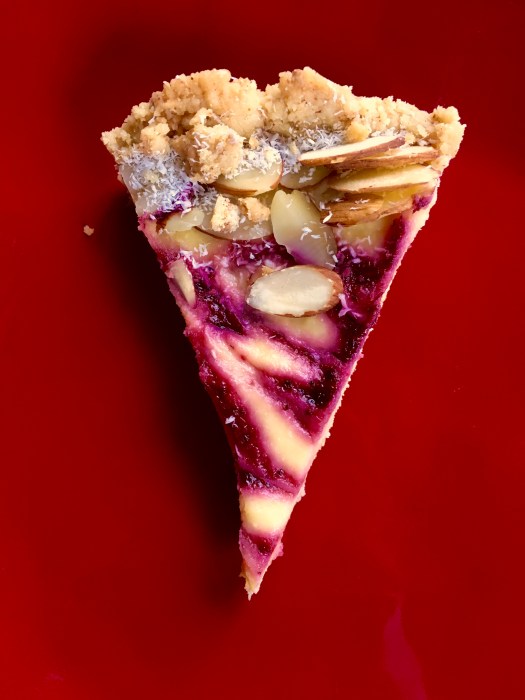
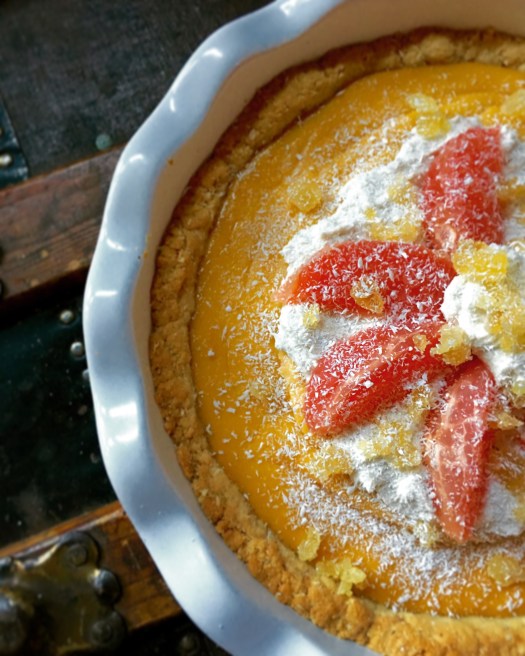
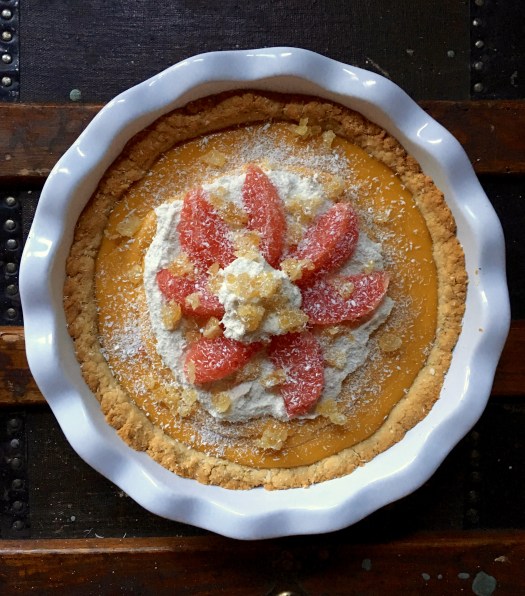
I have a very spring-y dessert for you today – our consensus was that this is a light, spring-like, mellow-in-a-good-way dessert – it certainly disappeared quickly over here!

fullsizeoutput_14ca

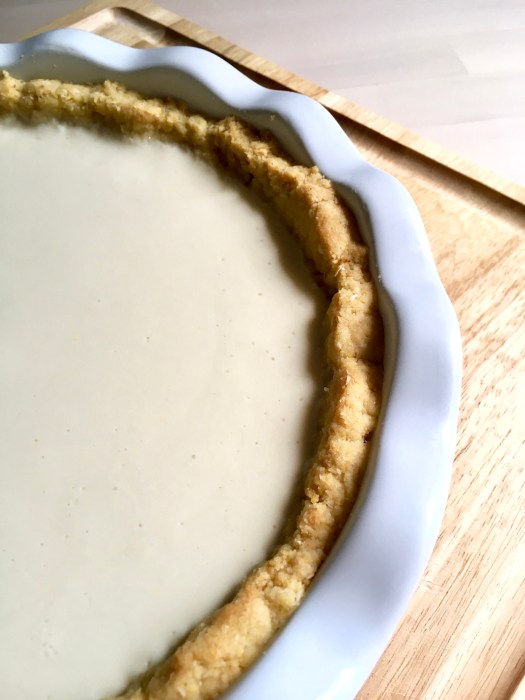
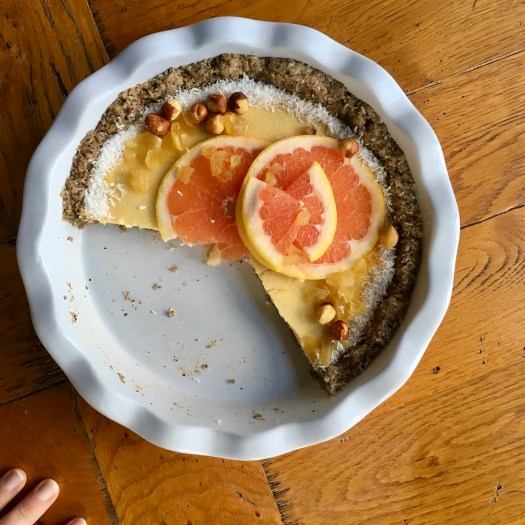
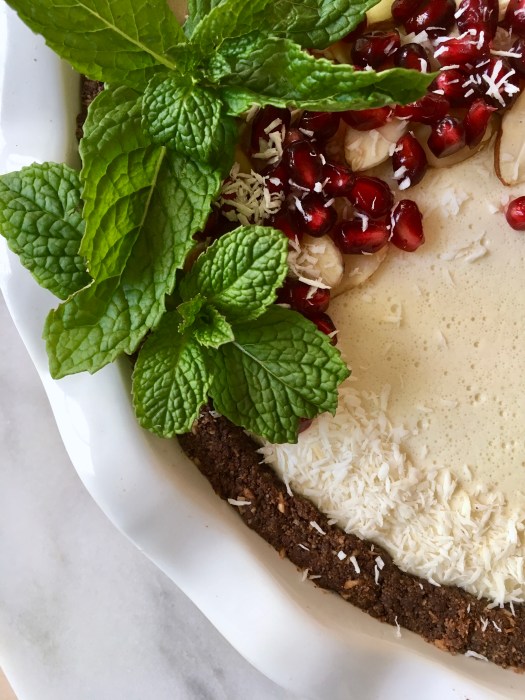
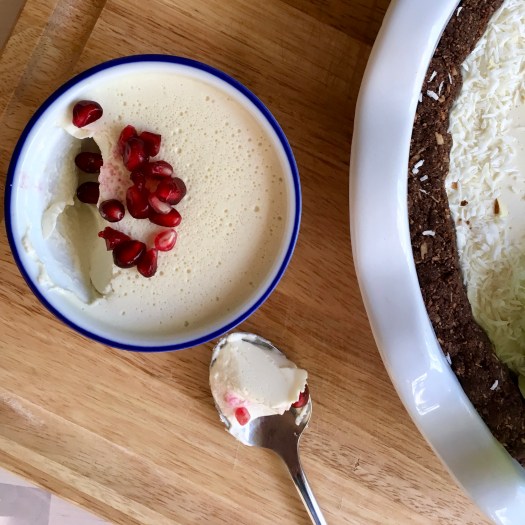
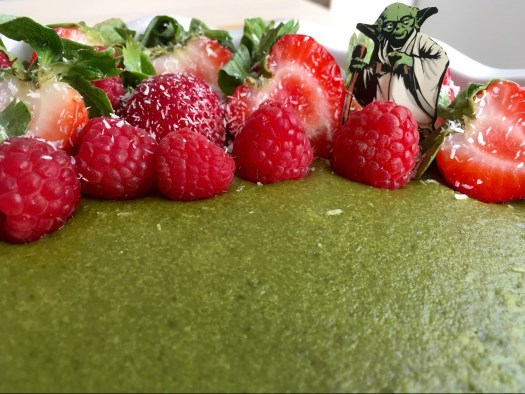
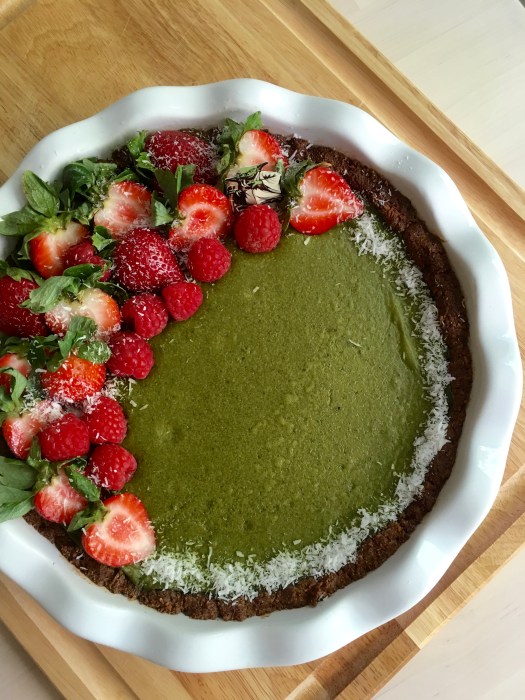
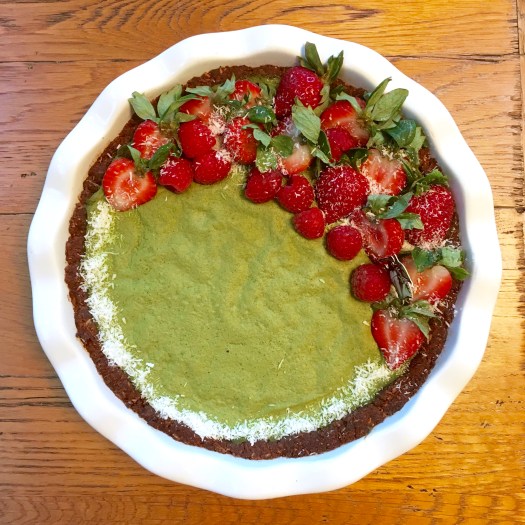
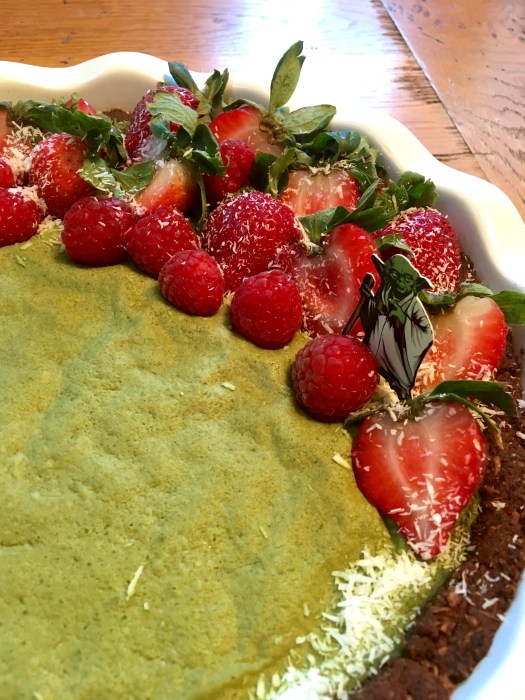
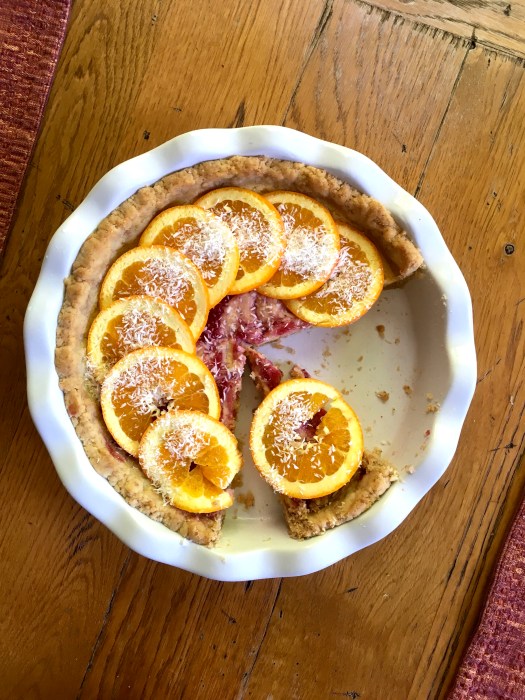
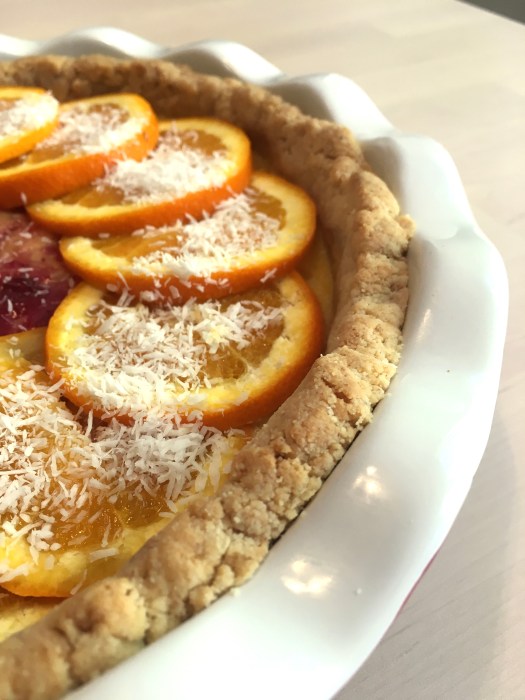
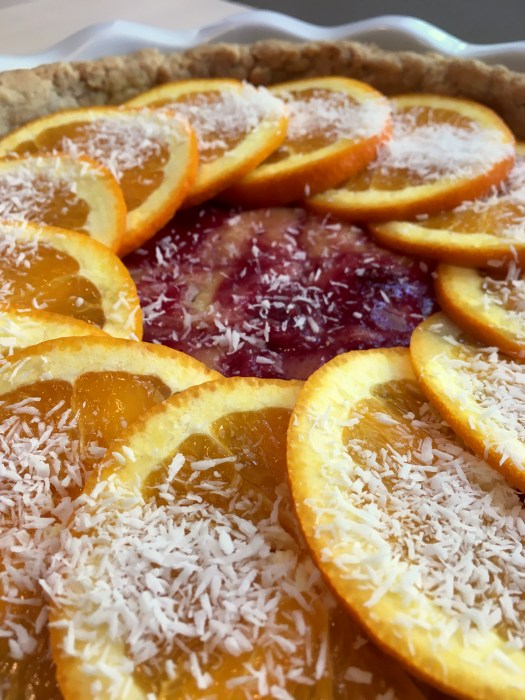
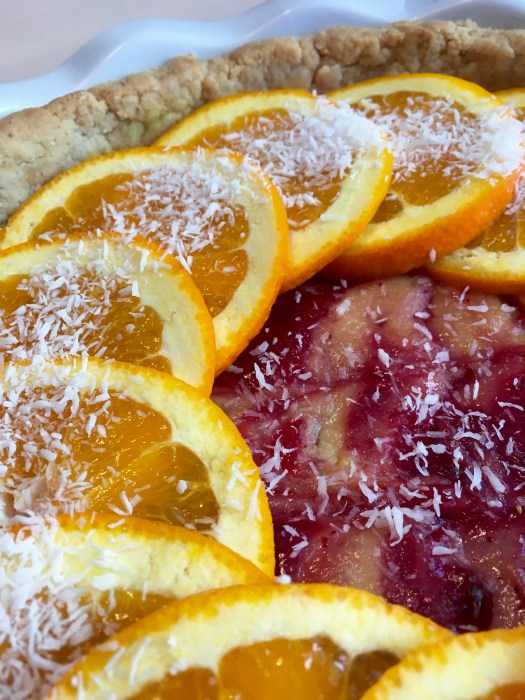
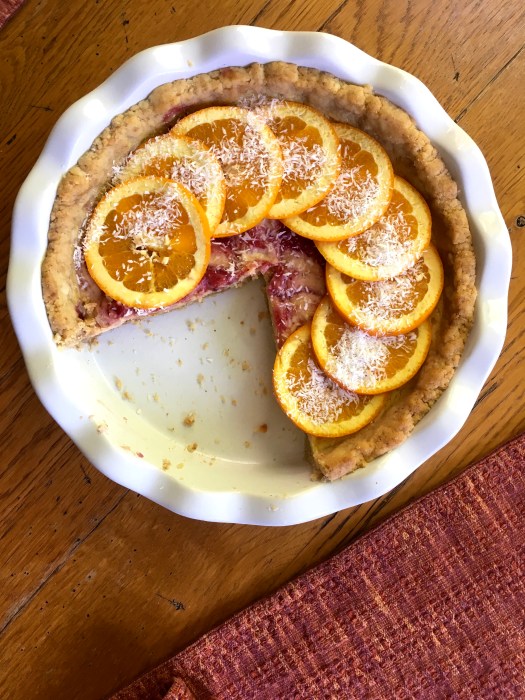
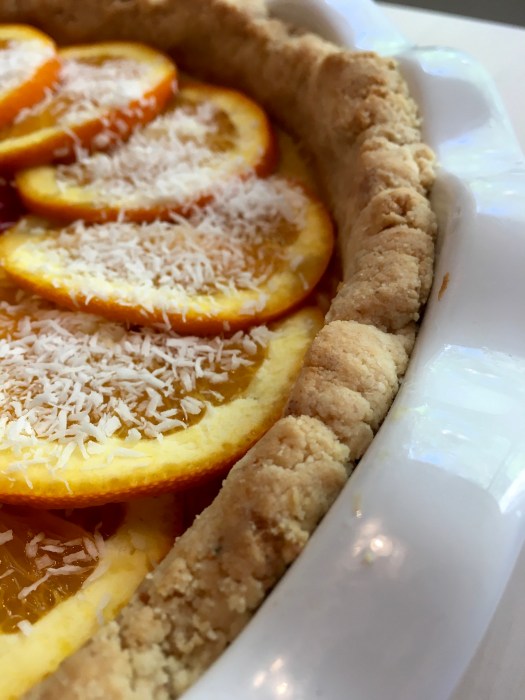
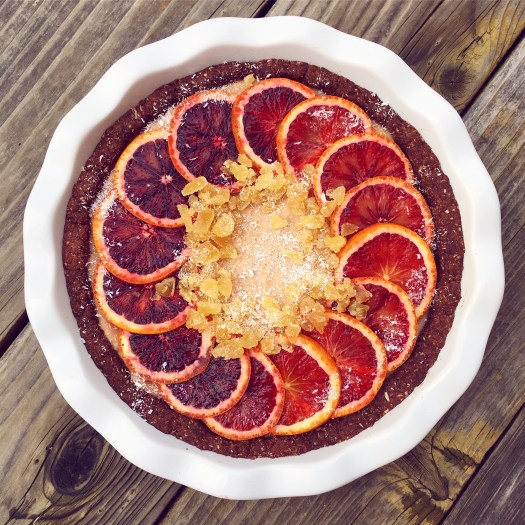
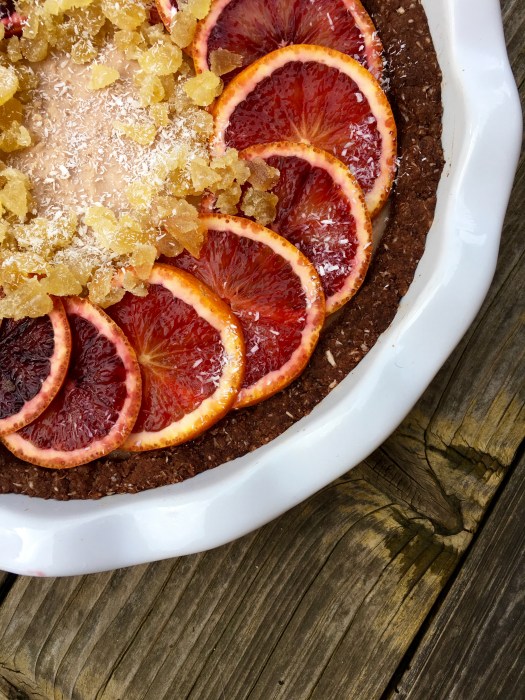
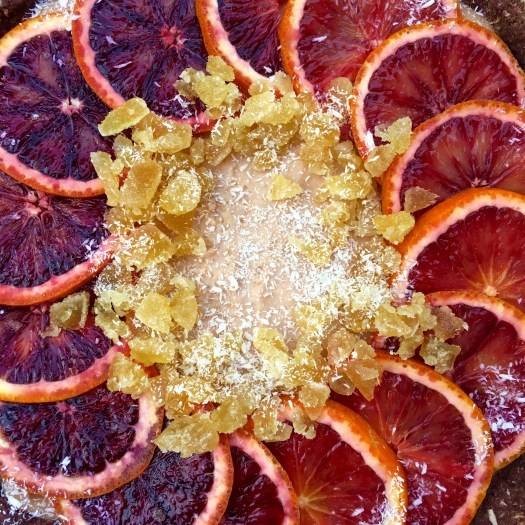
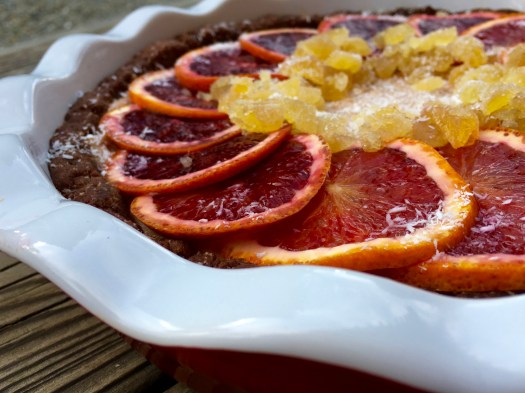
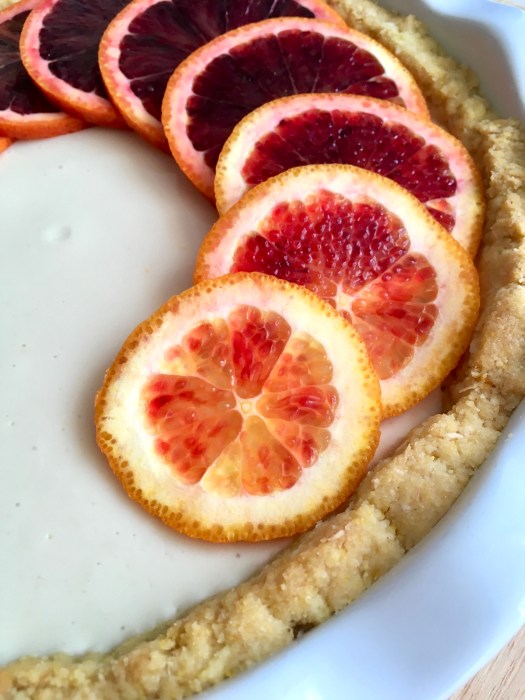
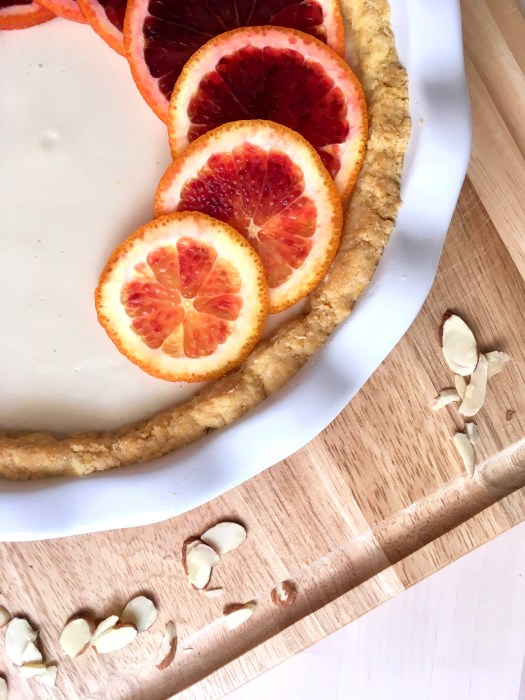
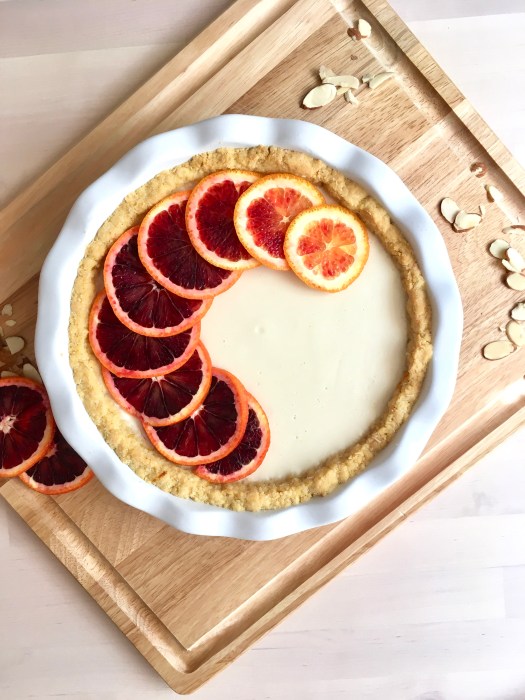
The panna cotta is very lightly citrusy, which plays nicely against the cornmeal & meyer lemon crust. Cornmeal is an easy sell with both of us, so no complaints there (except for some extra flossing). We ended up serving this with extra sliced citrus – both of us are really into tart things, but it’s also great on its own. I’d say that I like it with ice cream (because we know I love ice cream in general), but it’s not absolutely necessary, and could easily overwhelm the delicate panna cotta – in which case I’d say to skip it, just this once.

fullsizeoutput_14b4

This is a dessert that sounds complicated but comes together super quickly and requires minimal baking time. The only consideration is allowing enough time to let the gelatin set, but that’s just a small bit of planning ahead – I like to make this the night before and let it set overnight.

fullsizeoutput_14b8

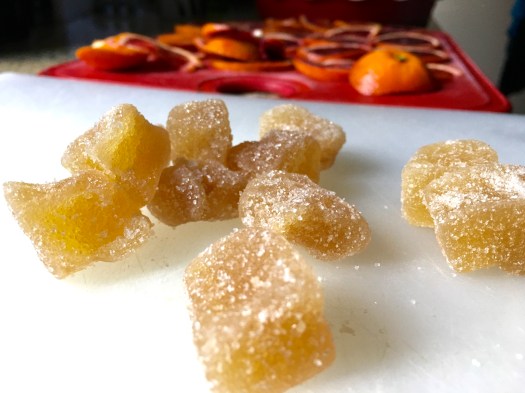
Happy spring baking! Get on those blood oranges before they disappear!

fullsizeoutput_14cc

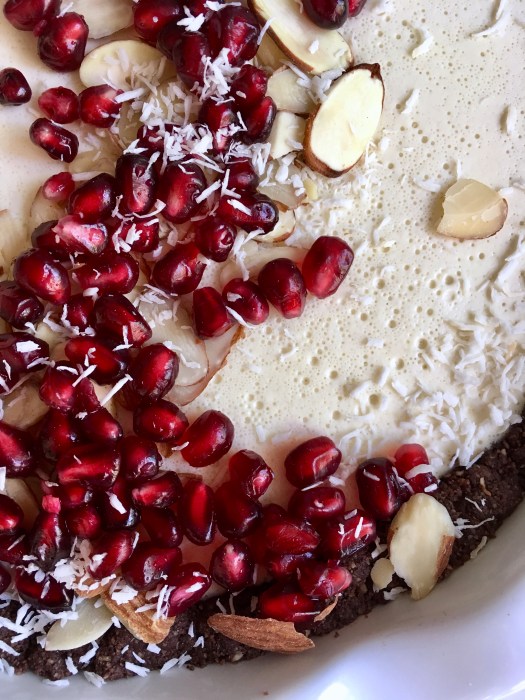
Citrus Panna Cotta Tart on a Cornmeal Lemon Coconut Crust

Gluten free and refined sugar free. Definitely could be done with coconut milk and dairy free yogurt for a df version! To me, this has the flavor essence of a creamsicle or a 50/50 bar, only lightyears better and not full of processed nastiness. Despite sounding complicated, this comes together quickly & easily, and can be made the night before. Yield: 1 9″ tart, serves several! A Wait are those Cookies original.

fullsizeoutput_14b6

For the crust:

1.5 c almond flour
1/4 c unsweetened shredded coconut
1/2 c cornmeal
heaping 1/4 tsp sea salt
1/2 tsp baking soda
2 tsp vanilla extract
2 tbsp pure maple syrup
6 tbsp coconut oil, melted
zest of 2 small meyer lemons (or 1 large)

In a large bowl, stir together almond flour, shredded coconut, cornmeal, sea salt, and baking soda. Add in vanilla, maple, melted coconut oil, and lemon zest, and stir until completely combined. The dough will look crumbly, but you’ll be able to press it together with your fingers.
Preheat the oven to 350, and lightly grease a pie plate with coconut oil. Press the crust into the plate and up the sides with a spoon or your fingers, creating a smooth edge (or not, your call!). Poke the bottom with a fork a few times, and bake for 15 minutes. Remove and let cool for a few minutes.

Panna Cotta:
1 package unflavored powdered gelatin
3/4 cups whole milk, divided
2 tsp vanilla
Scant 1/4 cup maple
zest of two oranges
zest of 1 meyer lemon
1 cup plain whole-milk yogurt

In a small bowl, sprinkle the gelatin over 1/4 cup of the milk. Let stand without stirring until the gelatin is moistened, about 10 minutes.

Pour the remaining 1/2 cup milk into a small saucepan. Add vanilla, maple & zest into the milk. Bring to a simmer over medium heat, stirring consistently. Remove from the heat. Add the gelatin mixture and stir until completely dissolved, about 3 minutes. Strain into a large bowl to remove the citrus zest and cool until lukewarm, about 5 minutes. Whisk in the yogurt until well blended. Pour the panna cotta mixture into the cooled tart shell. Place in the refrigerator until set, approximately 4 hours or, better yet, overnight.

fullsizeoutput_14b9

fullsizeoutput_14ab

{Citrus} Zest for life

IMG_2650

I do love California’s winter citrus season.

fullsizeoutput_1416

Doesn’t seem to matter which kind of citrus – though I think grapefruit and meyer lemon are tied for first for me. Especially when it’s grey out (which really doesn’t bother me in the slightest), I love baking with citrus: it smells like sunshine!

fullsizeoutput_141b

I’ve done a grapefruit tart on the blog before (several times, actually!) but never paired it with hazelnut, which I’m finding is an excellent combination.

fullsizeoutput_141e

As per usual, this tart does double duty for dessert paired with ice cream or for breakfast alongside the usual fare, and coffee, obviously.

fullsizeoutput_142a

fullsizeoutput_1428

I like versatile baked things! Life is more fun when you can eat them for breakfast, preferably in good company on a lazy weekend morning.

fullsizeoutput_141d

Let’s see, life things lately…

IMG_2595

My car needed a new distributor (you may recall my interesting adventure with a freeway onramp from my last post), but I have it back now, so that’s all fine and dandy. The sky has been doing some crazy things lately, but I’ve been loving the rainy weather, and heaven knows we need it! Maybe maybe I can squeeze in at least one ski day before the end of the season… fingers crossed.

fullsizeoutput_1424

fullsizeoutput_1425

In the meantime, I shall eat tart in the company of my fave human and be content, because that is what weekends are for.

fullsizeoutput_1418

Go find yourself some citrus and join me! You won’t be sorry, promise :)

fullsizeoutput_141a

Grapefruit Curd and Ginger Tart on a Hazelnut Coconut Crust

Tart but sweet, creamy and a perfect winter dessert when citrus really shines. Grain free, gluten free, refined sugar free, dairy free, pretty much paleo! A Wait are Those Cookies original. Yield: 1 9″ tart, serves 2-6!

For the crust:

1.5 c hazelnut meal
1/2 c unsweetened shredded coconut
heaping 1/4 tsp sea salt
1/2 tsp baking soda
2 tsp vanilla extract
2 tbsp pure maple syrup
3 tbsp coconut oil, melted

In a large bowl, stir together hazelnut meal, shredded coconut, sea salt, and baking soda. Add in vanilla, maple, and melted coconut oil, and stir until completely combined. The dough will look crumbly, but you’ll be able to press it together with your fingers.

Preheat the oven to 350, and press the mixture into the bottom and up the sides of a 9″ pie plate. Poke the bottom a few times with a fork, and bake for 10 minutes.

Maple Grapefruit Curd:

2 whole eggs
2 egg yolks
1/3 c grapefruit juice
zest of 2 grapefruits
pinch of sea salt
2 tbsp maple syrup
3.5 tbsp coconut oil
1 tsp vanilla

I use a double boiler for this curd, which literally is a game changer. Highly recommended! Heat water in the bottom of the double boiler until it’s at a high simmer. In the top of the double boiler, whisk together eggs, egg yolks, grapefruit zest and juice, sea salt, and maple syrup. Add in the coconut oil one tbsp at a time, whisking continuously, not adding the next tbsp until the first is completely melted. Whisk in vanilla. Cook, stirring constantly, until the curd thickens and will coat the back of a spoon (or your whisk leaves tracks) – usually around 5 to 8 minutes. It’s a noticeable change when it happens, so just watch the cooking magic! Remove from heat and strain through a mesh strainer into your glass/pyrex storage container. Keep in the fridge until ready to use – curd keeps for about a week.

Assembly:
1 packet gelatin (pref. grass fed)**
1/4 c meyer lemon or grapefruit juice, *cold (refrigerated)
1 grapefruit, sliced
shredded coconut, candied ginger, hazelnuts, etc for topping

I stabilized the curd for this tart with gelatin, since I was a little suspicious of its structural integrity. To do so, since I’d already made the curd ahead of time, I needed to bring it back to a warm enough temperature to dissolve the gelatin. The following is what I did – if you’re making it all at once, no need to do as I did, just stir the softened gelatin into the already warm curd once it thickens.

In a small bowl, sprinkle 1 packet of gelatin over 1/4 c cold meyer lemon or grapefruit juice. Stir until incorporated and let sit for a minute. Once softened, stir into the warm curd, stirring until the gelatin is dissolved completely (give it 1-2 minutes of stirring). Pour the curd into the baked crust shell, and let cool for a few minutes on the counter before transferring to the fridge to cool completely – preferably overnight but at least 4 hours.

**If you prefer not to use gelatin, you could also set the curd by pouring it into the baked tart shell, and baking the whole thing at 350 for 8-10 minutes, then letting cool completely and refrigerating for at least 4 hours before serving. I prefer the gelatin method with this curd since it will set completely – the baked version might have more wobble / lose some structural integrity when sliced, but it’s a pretty solid second option.

Top with sliced grapefruit, hazelnuts, shredded coconut and candied ginger if desired. I prefer to chill mine in the fridge for at least two hours before serving.

Keeps well in the fridge covered overnight, though it’s best eaten in 2-3 days.

fullsizeoutput_1422

fullsizeoutput_1415

Walking in a mint-ery wonderland

IMG_2111

Happy holidays!

fullsizeoutput_10e5

As much as certain elements of this time of year drive me bananas (having to throw elbows in the grocery store to retrieve the last piece of whatever, extra lines everywhere, no parking, where do all these extra people come from?!), I do undeniably love the run-up to the holidays.

Everything looks festive, even traffic light reflections in wet pavement. And of course I love the excuse to have a tiny conifer in my living room.

fullsizeoutput_10d5

Let’s not overlook holiday baking! Heaven forbid.

fullsizeoutput_10ae

Fun fact! This is actually a giant panna cotta tart. It didn’t really occur to me while I was making it – I was just thinking, la la la cream tart la la but then I got curious and did some googling. I had forgotten that cream stabilized with gelatin is technically panna cotta… so, there ya go! Panna cotta tart, if that’s even a thing.

This one is even grain and gluten free! I suppose you could make this with coconut milk to make it dairy free, but I haven’t tried that yet (next time!) – partially because I have a massive weakness for cream.

fullsizeoutput_10e6

Heavy cream reminds me of being a kid and pouring a bit over my cereal – my grandmother used to do this, and after my dad told me that, I always lurked around waiting for leftover cream to appear the fridge. As I recall, my favorite combination was a giant bowl of honey nut cheerios with about 3/4 milk and 1/4 cream.

fullsizeoutput_10e3

Now I’ve leveled up and adult-ed my cream: it gets baked into cream biscuits, set into a panna cotta tart, or poured into my coffee (omg heaven).

fullsizeoutput_10c5

I love this dessert though: it looks like a mini winter wonderland! Walking in a mint-er wonderland? Ha. And it’s delicious. It actually took a minute to grow on me, but then I couldn’t get enough. Minty, chocolatey & slightly tart from the yogurt-cream panna cotta, it’s a perfect holiday dessert when something light is called for. I couldn’t resist the pomegranate, both for flavor and texture, but also for color. They are always so pretty!

fullsizeoutput_10dd

fullsizeoutput_10d9

Happy holidays! Share this with loved ones, since it’s so much better enjoyed in good company :)

fullsizeoutput_10e9

fullsizeoutput_10b2

Mint Cream Tart on a Dark Chocolate Coconut Crust

Grain free, gluten free, refined sugar free! A perfect wintery dessert, especially since it even *looks* festive. You can even make the whole thing the night before, since gelatin-based things like to hang out in the fridge for awhile. Lightly minty, slightly tart from the yogurt, balanced nicely by dark chocolate. Who doesn’t love mint and chocolate?! This is really a giant panna cotta in a crust, if we want to get technical. Mint cream adapted from Martha Stewart, here; the rest is my brainchild. Yield: 1 9″ tart, serves… two ;) Kidding! 2-8, realistically.

For the crust:

1.75 c almond flour
1/3 c unsweetened cacao powder
1/4 c unsweetened shredded coconut
heaping 1/4 tsp sea salt
1/2 tsp baking soda
2 tsp vanilla extract
2 tbsp pure maple syrup
3.5 tbsp coconut oil, melted

Preheat the oven to 350, and lightly grease a 9″, deep pie plate with coconut oil. Alternatively, you could use a tart ring with a removable bottom – I needed to transport mine so opted for just keeping it in a less fussy dish.

In a large bowl, stir together almond flour, cacao powder, coconut, sea salt, and baking soda. Add in vanilla, maple, and melted coconut oil and stir until completely combined. The dough will look crumbly, but you’ll be able to press it together with your fingers.

Press the crust into the plate and up the sides with a spoon or your fingers, creating a smooth edge (or not, your call!). Poke the bottom with a fork a few times, and bake for 17 minutes.

For the filling:

2 cups heavy cream
1/4 cup maple sugar*
6 stems peppermint or spearmint, plus more for garnish
1 tsp vanilla extract
2 tsp peppermint extract
1/2 teaspoon fine sea salt
1/3 c dark chocolate, melted
1 tablespoon unflavored gelatin (one envelope)
1/2 cup cold water
1/2 cup whole milk greek yogurt, plain
pomegranate arils

*I use maple sugar here because it’s lighter in color than coconut or maple syrup, and I wanted to preserve the lightness of the cream filling. But any granulated sweetener would be fine, just keep in mind the filling color may darken.

Make the filling: Bring cream, sugar, mint, and salt to a simmer in a medium saucepan. Remove from heat, and let cool completely, about 30 minutes.

In a double boiler or in the microwave, heat the 1/3c dark chocolate until completely melted. I am lazy and use the microwave method: 30 second intervals, and stir in between until everything is melty. If you’re using a double boiler, stir continuously until the chocolate is melted.

With a pastry brush (or a spoon, totally fine – this is what I used), coat the bottom the crust with an even layer of melted chocolate. Refrigerate (or leave on the counter in your freezing apartment) until chocolate sets, about 10 minutes.

Sprinkle gelatin over water in a small bowl. Let stand until softened. Remove mint from cream mixture, and bring cream mixture to a simmer. Whisk in softened gelatin until it dissolves. Remove from heat, and stir in the yogurt. Pour filling into the prepared crust (if there’s leftover, pour it into a ramekin or two & save for later!) Carefully transfer to the refrigerator. Chill, uncovered, until set, at least 4 hours (or overnight). Garnish with mint stems, pomegranates, and sliced almonds if you’re feeling fancy. Slice and serve!

Chocolate dipped mint leaves are easy too: wash and pat dry nice-looking mint leaves, and dip in melted chocolate. Lay on a parchment lined baking sheet, and freeze until needed.

Keep leftovers covered in the fridge for a day or two.

fullsizeoutput_10df

fullsizeoutput_10dc

Cranberries – not just for sauce!

IMG_1788

Happy almost-Thanksgiving! Hard to believe it’s in less than a week. In keeping with the spirit of all things autumnal and holiday-ish, I bring you a cranberry curd tart! Perfect for dessert but also excellent for breakfast alongside eggs & kale.

IMG_1782

Besides, this color is amazing! Nature is really spectacular when you let her do her thing – no artificial coloring here, obviously!

IMG_1773

This tart is for those who love love love tart things! I really loved the crust – cornmeal and ginger are a match made in heaven.

IMG_1780

In other news, the leaves are gorgeous around here just now, and I move my plants around my apartment to follow the sun. They seem happy about it…

IMG_1739

IMG_1745

I don’t think I have too much more for you today; it’s a mellow Sunday and I’m contentedly chill today.

IMG_1749

Enjoy your holiday week!

IMG_1772

Cranberry Curd Tart on a Cornmeal Ginger Crust

Tart, PINK and perfect for fall / holiday dessert. Gluten free, dairy free and refined sugar free – this is for those who like tart things! The cranberry curd ended up kind of like mousse – see note; if you’d like it sliceable like a proper tart, use a few extra eggs in the curd. The cornmeal ginger crust provides a naturally not-too-sweet complement to the tartness of the curd & puree. Yield: 1 9″ tart, serves 2 ;) kidding – serves 2-6! A Wait are Those Cookies original.

For the crust:

1.5 c almond flour
1/4 c unsweetened shredded coconut
1/2 c cornmeal
heaping 1/4 tsp sea salt
1 tsp ground ginger
1/2 tsp baking soda
2 tsp vanilla extract
2 tbsp pure maple syrup
5 tbsp coconut oil, melted

In a large bowl, stir together almond flour, shredded coconut, cornmeal, sea salt, ginger, and baking soda. Add in vanilla, maple, and melted coconut oil, and stir until completely combined. The dough will look crumbly, but you’ll be able to press it together with your fingers.
Preheat the oven to 350, and lightly grease a pie plate with coconut oil. Press the crust into the plate and up the sides with a spoon or your fingers, creating a smooth edge (or not, your call!). Poke the bottom with a fork a few times, and bake for 15 minutes. Remove and let cool for a few minutes, but leave the oven on.

For the cranberry curd*:

3 cups (12oz) cranberries, rinsed and picked over
1/2 c water
1/4 c maple
juice of 1 lemon
2 whole eggs
2 egg yolks
Pinch of salt
scant 1 tbsp vanilla
3.5 tbsp coconut oil

*mine was on the runnier side, making my tart more like mousse than a set curd tart. Suggest adding another couple of eggs – unless you’re okay with the mousse texture (it was totally fine taste-wise, just didn’t really hold its shape when sliced)

To make the cranberry curd, place the cranberries and water in a saucepan. Cook, covered, over medium-low heat, until you hear the the berries start to pop. Cook, stirring occasionally, until all the berries have burst. Cool slightly, then puree with an immersion or regular blender. Strain the mixture into a bowl or large liquid measuring cup, pushing on the solids to extract as much cranberry puree as possible. Yield is about 1.5 c of puree.

Beat the eggs, egg yolks, maple, and lemon juice together in the top of a double boiler. Whisking constantly, slowly pour in the warm cranberry puree. Add salt and vanilla. Whisk in coconut oil 1 tbsp at a time until melted. Cook over low heat, whisking constantly, until the mixture has thickened and coats the back of a spoon (about 15 minutes). Remove from the heat and let cool. The curd will thicken a little more as it cools – store in an airtight container in the fridge for a week, or freeze for later.

For the cranberry swirl:

Basically, you’re replicating the earlier part of the cranberry curd, prior to actually making curd with it. If you’re smart (unlike me, who decided to do this later), do it all at once, and reserve some of the cranberry puree.

1.5 c cranberries, rinsed & picked over
1/4 c water
2 tsp maple sugar
1 tsp vanilla

Combine cranberries and water and cook as directed above, for the curd, until the cranberries pop. Strain as before, pressing to extract the liquid. Stir in maple sugar and vanilla.

For assembly:

Bake the crust, as directed above (350 for 15, in case you don’t want to scroll back up). Remove and let cool for a few minutes, then pour in curd. Dollop the cranberry swirl in large dollops over the curd, then use a knife or toothpick to swirl everything together. Bake for 15-20 minutes to set the curd, then remove and let cool completely before serving. I prefer to refrigerate mine for at least half a day before serving to further set the curd. Serve with ice cream (obvs!) and extra cranberry puree. Store any leftovers in the fridge, covered.

IMG_1775

Dessert straight out of Dagobah

IMG_1443

Green things!

IMG_1417

Because of course I would make myself something ridiculously green for a (belated) birthday dessert!

IMG_1427

IMG_1431

Naturally it would also have a tiny Yoda in it, because that seems to have become the birthday dessert tradition around here (reference this cake!) and I am unashamedly nerdy – besides that, this dessert looks like it’s just come out of Dagobah, so it only seems fitting that Yoda would take up residence, right?

img_1438.jpg

IMG_1436

I have to say, I LOVED this (there I go again blowing my own horn regarding my baking, oops sorry). I already love matcha lattes, but this was something else. Earthy, lightly chocolatey, and not one of those desserts that put you into a coma – it’s the perfect post-opera snack and breakfast alongside eggs. Besides, then you can drink your coffee and eat your tea!

IMG_1426

Besides all that, how fun to have something so GREEN for dessert? And then alongside other greens at breakfast (because tea is breakfast food, obvs) – I was having fun with all of the tones of green (art history nerdiness is making an appearance, clearly).

IMG_1442

I mean, this thing is really aggressively green. It is not for the faint of heart, but luckily myself and the one I fed it to loved it, and is obviously fine with green dessert.

IMG_1424

IMG_1439

Among other things, I will have been to the opera three times by Saturday night – YAY!  Green dessert + opera is my kind of week!

IMG_1413

IMG_1397

So! Like green tea? Do yourself a favor and make a matcha tart! You won’t be sorry, and you can impress your friends with the GREEN-NESS of it all!

IMG_1441

Matcha Custard Tart on Cacao Coconut Almond Crust

Lightly sweet and perfect for those who love their matcha lattes! This is somewhere between a custard and a mousse – the filling is light & earthy, and plays perfectly against the chocolate crust. Grain and gluten free, refined sugar free, dairy free, and paleoish (it’s sweetened with maple, so it depends on your def of paleo). Yield: 1 9″ tart. Serves: 2. Ha! Eat for dessert & breakfast, because tea = breakfast food.

For the crust:

1.5 c almond flour
1/3 c unsweetened cacao powder
1/2 c unsweetened shredded coconut
heaping 1/4 tsp sea salt
1/2 tsp baking soda
2 tsp vanilla extract
2 tbsp pure maple syrup
3.5 tbsp coconut oil, melted

In a large bowl, stir together almond flour, cacao powder, coconut, sea salt, and baking soda. Add in vanilla, maple, and melted coconut oil and stir until completely combined. The dough will look crumbly, but you’ll be able to press it together with your fingers.

Preheat the oven to 350, and lightly grease a pie plate with coconut oil. Press the crust into the plate and up the sides with a spoon or your fingers, creating a smooth edge (or not, your call!). Poke the bottom with a fork a few times, and bake for 15 minutes.

Increase the oven temp to 375. While the crust is baking, make the custard.

For the matcha coconut milk custard:

3 cups coconut milk
3 large eggs
1/3 c maple syrup
3 tablespoons tapioca starch
2 tablespoons culinary-grade matcha powder
2 teaspoons pure vanilla extract
1/4 teaspoon pure almond extract
1/8 teaspoon fine sea salt

Heat coconut milk in medium saucepan over medium-low heat until it just barely simmers, about 5 minutes. Meanwhile, whisk together eggs, sugar, cornstarch, matcha powder, vanilla, and salt in medium bowl.

Whisk warm milk into egg mixture in slow, steady stream to temper the eggs. Return egg and milk mixture to saucepan and cook over medium-low heat, stirring constantly and scraping the bottom of the pan, until custard begins to thicken and forms a ridge on tip of spoon when bottom of pan is scraped and spoon is lifted, about 4-6 minutes. Remove crust from the oven and pour in the custard*. Bake until custard has set around edges but jiggles slightly in the center when shaken, 13-15 minutes. Cool to room temperature, about 2 hours. Refrigerate until serving.

Decorate with raspberries, strawberries & coconut (and a tiny Yoda) if you’re so inclined! Serve with ice cream for dessert or eat straight up for breakfast. Refrigerate any leftovers, covered.

*Note – I had slightly more custard than what would fit comfortably in my pie plate. You have options here – bake it in some smaller ramekins until set, or maybe add some tapioca pearls and make pudding? I didn’t do that but now I wish I had! If you do, let me know how it turns out…

IMG_1432

IMG_1433


Just can’t get enough of all the citrus!

IMG_0387

Hello, internet friends, and happy Mother’s Day to the moms out there! I do like my little corner of the interwebs… there’s so much STUFF going on in the world right now, I like to keep a little spot that’s just pretty food & friends.

IMG_0404

I went on my annual yoga retreat last weekend! So lovely as always – love, laughter and light with friends (and delicious food, and beautiful scenery)!

IMG_0351IMG_0348IMG_0343IMG_0346IMG_0318IMG_0315IMG_0306

But I’m back now, and fully back into the dessert swing of things – party snax, plus another citrus tart! The brownies are barely adapted from Ambitious Kitchen, here – I doubled the recipe & used blackberries instead with excellent results.

IMG_0398

IMG_0397

My kitchen currently smells like heaven – two desserts in under two hours is my kind of morning.

IMG_0399

More progress on the SF series!

IMG_0384

But this tart. Let’s get back to the tart…

IMG_0388

Citrusy (though not as much as my meyer lemon curd/blackberry iteration) – this one is lighter on the citrus front, which makes sense since oranges are less in your face than lemons anyway.

IMG_0390

Lingonberries are delicious – tart like cranberries but… different! Apparently they’re high in antioxidants too, whoop whoop! I have a largish jar of lingonberry jam that I wasn’t really going to get through using it just for toast, so I decided to introduce it to my orange curd and see if they got along. Turns out they pair surprisingly well, especially with a vanilla crust to bring it all together.

IMG_0392

Lightly sweet and perfect for spring – this tart does double duty as dessert and breakfast (as so many of my desserts do; why be limited?). I mean, it’s basically fruit and nuts…

IMG_0401

Have a great weekend, friends in my little corner of the internet!

IMG_0393

Orange Curd Tart with Lingonberry Swirl on an Almond Vanilla Crust

More citrus! Tart, lightly sweet, and perfect for spring. Gluten free, grain free, refined sugar free, dairy free. Yield: 1 9″ tart; serves 6-9 (or two. your call). Incidentally, curd freezes quite well in airtight container –  I made this ahead of time and froze it for about a week since I wasn’t quite sure when I would use it. Tart is a Wait are those Cookies original!

For the orange curd:

  • 4 eggs
  • 1/2 c coconut oil
  • scant 1/4 c honey
  • 1/8 tsp sea salt
  • 1/2 c orange juice
  • juice of 1 meyer lemon
  • zest of 3 oranges
  • 1 tsp vanilla

In a saucepan over medium-low heat, combine eggs, coconut oil, honey, sea salt, lemon juice, lemon zest, and vanilla. Whisk to combine and continue to cook, whisking constantly for about 10-15 minutes – it should be just on the edge (but not there yet!) of a low boil. The curd should thicken and your whisk will make tracks – don’t let it boil. It will still be slightly runny but will firm up in the fridge. While it’s still warm, strain curd through a metal strainer into a glass container and let cool completely before storing in the fridge (overnight is preferable, but at least 4 hours if pressed for time).

For the lingonberry swirl:

I used about a 1/4 c lingonberry jam (on the tart side) blitzed a few times with an immersion blender (a food processor would be fine too), just to get rid of the whole berries (cause piping those through a pastry bag or ziplock is a recipe for disaster, just saying)

For the crust:

  • 2.5 c almond flour
  • 1 tbsp coconut flour
  • 1/4 tsp baking powder
  • 1/4 tsp fine sea salt
  • 3 tbsp melted coconut oil
  • 1 tbsp vanilla extract
  • 1/4 c unsalted almond butter
  • 2 tbsp maple syrup

In a large bowl, whisk together almond flour, coconut flour, baking powder, and sea salt. Add in melted coconut oil, vanilla, almond butter, and maple syrup, and stir until combined – the mixture will be crumbly.

Preheat the oven to 350, and press the mixture into the bottom and up the sides of a 9″ pie plate. Poke the bottom a few times with a fork, and bake for 10 minutes. Remove from the oven and fill with the orange curd. If you’re planning on the lingonberry swirl, use a ziplock bag with a teeny corner cut off to pipe the sauce into the curd, and then use a knife to swirl it around (alternatively, use a pastry bag if you’re less lazy than me!). Bake for 8-10 minutes to set the curd, then let cool completely at room temperature. Top with sliced oranges and shredded coconut if desired. I prefer to chill mine in the fridge for at least two hours before serving.

Leftovers keep well covered in the fridge (though I dare you to have any!).

IMG_0395

Pink celery!! Just kidding. Rhuuuubarb!

IMG_0196

Dumb question… Is rhubarb a vegetable? Wait. I have to go look this up.

It is! Okay good. I’m not going (too) crazy… I was pretty sure it was, given that it looks like celery’s pink cousin. ANYWAY, moving on after that little aside…

Spring has officially sprung! Asparagus with dinner last night and rhubarb for dessert (and for breakfast, obviously). Besides the seasonal produce (yay!) literally everything is in bloom right now — my yard looks and smells amazing!

IMG_0187

With that in mind, and given that there are a bunch of eating-type holidays this weekend (Eater, I mean.. Easter… I’m looking at you), might I recommend this rhubarb tart? It comes together in a snap and is delicious to boot.

IMG_0179

IMG_0194

In other news… more drawing! (What else is new)

IMG_0163

Springy things!

IMG_0173

Keeping it short and sweet today – but do yourself a favor and get on that rhubarb before the season ends! It’s amazing — who doesn’t like pink celery? Just kidding…

IMG_0176

I love rhubarb in this galette because it can be it’s true tart self! I find that when it’s paired with strawberry it loses some of it’s punchiness, which is what I like about it — I prefer to let it shine on its own (accompanied by some ice cream, obviously). The almond frangipane keeps it from being overly tart and still desserty, but not too sweet – perfectly acceptable for breakfast alongside obligatory eggs & kale.

IMG_0190

Happy spring!

IMG_0195

Rhubarb Galette with Almond Frangipane

Grain & gluten free option and refined sugar free. Dairy free option is is probably a breeze – make the dough with cold coconut oil instead of butter. Yield: 1 galette – serves 4-6. Frangipane adapted from the Feed Feed, here.

IMG_0174

For the galette dough:

  • 1.5 c almond flour (not meal; you want the finer flour variety)
  • 1/2 c tapioca flour
  • 1/4 tsp fine sea salt
  • 6 tbsp salted butter, chopped
  • 1 egg
  • 1/2 tbsp coconut sugar
  • 1 tbsp vanilla extract

In a food processor or high-power blender (I used a food processor), pulse almond flour, tapioca starch, salt, and butter, and pulse to combine until it looks like coarse meal. Add in egg, coconut sugar, and almond extract and pulse just until combined. Turn out onto a piece of plastic wrap, shape into a disk and chill in the fridge for at least an hour, or up to overnight.

For the frangipane:

  • 1/2 c almond flour
  • 1/3 c coconut sugar
  • 3 tbsp whole wheat pastry flour* (omit for grain free; replace with oat flour or rice flour for gluten free)
  • 2 eggs
  • 1 tsp vanilla
  • 1/4 tsp almond extract
  • 1/3 c roasted unsalted almond butter
  • 1-2 tbsp maple syrup (if needed)

In a food processor, combine almond flour, coconut sugar, and whole wheat flour (if using). Pulse once to combine. Add in eggs, vanilla and almond extract, and pulse once or twice, until combined. Add in almond butter, and blend again until smooth. If the frangipane seems too sticky, add 1-2 tbsp of maple to loosen it.

Topping & finishing:

  • 5-6 stalks of rhubarb
  • coconut sugar
  • beaten egg for brushing the dough

Once the dough has chilled, preheat the oven to 375. Roll out the dough between two pieces of parchment paper, keeping the circle to about 1/4″ thickness. Peel off the top piece of parchment, and slide the rolled out dough on its parchment onto a baking sheet. Top with the frangipane, spreading it carefully in order to not rip or crack the dough.  Add sliced rhubarb, in whatever pattern you like! Sprinkle with a little coconut sugar. Begin folding up the sides, creasing them together as you go – if the dough is cracking, that’s okay (you can crimp the cracks back together; remember: galettes are forgiving and rustic!); you can use the bottom piece of parchment to help fold up the sides. Brush the edges of the dough with the beaten egg and sprinkle a little coconut sugar around the sides. Bake for 35-40 minutes until edges are golden brown — mine came out just fine at 35 minutes, so check accordingly. Let cool for a few minutes on the baking sheet, then carefully slide the whole galette onto a cooling rack to let it cool completely. Serve with your fave ice cream or whatever of choice! Keeps well covered in foil on the counter; mine didn’t last longer than about 2 days so I can vouch for it at least that long!

IMG_0185

IMG_0181

I’ll just take everything citrus, thanks

IMG_0044

Hello hello internet blog friends!

IMG_0036

What’s new with you? Business as usual over here, still very obviously obsessed with all things citrus. If you’re like me and just can’t get enough of all varieties these days, make this! You won’t be sorry.

IMG_0041

Meyer lemons are still going strong (at least over here in northern California) – I’m lucky enough to have access to a full tree of them but I’m still seeing them in stores too, so you should be good to go. Meyer lemons make the most perfect curd – light yellow and perfectly lemony. I’ve reached the point where I use very little sweetener in the citrus curds that I make – I want to have the tart citrus flavor at the forefront, not the sweet!

IMG_0024

Eat this for dessert, for breakfast, for snacking purposes… it’s delicious any way you slice it. I just want all the citrus, all the time!! Just make sure lemon is your thing before making this — it’s not for the citrus faint of heart ;)

IMG_0040

Let’s see, what else…

Mother Nature has been doing some spectacular things in the sky lately!

IMG_0001

IMG_0007

IMG_0003

Happy spring! Go eat some lemon tart with your loved ones.

IMG_0043

Meyer Lemon Tart with Blackberry Sauce on an Almond Crust

Not for the faint of heart! If you love tart & citrus things – this is calling your name. Lemons and berries are a natural pairing, and almonds are basically the food of the gods. Tart, lightly sweet, and perfect for spring. Gluten free, grain free, dairy free, refined sugar free, paleo. A Wait are Those Cookies original recipe. Yield: 1 9″ pie plate; servings: 2-8!

IMG_0032

For the meyer lemon curd

  • 4 eggs
  • 1/2 c coconut oil
  • 1/4 c honey
  • 1/8 tsp sea salt
  • 1/2 c meyer lemon juice
  • zest of 3 meyer lemons
  • 1 tsp vanilla

In a saucepan over medium-low heat, combine eggs, coconut oil, honey, sea salt, lemon juice, lemon zest, and vanilla. Whisk to combine and continue to cook, whisking constantly for about 10-15 minutes – it should be just on the edge (but not there yet!) of a low boil. The curd should thicken and your whisk will make tracks – don’t let it boil. It will still be slightly runny but will firm up in the fridge. While it’s still warm, strain curd through a metal strainer into a glass container and let cool completely before storing in the fridge (overnight is preferable, but at least 4 hours if pressed for time).

For the blackberry sauce:

  • 2 c blackberries
  • juice of 1 meyer lemon
  • 1 tbsp maple syrup

In a high powered blender or food processor, puree the blackberries until smooth. Push the puree through a metal strainer into a large bowl to remove the seeds, then stir in lemon juice and maple. Store in a glass jar in the fridge until ready to use – you’ll only use a tablespoon or two to make the swirl on the top of the tart, so keep the rest for extra tart topping.

For the crust:

  • 2.5 c almond flour
  • 1 tbsp coconut flour
  • 1/4 tsp baking powder
  • 1/4 tsp fine sea salt
  • 3 tbsp melted coconut oil
  • 2 tsp vanilla extract
  • scant 1/2 tsp almond extract
  • 1/4 c unsalted almond butter
  • 2 tbsp maple syrup

In a large bowl, whisk together almond flour, coconut flour, baking powder, and sea salt. Add in melted coconut oil, vanilla, almond extract, almond butter, and maple syrup, and stir until combined – the mixture will be crumbly.

Preheat the oven to 350, and press the mixture into the bottom and up the sides of a 9″ pie plate. Poke the bottom a few times with a fork, and bake for 10 minutes. Remove from the oven and fill with the lemon curd. If you’re planning on the blackberry swirl, use a ziplock bag with a teeny corner cut off to pipe the sauce into the curd, and then use a knife to swirl it around (alternatively, use a pastry bag if you’re less lazy than me!). Bake for 8-10 minutes to set the curd, then let cool completely at room temperature. Top with slivered almonds and shredded coconut if desired. I prefer to chill mine in the fridge for at least two hours before serving.

Leftovers keep well covered in the fridge (though I dare you to have any!).

IMG_0018

Blood oranges: Mother Nature’s ombre playground

img_5585

It’s blood orange season! They are just absolutely gorgeous, I never get tired of that beautiful color.

img_5570

They remind me of stained glass… appropriate, considering architecture and food are two of my fave things (really?! I’m sure you had NO idea). Case in point: old and new! A favorite juxtaposition.

img_5565

I love how they’re variegated in color too – you never quite know what you’re getting. Dark red? Ombre? Everything is fair game when mother nature gets involved.

img_5574

It’s sunny and beautiful today!! I’ve been enjoying the rain but I must say I’m not minding the sun either… AND it’s ski season! Tahoe-bound this week to get back on my K2 babies — it’s been way too long. Actually I’m currently sitting OUTSIDE to write this, what?! Weird. But awesome. Hooray for wifi that extends into the back yard!

img_5579

But back to food. This tart is perfect winter dessert — I’m also pretty sure I’ve said that about the last five citrus desserts I’ve made but that’s because it’s TRUE! Citrus + winter = made for each other. The brightness of the citrus perks up even the greyest of days, even for someone like me who *likes* the grey! (I like sun too, don’t get me wrong)

img_5583

Highly recommended, easy and delicious. This can also be made in stages and left overnight in the fridge before serving, so it’s a user-friendly experience all around. Lightly sweet, lightly tart, orangey & chocolatey.

Happy weekend!

img_5581

Blood Orange Curd Tart on a Chocolate Coconut Crust with Candied Ginger

Blood orange curd is like lemon, only it’s orange! Brilliant, no? Ha. Lightly sweet, somewhat tart (though less so than it’s lemony cousin), complemented by a chocolate coconut crust and candied ginger… for breakfast and dessert! Gluten free, grain free, dairy free, refined sugar free, pretty much paleo. Yield: 1 9″ pie dish; serving sizes are up to your discretion. A Wait are Those Cookies original – the curd is riffed off of my usual go-to, and the crust is an easy favorite I’ve modified many times for different tarts.

img_5571

For the curd (make at least one day ahead so it can chill overnight in the fridge)

  • 4 eggs
  • 1/2 c coconut oil
  • 1/4 c honey
  • 1/8 tsp sea salt
  • 1/2 c blood orange juice
  • 2 tbsp lemon juice
  • zest from 3 blood oranges
  • 1 tsp vanilla

In a saucepan over medium-low heat, combine eggs, coconut oil, honey, sea salt, blood orange juice, lemon juice and orange zest. Whisk to combine and continue to cook, whisking constantly for about 10-15 minutes – it should be just on the edge of a low boil. The curd should thicken and your whisk will make tracks – it will still be runny but will firm up a bit in the fridge. Strain curd through a metal strainer into a glass container and let cool completely before storing in the fridge (overnight is preferable, but at least 4 hours if pressed for time).

For the crust:

  • 1.25 c almond flour
  • 1/4 c unsweetened cacao powder
  • 1/2 c unsweetened shredded coconut
  • heaping 1/4 tsp sea salt
  • 1/2 tsp baking soda
  • 2 tsp vanilla extract
  • 2 tbsp pure maple syrup
  • 3.5 tbsp coconut oil, melted

In a large bowl, stir together almond flour, cacao powder, coconut, sea salt, and baking soda. Add in vanilla, maple, and melted coconut oil and stir until completely combined. The dough will look crumbly, but you’ll be able to press it together with your fingers.

Preheat the oven to 350, and lightly grease a pie plate with coconut oil. Press the crust into the plate and up the sides with a spoon or your fingers, creating a smooth edge (or not, your call!). Poke the bottom with a fork a few times, and bake for 15 minutes. Remove and let cool.

For garnish:

  • 2 small blood oranges, sliced thinly
  • candied ginger
  • shredded coconut

Assembly:

Once the crust is cool, pour the curd into the crust and bake at 350 for 10-15 minutes or until the curd is just set when you jiggle the pan. Let cool completely and chill for an hour or two before topping.

Top the cooled tart with sliced oranges & candied ginger + shredded coconut if that’s your jam (melted chocolate wouldn’t come amiss either, I’m sure)… Serve immediately, or store in the fridge for a few hours before serving. Refrigerate any leftovers – I usually just cover the original pie dish with foil but an airtight container works just fine too.

Happy eating!

img_5584

img_5568

Tarts for days. Grapefruit is the new lemon (at least for today)

img_5459

Sometimes, you just need all the citrus. ALL the citrus! Lately I’ve been eating a ton of mandarins and clementines – they have been so delicious and they’re such a great snack!

img_5438

But sometimes you need more than just a citrus snack… you need citrus DESSERT. When that happens, I usually gravitate toward lemon curd for it’s bright, citrusy, sunshine-in-my-kitchen scent and taste. But I’ve never actually made grapefruit curd until now, despite loving grapefruit even more than lemon.

I’m not so sure how it translates into photos, but I promise it was incredibly delicious…

img_5442

This is definitely going into the rotation. I actually added a slight bit of lemon to bump up the citrus flavor – next time, I might even reduce the honey a bit to really bring out the citrus tang. It makes a great change from lemon curd, and a great tart filling. I had no idea grapefruit and ginger were flavor affinities, but they are! And it’s a match made in gastronomic heaven, at least for those of us who love grapefruit.

By the way, this tart make excellent breakfast. Just a suggestion…

A bit more progress in the SF series, of course.

img_5426

Keeping it short and sweet today, and finishing with this to my beloved grandpa who transitioned off this earth plane this past weekend: You are responsible for so many wonderful memories, and for my fierce love of malted milkshakes. Happy travels, you are so, so missed. Om Shanti, Grandpa.

img_5437

Grapefruit Curd Tart with Coconut Ginger Crust and Citrus Coconut Cream

Citrusy, relatively light on the dessert-intensity scale, and perfect for the winter season. Dairy free, gluten free, grain free, refined sugar free, paleo if that’s your jam. Full of healthy fats and vitamin c! The crust is a riff on my usual citrus bar crust, but I’ve discovered it makes a good tart shell too. You’ll want to make the grapefruit curd ahead of time, and chill the coconut milk overnight. Yield: 1 9″ pie dish.

img_5452

For the curd:

  • 4 egg yolks
  • 3 whole eggs
  • 2/3 c grapefruit juice
  • juice of 1 lemon
  • zest of 2 large grapefruits, about ~1 tbsp zest
  • scant 1/4 c honey
  • 1/4 c coconut oil, solid
  • 1/8 tsp sea salt

In a non-reactive saucepan, combine eggs, grapefruit and lemon juice, zest, honey, coconut oil, and sea salt. Heat over medium-low, whisking constantly. The curd will begin to thicken as it cooks, and usually is as thick as it’s going to get after about 10 minutes. I usually strain mine to get rid of any erroneous bits – a metal strainer over a bowl works just fine; I recommend straining it while it’s still warm. Let cool completely in a bowl sitting in an ice bath, then move to the fridge to chill for at least 4 hours before using (overnight is preferable, which is why I usually try to make this the day before).

For the crust:

  • 1.5 c almond flour
  • 1/2 c unsweetened shredded coconut
  • heaping 1/4 tsp sea salt
  • heaping 1/2 tsp ground ginger
  • 1/2 tsp baking soda
  • 2 tsp vanilla extract
  • 2 tbsp pure maple syrup
  • 1 tsp almond butter
  • 3 tbsp coconut oil, melted

In a large bowl, stir together almond flour, shredded coconut, sea salt, ginger, and baking soda. Add in vanilla, maple, almond butter, and melted coconut oil, and stir until completely combined. The dough will look crumbly, but you’ll be able to press it together with your fingers.

Preheat the oven to 350, and lightly grease a pie plate with coconut oil. Press the crust into the plate and up the sides with a spoon or your fingers, creating a smooth edge (or not, your call!). Poke the bottom with a fork a few times, and bake for 15 minutes. Remove and let cool for a few minutes.

Once the crust is cool, pour the curd into the crust and bake for 15-20 minutes or until the curd is just set when you jiggle the pan. Let cool completely and chill for an hour or two before topping.

For the citrus coconut cream:

  • 1 can of full-fat coconut milk, chilled overnight in the fridge
  • zest of one grapefruit
  • 1 tsp coconut sugar
  • 2 tsp vanilla extract
  • 1 tbsp grapefruit juice

For topping:

  • candied ginger!

Zest the citrus, and rub the coconut sugar into it until fragrant. Open the can of coconut milk and scrape out the cream that has solidified at the top, leaving the coconut water at the bottom (save it and use it later!). Scoop the cream out into a bowl, add vanilla, coconut sugar-zest, and grapefruit juice, and use an electric mixer to beat into the consistency of whipped cream. Use immediately, or chill for later use.

To serve, top the tart with segmented grapefruit and citrus coconut cream. Don’t skip the candied ginger! It’s awesome. Store any leftovers in the fridge!

img_5440