I only have (pies!) for you

IMG_1737

Could someone explain to me what happened to October? I blinked, and then… here we are. ALSO it’s already less than two weeks till Thanksgiving?! Um…. wat.

IMG_1738

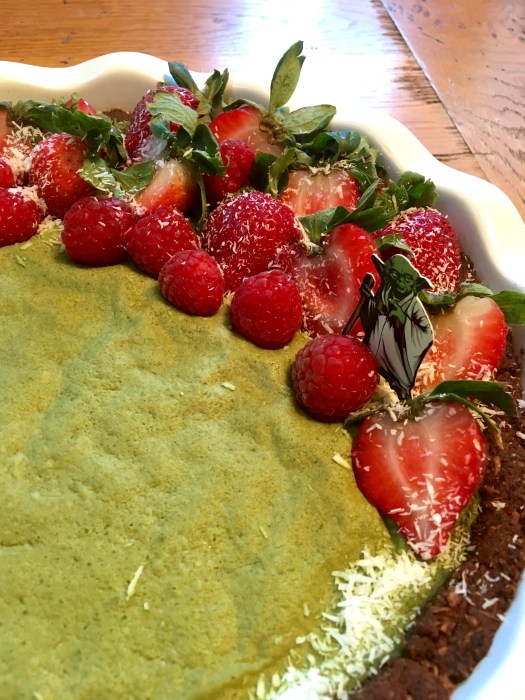
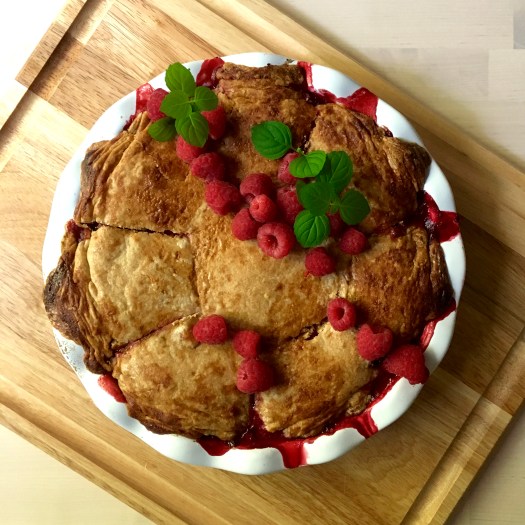
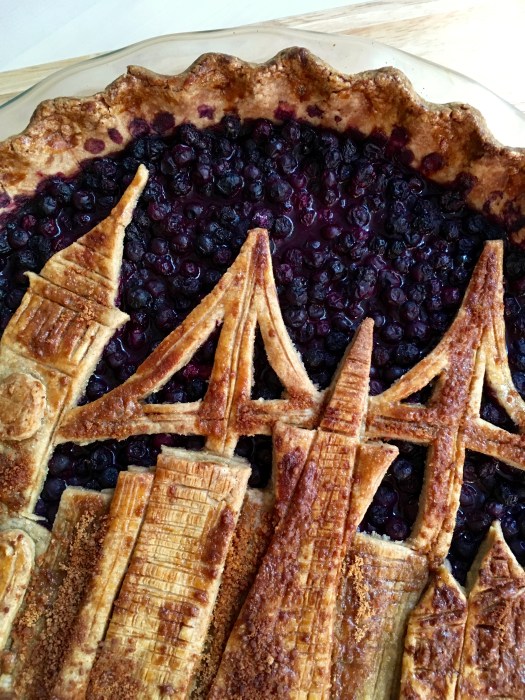
But regardless… I have PIE!

IMG_1710

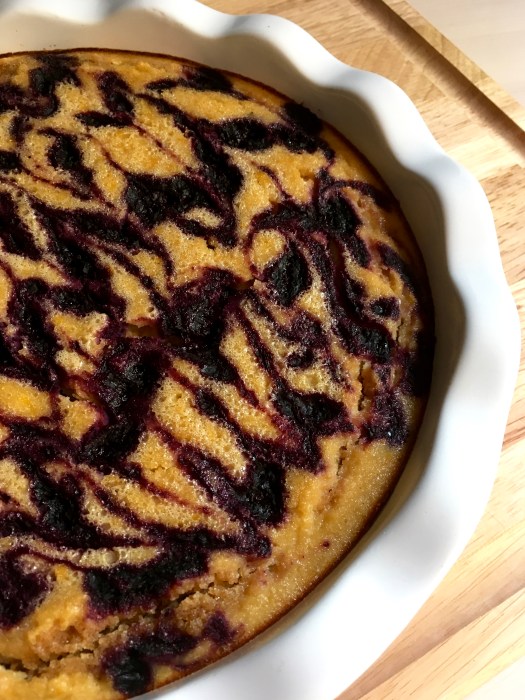
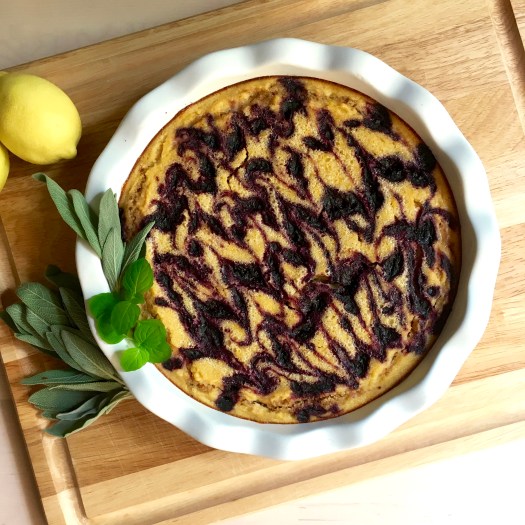
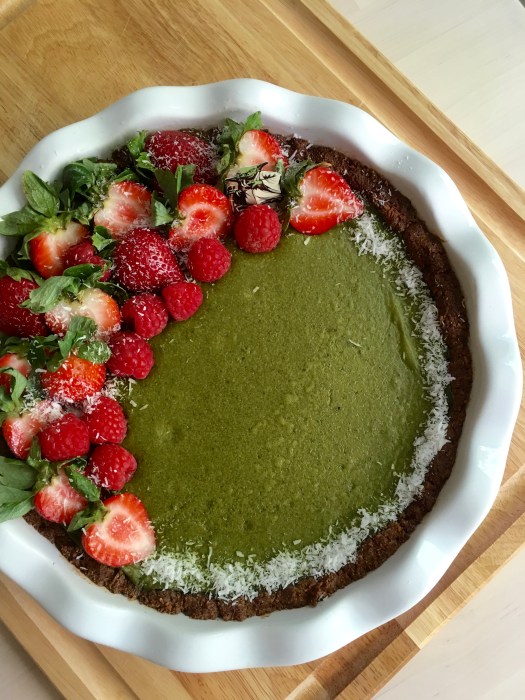
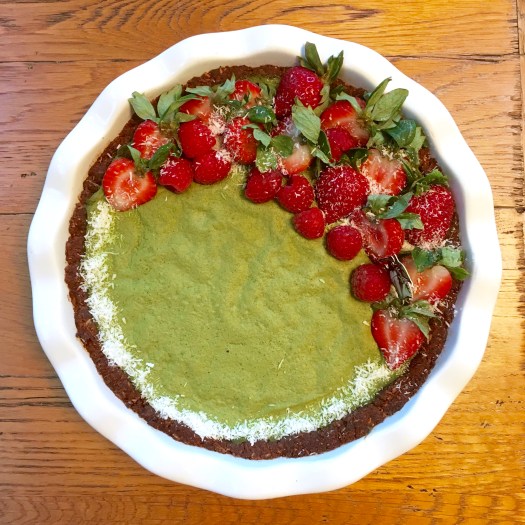
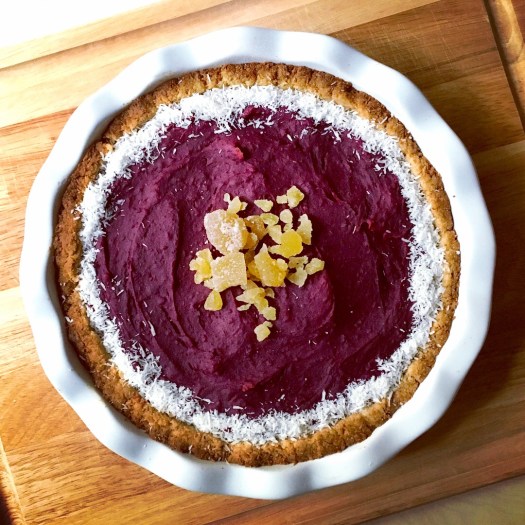
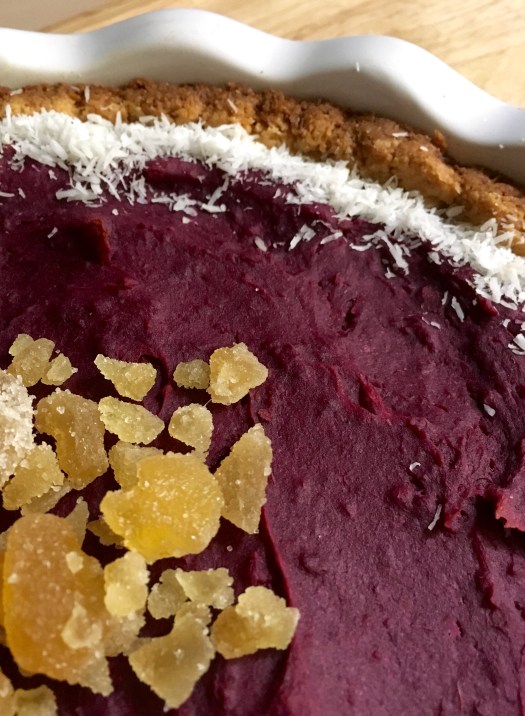
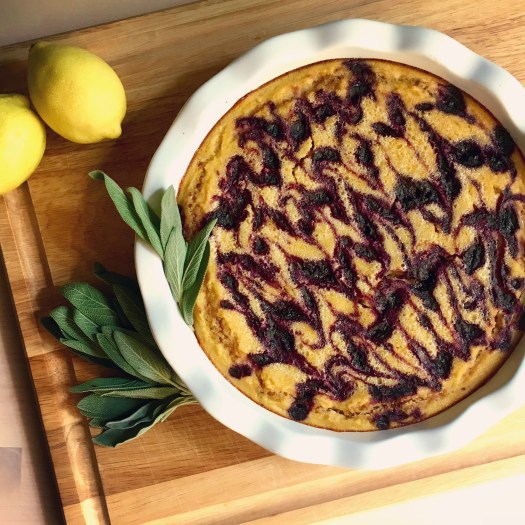
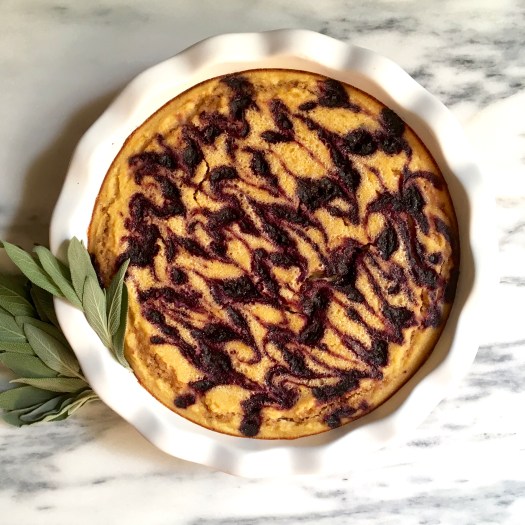
And it’s PURPLE pie!

IMG_1708

Because really, how could something like this not make you happy? That color just makes me smile every time. As does the fact that it’s grain & gluten free, dairy free, refined sugar free, vegan & paleo so errrybody can enjoy – because also, despite all the ‘free’ in its name, it is also delicious (NOT taste free. ha!)

IMG_1734

Maybe consider it if you’ve got friends or fam with some dietary stuff and they’re coming for Thanksgiving? I’m 100% sure they’d love you for it.

It’s been raining! I love love love the sound of rain – it so soothing, no matter what kind of day I’m having. Baking when it’s raining is one of my favorite things – I love that even though my apartment’s galley kitchen doesn’t have windows, I have a big window on the wall facing the entrance to the kitchen, which lets in light and rain sound. It’s perfect! Besides, my little one-butt kitchen is exactly the right size for my baking shenanigans.

IMG_1735

In other news, pretty coffee and some opera (shocking, I know…NOT).

IMG_1695

IMG_1696

IMG_1733

I’ve made this pie twice in three days – it’s that good! Full disclosure: the first time I made it, I took the first bite straight out of the pie dish: fork, meet pie. I NEVER do that, since I’m all about the presentation, but you know what? Sometimes it just has to happen.

IMG_1714

IMG_1729

Happy Saturday! I’m loving the beautiful fall weather over here – the leaves are gorgeous, the air is crisp, and I had purple pie, eggs & kale for breakfast with the best company: life is wonderful! Happy baking!

IMG_1709

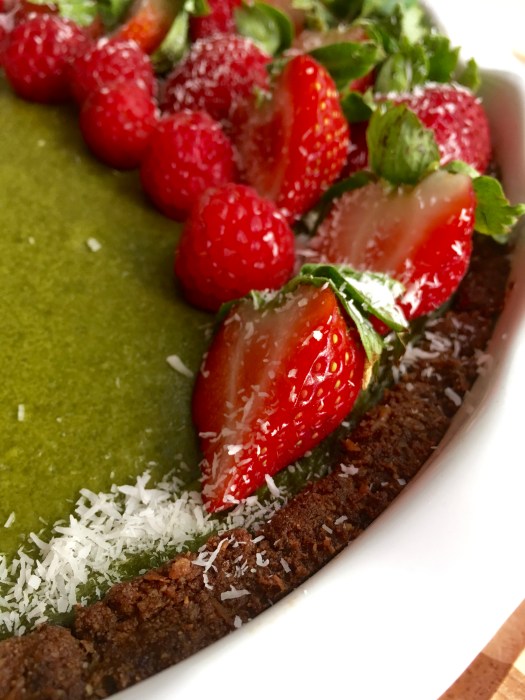
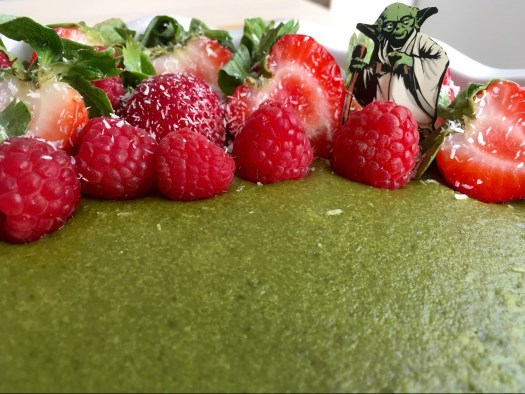
Purple Sweet Potato Pie on an Almond Coconut Crust

Gluten & grain free, refined sugar free, dairy free, vegan, paleo. Crust is a Wait are Those Cookies original, filling is adapted from The Endless Meal, here! Yield: one 9″ pie, serves 2 or several! ha.

For the crust:

  • 1.75 c almond flour
  • 1 c unsweetened shredded coconut
  • heaping 1/4 tsp sea salt
  • 1/2 tsp baking soda
  • 1 tbsp vanilla extract
  • 1/4 tsp almond extract
  • 2 tbsp pure maple syrup
  • 4 tbsp coconut oil, melted

Preheat the oven to 350, and lightly grease a pie plate with coconut oil.

In a large bowl, stir together almond flour, shredded coconut, sea salt, and baking soda. Add in vanilla, almond extract, maple, and melted coconut oil, and stir until completely combined. The dough will look crumbly, but you’ll be able to press it together with your fingers. Press the crust into the plate and up the sides with a spoon or your fingers, creating a smooth edge (or not, your call!). Poke the bottom with a fork a few times, and bake for 15 minutes. Remove and let cool for a few minutes, but keep the oven on if you’re making the whole thing at once.

For the filling:

  • 2 large purple sweet potatoes, peeled & sliced into 1″ pieces (about 3 cups worth)
  • 3/4 c full fat coconut milk
  • heaping 1/4 c maple syrup
  • 1.5 tbsp tapioca starch*
  • juice of 1/2 a lemon (~1tbsp)
  • 1 tablespoon vanilla extract
  • 1/4 tsp almond extract
  • 2 teaspoons ground cinnamon
  • 1 teaspoon ground ginger
  • heaping 1/4 teaspoon ground nutmeg
  • 3/4 teaspoon fine salt

*full disclosure: I made this twice in three days & totally forgot the tapioca starch the second time. It’s actually not essential – the filling set up fine without it.

While the crust is baking, make the filling!

In a medium saucepan, boil the sweet potato slices until fork tender. Drain and let cool for a few minutes. Add them to a food processor (or high powered blender) and pulse a few times to puree. Add in coconut milk, maple, tapioca, lemon juice, vanilla, and almond extract, and pulse to combine. Add cinnamon, ginger, nutmeg, and sea salt, and pulse until combined. The filling should be thick! Pour/spoon/spatula it into the prepared crust, smooth the top (or not, you do you!), and bake at 350 for about 45 minutes – the crust should be golden brown and the pie should be set, but with just the slightest bit of jiggle in the middle. Remove and let cool completely before serving (preferably with ice cream or whipped cream of choice, either dairy or non dairy). I prefer to make this earlier in the day and refrigerate until serving, to give the filling ample time to set up.

Top with crystalized ginger & extra coconut if desired!

Keep leftovers covered in the fridge – it will last for a few days, provided all of it doesn’t get eaten first!

IMG_1703

IMG_1711

Appropriately autumnal baking

IMG_1677

There is something so soothing about early morning baking. I don’t necessarily choose to bake at 6:30a, but when a workout and work have to happen before I can deliver & eat dessert, baking by necessity becomes an early morning activity. That being said, though, it’s a very meditative way to spend a morning, especially when it’s still dark outside.

IMG_3170

Of course, then of course there’s that moment when you go to put socks on and somehow find some crystallized ginger stuck to your foot… um… no comment.

IMG_1654

It also gives me a great sense of productivity to know I’ve created something before I even leave the house that day – and then add a workout and a highly productive work day and by 6p I feel extraordinary accomplished.

IMG_1656

IMG_3171

And THEN I get to eat cake! Ha. Win win, all around. Besides, coming back into my apartment after work, I’m greeted with a waft of OMG THIS CAKE SMELLS AMAZING – always a good sign.

IMG_3168

IMG_1663

This cake was well loved by both of us – it is definitely going on the to-make-again list – and I have high standards for that list! The cornmeal/polenta give it great texture – it’s a cross somewhere between cake and cornbread, in the best way possible. It’s amazing with ice cream for dessert, and equally so alongside eggs and kale for breakfast – see exhibit A below.

IMG_3173

Besides that, just in case you needed proof as to how loved this cake was, see exhibit B:

IMG_3177

No crumbs. One (large) slice left – that is after a stint of very productive yard work & leaf raking – that cake had NO chance.

IMG_1656

I can’t believe it’s already November. What happened to October?! Happy autumn!

IMG_1653

Apple Ginger Polenta Cake

Gluten free, refined sugar free, and dairy free. Lightly sweet, sort of like a cross between cake and cornbread – perfect for dessert (served with ice cream!) and breakfast alongside eggs and leafy green things. Yield: 1 8″ cake, serves… um… 2! Ha.

1 c almond meal
2/3 c yellow corn meal (I used medium grind)
1/3 c rice flour
2 tsp baking powder
Heaping 1/4 tsp sea salt
1/4 c extra virgin olive oil
2 eggs
1/6 c maple sugar
1/6 maple syrup
2 tsp vanilla
2 Granny Smith apples
1/3 c crystallized ginger chunks, chopped*

*I have also made this with fresh ginger and it’s equally amazing; finely mince peeled, fresh ginger root and add to the batter. The quantity is up to you – I love ginger, so I used a knob probably about 1.5″ long

Preheat the oven to 350, and line an 8″ cake pan with parchment paper, or do like I did and use strips of parchment paper for easy removal. Be sure to grease the pan first though to prevent any stickage.

In a large bowl, whisk the eggs with the maple sugar and maple syrup until soft and fluffy. Add in olive oil and vanilla. In a smaller bowl, whisk together almond flour, polenta, rice flour, and baking powder. Stir dry into wet. Cut one and a half apples into cubes and thinly slice remaining half. Add the apple cubes and chopped ginger and stir until just combined. Pour the cake batter into the prepared pan, and smooth it out a bit.

Arrange a few apple slices on top of the cake, sprinkle with a bit of maple (or coconut) sugar. Bake at 350F for 40 minutes. Check the cake after 35 minutes; mine was perfect at 40. If the top of the cake is browning too quickly during baking, you can always tent it with a sheet of tinfoil.

I stuck mine in the fridge for a few hours of storage, which didn’t hurt it at all. It keeps well on the counter overnight (covered with foil), and makes a ridiculously amazing addition to breakfast the next day!

IMG_1631

IMG_1632
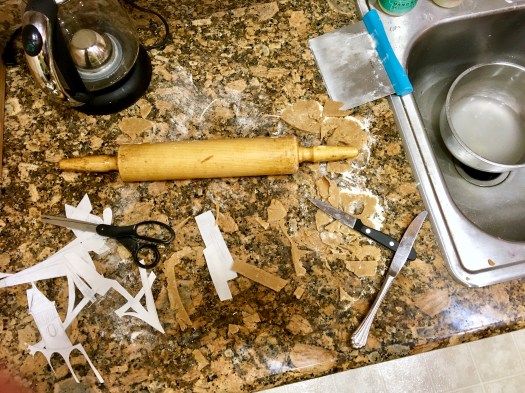
Early morning mis en place…

IMG_1637

Aggressively Green Things

IMG_1584

I know, I know – could this cake look any swampier? I promise it’s delicious though. This is why matcha does so well in a tart – the pure green shows through so much better!

IMG_1581

This gets a little muddied with the almond flour and whatnot and kind of looks like it belongs on Dagoba in the middle of Yoda’s table, but whatever – it’s delicious, I swear! Some desserts are just prettier than others…

IMG_1588

I went out on a baking limb with this one a bit, but knowing I was feeding it to an adventurous one who has very similar tastes to mine (and likewise thinks overly sweet things and sugar are the devil), I knew I could a) go really tart on the lemon curd and b) make a really assertively green cake.

IMG_1574

IMG_1579

FYI on the lemon curd situation – after consideration, we decided that the cake is really awesome on its own, no lemon curd needed. Obvs though we both love lemon curd, so we like that too, but it slightly overpowers the cake if the ratio isn’t quite right. So…. you do you! Both ways are tasty and lemon and matcha are a nice pairing, so it’s up to you how much tartness you want with your cake.

IMG_1590

IMG_1594

In other life things, there have been very pretty skies lately!

IMG_1573

Happy almost weekend, blog friends!

IMG_1585

Matcha Almond Cake with Lemon Curd and Maple Hazelnuts

Grain free, gluten free, refined sugar free, dairy free, paleoish. Lightly sweet, definitely matcha-y, and assertively green! A word to the wise on this – we decided that the cake was great on its own, so I’m including the lemon curd recipe for thoroughness, but feel free to serve without. The lemon is pretty strong so if you want a more matcha-forward dessert, skip it. Perfect for dessert with a bit of ice cream, or breakfast alongside eggs & veg. Adapted from the almond honey cake I made, here. Yield: 1 8″ skillet or 8″ cake, depending on what pan you use. Serves 2 with leftovers ;)

For the cake:

  • 1.5 c almond flour (not meal), firmly packed
  • 3/4 tsp baking powder
  • 1/4 + 1/8 tsp baking soda
  • 1/4 + 1/8 tsp fine sea salt
  • 1.5 tbsp culinary grade matcha powder
  • 2 eggs, beaten
  • 1/3 c maple syrup
  • 1/8 + 1/16 c melted coconut oil
  • 1.5 tsp vanilla extract

Preheat the oven to 325, and lightly grease cast iron skillet or pan of choice with coconut oil. Toss a little almond flour in the bottom to finely coat. In a large bowl, whisk together almond flour, baking powder, baking soda, sea salt, and matcha. In a smaller bowl, whisk together beaten eggs, maple, melted coconut oil, and vanilla. Pour wet into dry, and stir until just combined. Pour into the prepared pan, and bake on the center rack of the oven for about 38-40 minutes. I checked mine at 30 and put it back in for 8; it was perfect at 39. The top should be golden brown and firm to the touch, and the center shouldn’t jiggle when lightly shaken. Remove from the oven and let cool before topping and serving.

Maple Lemon Curd:

  • 2 whole eggs
  • 2 egg yolks
  • 1/3 c lemon juice
  • zest of 4 lemons
  • pinch of sea salt
  • 2.5 tbsp maple syrup
  • 3.5 tbsp coconut oil
  • 1 tsp vanilla

I used a double boiler for this lemon curd, which literally is a game changer. Highly recommended! Heat water in the bottom of the double boiler until it’s at a high simmer. In the top of the double boiler, whisk together eggs, egg yolks, lemon zest and juice, sea salt, and maple syrup. Add in the coconut oil one tbsp at a time, whisking continuously, not adding the next tbsp until the first is completely melted. Whisk in vanilla. Cook, stirring constantly, until the lemon curd thickens and will coat the back of a spoon (or your whisk leaves tracks) – usually around 5 to 8 minutes. It’s a noticeable change when it happens, so just watch the cooking magic! Remove from heat and store in a glass container in the fridge until ready for use.

Maple Glazed Hazelnuts:

  • 1/4 c pure maple syrup
  • 1 c roasted hazelnuts
  • sprinkle of sea salt

Remove most of the skins from the hazelnuts by rubbing them together; it doesn’t matter if there are skins left, but I try to get rid of the majority. Heat an empty saute pan (not nonstick) over medium heat; once heated, add maple (it will bubble and fizz) and hazelnuts. Cook for about 3-5 minutes, stirring continuously until the maple has caramelized. The nuts will feel a little soft, which is fine. Spread parchment paper on a baking sheet, pour out the nuts and spread them out a bit. They will harden as they cool. Store in an airtight jar at room temp for as long as they last which is realistically about five minutes.

Serve the cake with lemon curd, or not – your choice! Definitely with hazelnuts though, and quite possibly with ice cream. Store leftover cake in the fridge; covered with foil in the original pan is just fine. I’m here to attest that this cake is fabulous the next morning for breakfast!

IMG_1592

Pie in the sky(line)!

IMG_1559

I’ve discovered in the last year that I really love making fancy pies! That’s probably fairly obvious to anyone who reads this on a semi-regular basis — I’m still dreaming of one day starting a pie/dessert business – we shall see!

IMG_1546

21875573_10155821747858982_132222487_o

IMG_1547

This is a start at least – to benefit the Lamplighters at their annual Champagne Gala auction, I made pie! Excited to report that it went for $45 — not too shabby! Besides, it was such a joy to make and to help benefit a group I love — everyone is just winning all around :)

IMG_1550

This one is an ode to my beloved Bay Area – despite all its issues (traffic and ridiculous cost of living, to name a couple), there is nowhere I would rather live. Besides, since the Lamps are based in SF, it was a fitting auction contribution.

IMG_1554

IMG_1548

The recipe is the same I’ve made before; namely the Death Star pie (here) – I find wild blueberries are optimal for decorative pies, since the small berries don’t create distortions in the top crust like chunkier things do (think blackberries, rhubarb, and apples). Plus, they look like night sky, AND they’re delicious – what’s not to like. This pie was refined sugar free and whole wheat.

IMG_1552

IMG_1551

I’m excited for so many top crust ideas – since I draw my own templates, the options are endless! Watch this space for further pie shenanigans ;)

IMG_1535

IMG_1541


Kitchen wisdom is sage advice

IMG_1526

Sending all the good vibes and healing thoughts to those caught in the terrible wildfires in the North Bay – I can’t even imagine the scale of destruction happening. I don’t even live in the thick of it, and I still can’t see the sky on account of smoke. My heart hurts for my state and for those in the middle of it all.

IMG_1500

These bars can bring a little sunshine to otherwise smoky, obscured days – the citrus is bright and fresh, and we all know I’m obsessed with herbs in dessert, so this is no exception. The sage in the crust is noticeable but not aggressive – just a hint of earthiness to play up the brightness of the meyer lemons (locally grown, of course!). Blueberries and almonds go with just about anything, so why not invite them to the party too?

IMG_1508

These do double duty as dessert and breakfast (that seems to be a theme around here, hmm) – makes some amount of sense, since my desserts are almost all whole-food and fruit focused.

IMG_1524

Besides, these have a hefty dose of eggs which basically makes them breakfast. See? Science!

IMG_1505

In other news, there are finally leaves on the ground, and of course I’m excited about a return to sweater, boot and scarf weather. I’m a little sad at the shortening days though, especially because I miss my good morning photography light! Sigh. It will be back!

IMG_1484

IMG_1496
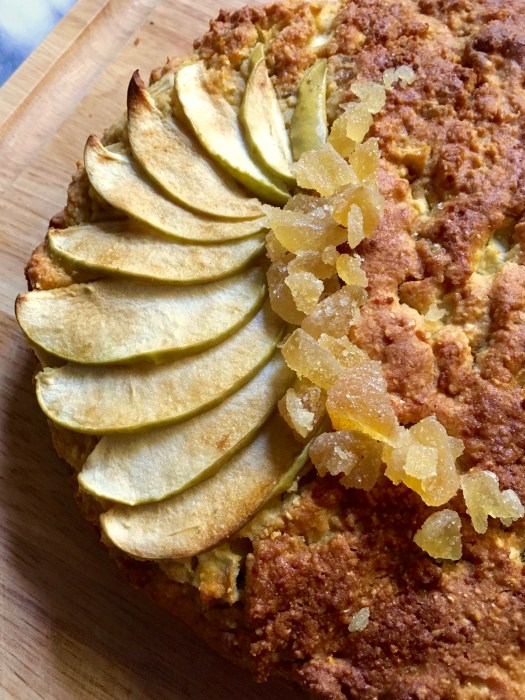
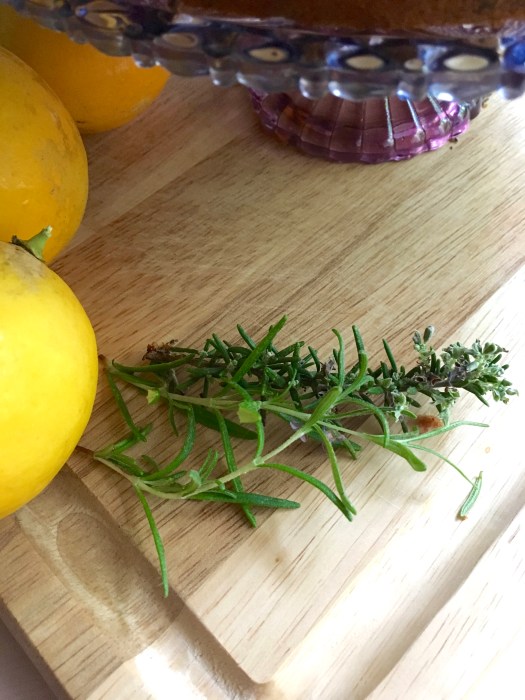
In the meantime, I’ll make bright, citrusy and quite probably herb-y desserts to bring some brightness to the shorter days. Happy Autumn!

IMG_1507

Meyer Lemon Blueberry Bars on an Almond Sage Crust

Lightly sweet, tangy, and perfect if you have a glut of meyer lemons (though regular lemons are fine too!). The sage adds such a nice earthy twist to the basic lemon bar – I love lemon with almond so these just hit all high points for me! Grain free, gluten free, refined sugar free, dairy free, arguably paleo. Yield: 1 9″ pie plate or 1 8 by 8 square pan, serves 2-8 (ha – I recommend dessert and then for breakfast the next day). Adapted from my orange creamsicle bars, here!

For the crust:

1.5 c almond flour
3/4 tsp baking soda
heaping 1/4 tsp fine sea salt
1/4 + 1/8 c unsalted almond butter
1.5 tbsp pure maple syrup
1.5 tbsp coconut oil, melted
2 tsp vanilla extract
1/4 tsp almond extract
1.5 tbsp chopped sage

Preheat the oven to 350, and grease an 9″ round pie dish (must be deep) or an 8 by 8 pan.

In a large bowl, stir together almond flour, baking soda, and sea salt. Add in almond butter, maple syrup, melted coconut oil, vanilla, and almond extract and stir until combined and crumbly. Stir in chopped sage. Press the crust dough evenly into the prepared pan, and poke with a fork a few times. Bake for 10 minutes. Remove and set aside when done.

For the filling:

4.5 eggs*
1/2 c pure maple syrup
zest of 3 meyer lemons, roughly chopped
1/4c + 1/8c fresh lemon juice
pinch of sea salt
4.5 tbsp coconut flour
2 tsp vanilla extract
* to achieve half an egg: crack an egg into a small bowl and whisk it; then either measure or eyeball half and use that. or just use a whole one as long as it’s small, I doubt it would affect the consistency of the bars all that much…

For the blueberry swirl:
1 c wild blueberries (preferably frozen, thawed)
1 tsp vanilla extract

While the crust is baking, make the filling! In a large bowl, whisk together eggs, maple, lemon zest and juice, sea salt, coconut flour (sifted if lumpy) and vanilla until smooth. Pour the filling into the par-baked crust. For the blueberry swirl, blend blueberries with their juice (some is released during thawing) and vanilla either with an immersion blender or a food processor. The sauce won’t be especially thick, but that’s fine. Pour the sauce into a ziplock bag (or use a piping bag, but be warned that blueberry stains!), carefully snip a really small triangle off of one corner, and pipe 5-6 lines across the lemon filling. Some will sink in, but most will stay on top (and no, the lines do NOT have to be perfect!). Take a table knife and swirl the lines gently into the filling.

Bake for 30-35 minutes. The top should be mostly firm and the filling set, with just a small amount of wiggle (it’ll firm up as it cools). Let cool completely and eat immediately or chill in the fridge for later (I like them cold!) — serve with vanilla ice cream :) Store any leftovers in the fridge.

IMG_1510

Eat, drink, and be even MORE rosemary!

IMG_1466

Despite the name of this blog, it’s been awhile since I’ve posted a cookie recipe on here – it’s high time I think.

IMG_1177

Additionally, I should note – the light was not playing nice with me the several times I photographed these little guys so apologies for the inconsistencies in the photos! (I am nitpicky about this kind of thing and therefore have to point it out… just in case you might have overlooked it. Ha!)

These are probably my most frequently made cookies – not even probably, they ARE my most frequently made cookies, so they really should be on here!

IMG_1349

They’re so easy to put together – the flour is really adaptable & I’ve never had a bad batch, even with many substitutions. This is my favorite version of the recipe though; as I said a few posts ago – you’ve been warned against the excess of rosemary & herby desserts upcoming!

IMG_1347

More rosemary! I just can’t get enough these days in a dessert setting. It is just so good – subtle and not overpowering, but just perfectly there to remind you that you’re eating something out of the ordinary. Besides, it pairs unbelievably well with dark chocolate and coconut.

IMG_1180

Let’s see, what else besides cookies lately?

IMG_1463

Another opera trip on a beautiful evening! Three times in one week, that has to be a record even for me.

IMG_1452

IMG_1453

I’m behind on drawing, I need to get back on that boat but I’ve just been too busy or distracted with one thing or another (might have something to do with the large pile of new books I just acquired).

IMG_1345

So! Cookies. Make yourself some rosemary goodness – these come together in just about 10 minutes; the most time consuming thing is chopping the rosemary and even that doesn’t take long. Instant cookie gratification in about 20 minutes – not too shabby! Also, you’ll end up smelling like a heavenly combination of rosemary and chocolate, and I really can’t think of anything better.

Happy baking!

IMG_1346

Rosemary Coconut Chocolate Chunk Cookies

Why stick to standard chocolate chip cookies when you could have rosemary in them?? It’s not overwhelming, just there in the background livening up your cookie experience. Chewy, thick cookies – these are perfect hiking snacks (or anytime snacks, really). Refined sugar free, dairy free, vegan (depends on your chocolate). Probably very easily adaptable to gluten free – a blend or oat flour would work nicely here I think! Yield: somewhere between 16-20, depending on how outrageously large you make them ;) A Wait are Those Cookies original!

  • 1 c whole wheat pastry flour (whole spelt works nicely here too)
  • 1 c almond flour
  • 1 c rolled oats
  • 1/2 c unsweetened shredded coconut
  • 1/2 tsp baking soda
  • 1 tsp baking powder
  • 1/2 tsp fine sea salt
  • 1 tbsp finely chopped fresh rosemary
  • 1 flax egg (1 tbsp ground flaxseed + 3 tbsp water)*
  • 1/3 coconut oil, melted and cooled
  • 1/3 c maple syrup
  • 1 tsp vanilla
  • 1/3 c extra dark chocolate, chopped (I use chunks and then chop them further so that I have a variety of chunk sizes & chocolate shavings)

*these are also great with an egg, if that’s your jam – I’ve made them both ways numerous times!

Preheat the oven to 350, and line a baking sheet or two with parchment paper. I usually shoot for 16 cookies and squash them all onto one baking sheet, because I can be lazy sometimes…

In a small bowl, combine flaxseed and water to make the flax egg, and set aside.  In a large mixing bowl, whisk together whole wheat flour, almond flour, oats, coconut, baking powder & soda, and salt. Chop the rosemary VERY finely and add it into the dry ingredients (large flecks of rosemary are slightly undesirable here). In a smaller bowl, whisk together melted coconut oil, maple syrup, and vanilla. Add wet ingredients, including flax egg, into dry and stir to combine. Stir in chocolate chunks until fully combined. Drop by the large tablespoon onto the prepared cookie sheets – I roll mine so they’re vaguely ball-shaped and then smash them down with the heel of my hand so they flatten a bit.

Bake for 11-12 minutes, until the top is nearly firm when you touch it. Remove from the oven and let cool on the baking sheets for 5ish minutes, until cool enough to handle, then move to a cooling rack to cool completely (these aren’t super fragile, but just be aware when moving them to the cooling rack).

I like these cold out of the fridge, but they’re great at room temp too. You do you! Happy snacking :)

IMG_1179

Dessert straight out of Dagobah

IMG_1443

Green things!

IMG_1417

Because of course I would make myself something ridiculously green for a (belated) birthday dessert!

IMG_1427

IMG_1431

Naturally it would also have a tiny Yoda in it, because that seems to have become the birthday dessert tradition around here (reference this cake!) and I am unashamedly nerdy – besides that, this dessert looks like it’s just come out of Dagobah, so it only seems fitting that Yoda would take up residence, right?

img_1438.jpg

IMG_1436

I have to say, I LOVED this (there I go again blowing my own horn regarding my baking, oops sorry). I already love matcha lattes, but this was something else. Earthy, lightly chocolatey, and not one of those desserts that put you into a coma – it’s the perfect post-opera snack and breakfast alongside eggs. Besides, then you can drink your coffee and eat your tea!

IMG_1426

Besides all that, how fun to have something so GREEN for dessert? And then alongside other greens at breakfast (because tea is breakfast food, obvs) – I was having fun with all of the tones of green (art history nerdiness is making an appearance, clearly).

IMG_1442

I mean, this thing is really aggressively green. It is not for the faint of heart, but luckily myself and the one I fed it to loved it, and is obviously fine with green dessert.

IMG_1424

IMG_1439

Among other things, I will have been to the opera three times by Saturday night – YAY!  Green dessert + opera is my kind of week!

IMG_1413

IMG_1397

So! Like green tea? Do yourself a favor and make a matcha tart! You won’t be sorry, and you can impress your friends with the GREEN-NESS of it all!

IMG_1441

Matcha Custard Tart on Cacao Coconut Almond Crust

Lightly sweet and perfect for those who love their matcha lattes! This is somewhere between a custard and a mousse – the filling is light & earthy, and plays perfectly against the chocolate crust. Grain and gluten free, refined sugar free, dairy free, and paleoish (it’s sweetened with maple, so it depends on your def of paleo). Yield: 1 9″ tart. Serves: 2. Ha! Eat for dessert & breakfast, because tea = breakfast food.

For the crust:

1.5 c almond flour
1/3 c unsweetened cacao powder
1/2 c unsweetened shredded coconut
heaping 1/4 tsp sea salt
1/2 tsp baking soda
2 tsp vanilla extract
2 tbsp pure maple syrup
3.5 tbsp coconut oil, melted

In a large bowl, stir together almond flour, cacao powder, coconut, sea salt, and baking soda. Add in vanilla, maple, and melted coconut oil and stir until completely combined. The dough will look crumbly, but you’ll be able to press it together with your fingers.

Preheat the oven to 350, and lightly grease a pie plate with coconut oil. Press the crust into the plate and up the sides with a spoon or your fingers, creating a smooth edge (or not, your call!). Poke the bottom with a fork a few times, and bake for 15 minutes.

Increase the oven temp to 375. While the crust is baking, make the custard.

For the matcha coconut milk custard:

3 cups coconut milk
3 large eggs
1/3 c maple syrup
3 tablespoons tapioca starch
2 tablespoons culinary-grade matcha powder
2 teaspoons pure vanilla extract
1/4 teaspoon pure almond extract
1/8 teaspoon fine sea salt

Heat coconut milk in medium saucepan over medium-low heat until it just barely simmers, about 5 minutes. Meanwhile, whisk together eggs, sugar, cornstarch, matcha powder, vanilla, and salt in medium bowl.

Whisk warm milk into egg mixture in slow, steady stream to temper the eggs. Return egg and milk mixture to saucepan and cook over medium-low heat, stirring constantly and scraping the bottom of the pan, until custard begins to thicken and forms a ridge on tip of spoon when bottom of pan is scraped and spoon is lifted, about 4-6 minutes. Remove crust from the oven and pour in the custard*. Bake until custard has set around edges but jiggles slightly in the center when shaken, 13-15 minutes. Cool to room temperature, about 2 hours. Refrigerate until serving.

Decorate with raspberries, strawberries & coconut (and a tiny Yoda) if you’re so inclined! Serve with ice cream for dessert or eat straight up for breakfast. Refrigerate any leftovers, covered.

*Note – I had slightly more custard than what would fit comfortably in my pie plate. You have options here – bake it in some smaller ramekins until set, or maybe add some tapioca pearls and make pudding? I didn’t do that but now I wish I had! If you do, let me know how it turns out…

IMG_1432

IMG_1433


Eat, drink and be rosemary

IMG_1390

THIS CAKE.

IMG_1389

OMG.

IMG_1368

Okay okay I know the rule is you’re not supposed to say your own cooking is amazing, but… I’m going to break it. For this cake.

Because, it is OUTSTANDING.

IMG_1369

Probably my favorite cake I’ve ever made, to date. And I’m not the only one – it got rave reviews from the lucky duck who got to eat most of it. So, I consider that a win.

IMG_1371

I am loving rosemary and more ‘savory’ herbs in desserts lately – apologies in advance if there’s suddenly a bumper crop of rosemary or herby desserts on here. It’s just SO good! This cake teeters on the edge between sweet and savory – it’s really not all that sweet, but it’s perfectly satisfying for dessert with some ice cream and strawberries, and perfect for breakfast alongside some eggs and kale (and coffee. obvs).

IMG_1365

I will absolutely be making this again (I think other parties would be amenable to this as well… no, I KNOW they would, they said so!) – it really is my new favorite, go-to cake. It’s also really quick to throw together – the most time consuming part is likely mincing rosemary. But it’s worth it, when your hands and kitchen smell deliciously like rosemary and chocolate and lemon zest.

IMG_1386

In other news, I did some *colorful* art the other day! A short break from my black ink and paper usual beat. It was lovely to paint again – I miss having paint on my hands! I’ll have to rectify that, and soon.

IMG_1343

Do yourself a favor and bake. It’s not so hot right now; the weather is perfect for baking and sharing. Make cake. Feed the ones you love!

IMG_1351

IMG_1378

Rosemary, Meyer Lemon Yogurt Cake with Dark Chocolate

This cake is a breeze to throw together; and it’s absolutely beyond delicious for either dessert with ice cream & sliced berries, or for breakfast. Lightly sweet and very aromatic, the rosemary is perfectly complemented by the chocolate and hint of lemon. Coconut oil makes for a slightly denser cake with a moist (hydrated?!) crumb. Easily could be gluten free and dairy free – substitute any gluten free all purpose blend for the whole wheat and non-dairy greek-style yogurt for the whole milk greek I used here. Refined sugar free and whole wheat. Yield: 1 8″ cake, serves…. 2! Jk. More like 8 (but save some for breakfast!)

  • 1 c plain Greek yogurt (I use whole milk greek)
  • 2/3 c coconut oil, melted, plus more for coating the pan
  • 1/3 + 1/6 c maple syrup
  • 1 tablespoon finely chopped fresh rosemary
  • 1 teaspoon finely grated meyer lemon zest
  • 1 tsp vanilla extract
  • 3 large eggs
  • 1 c whole wheat pastry flour
  • 1/2 c almond flour
  • 1/2 tsp baking powder
  • 1/2 tsp baking soda
  • 1/4 tsp fine sea salt
  • 1/3 c dark chocolate chunks (mine were 70%)

Preheat the oven to 325, and lightly grease an 8″ or 9″ round cake pan with coconut oil (I used 8″ and it was perfect with no spillage; you’ll have a slightly shorter cake if you use a 9″).

In a large bowl, whisk together greek yogurt, melted coconut oil, maple syrup, rosemary, lemon zest, and vanilla until smooth. Whisk in the eggs, one at at time. In a smaller bowl, whisk together whole wheat flour, almond flour, baking powder, baking soda, and sea salt. Add dry into wet, stirring until just combined. Roughly chop the dark chocolate chunks (I like how that yields a variety of chunk size) & add them to the batter. Scrape the batter into your prepared pan, and bake for 40-45 minutes. The top should be golden brown & a tester should come out clean – I took mine out at 40, but realistically it probably could have used another 2-3 minutes to get the center full done (there was a small spot that was less done than I would prefer).

Let the cake cool for 10 minutes in the pan, then run a knife around the edge, flip the cake onto a plate and then back onto a cooling rack to cool completely. Serve with ice cream (why not?); sliced strawberries are also excellent.

Store any leftovers covered in the fridge overnight – the cake will solidify a bit & be extra delicious for breakfast the next morning.

IMG_1383

Gettin’ figgy with it

IMG_1297

My morning yesterday was perfect: zesting meyer lemons early in the morning, to the sound of rain in the leaves and thunder overhead, under cloudy skies.

IMG_1160

Well, it would have been extra perfect with a latte, but no such luck!

IMG_1298

I LOVE the rainy weather we’ve been having – we don’t get summer storms all that often out here, so I’ve really been enjoying them (minus the super muggy nights – I could really do without that). We’ve also had cooler days, hooray! No more turning my apartment into a sauna by virtue of turning on my oven…

IMG_1262

A few shots from life lately… My last series of weekend snapchats was so stereotypically Bay Area Californian, I had to laugh at myself. Latte –> poolside lounging (with sci-fi novel, obvs) –> whole foods flower display –> sushi….

IMG_1225

IMG_1226

IMG_1227

IMG_1229

However. This is a food blog (well, okay… dessert & baking blog these days), so let’s back to the topic at hand!

IMG_1264

This pudding cake is really fun to make – it totally looks like it’s not going to work when it goes in the oven (fingers crossed, beseeching the baking gods) – the cake batter sinks into the pudding underneath and you think to yourself “OMG THIS IS NOT GOING TO WORK AND I WILL BE SCREWED!” but then… you put it in the oven 25 minutes, try to walk away and ignore it….

IMG_1268

Lo and behold, when you take it out, there is CAKE on top of your PUDDING SAUCE! Borderline baking miracle right there, just the sort of thing to make you feel like you’ve won your day, even when it’s only 7am.

IMG_1158

Happy almost-weekend!

IMG_1261

Meyer Lemon Vanilla Pudding Cake with Port Roasted Figs

Refined sugar free and whole wheat. I reduced the sugar heavily & used maple for unrefined-ness, because of personal proclivities… Lightly sweet, super fun concept where the cake bakes into a pudding bath, basically. Essentially it becomes a self-saucing cake, which looks like it won’t work, but it does! Adapted from King Arthur Flour, here. Yield: 1 8″ cake, serves 2-5 (but really 2, for dessert & breakfast w/ a few snacking leftovers…)

The port roasted figs are also a great way to use an abundance of figs if you can’t eat them all fresh – they freeze well, and can be kept into the dark winter months when you want some figgy goodness!

For the roasted figs:

  • 1 lb fresh figs (however many you need or want!)
  • 1 tbsp honey
  • 1 tbsp coconut sugar
  • 2 tbsp port wine
  • zest from 1 meyer lemon

Preheat the oven to 400, and procure a baking sheet. Slice the ends off each fig, and then halve them. In a large bowl, toss the halved figs with honey, coconut sugar, port, and lemon zest, then place them cut-side down on the baking sheet.

Cover the baking sheet with foil, and roast for 20 minutes. They will be soft, with more liquid – if you want them drier, bake for 30 minutes, uncovered. When done, carefully remove the foil (watch out for steam!) and let them cool completely. Store in an airtight container in the fridge for a week, or freeze – I’d say use them within 3 months if you freeze them, for best quality.

For the sauce:

  • 1 tablespoon tapioca starch
  • 1 1/2 cups whole milk, divided
  • 3 tablespoons maple
  • 1 teaspoon vanilla
  • 1/8 teaspoon salt
  • zest of 1 meyer lemon, finely chopped
  • 2 tsp meyer lemon juice

For the cake:

  • 1 cup whole wheat pastry flour
  • 1/4 c maple syrup
  • 1 tbsp coconut sugar
  • 1.5 teaspoons baking powder
  • 1/2 teaspoon fine sea salt
  • 1 large egg
  • 3/4 cup whole milk, minus 2 tbsp
  • 3 tablespoons unsalted butter, melted
  • 1 tablespoon vanilla extract
  • zest of 2 meyer lemons, finely chopped
  • 3 tbsp meyer lemon juice

Preheat the oven to 350°F. Butter an 8″ square pan (I used a ceramic baking dish with nice results).

To make the sauce: place tapioca in a saucepan and add 2 tablespoons of milk, stirring until no lumps remain. Add the remaining milk, maple, vanilla, salt, and lemon zest. Heat, stirring occasionally, just until the mixture simmers, about 5 minutes. It will thicken slightly but no more than that. Pour the mixture into the prepared pan.

To make the cake: in a largish mixing bowl, whisk together the flour, baking powder, and salt. In another bowl, whisk together the egg, milk, butter, vanilla, lemon zest and lemon juice (Or, if you’re me and baking at 6 am and kind of sleepy, just dump it all in one bowl – it’ll turn out just fine). Add to the dry ingredients and mix just until moistened. Pour the batter into the prepared pan over the sauce. It will kind of puddle into the sauce, which will creep up around the sides, and you will look at it and think that this will never work, but stick with me! Promise.

Bake the cake for 25 minutes, or until a toothpick inserted in the center of the cake comes out clean. The top of the cake will be golden brown, with some bubbles from the pudding that has crept up around the edges. Remove from the oven, cool for 15 minutes, and serve warm, OR refrigerate until ready to serve. Reheat briefly before serving (or just leave at room temp for a few hours). Store covered leftovers in the fridge & eat for breakfast (it’s essentially breakfast food anyway: maple, milk & whole wheat…) Serve with roasted figs, warmed.

IMG_1265

Sometimes dessert is just messy and comical

IMG_1221

BEWARE THE BLOB!

I had to laugh when I took this out of the oven. I’m not sure if it was due to the humidity or what, but when I made cream biscuits this time, instead of staying all nice and biscuit-y shaped, they all just decided to merge and become… the BLOB!

IMG_1202

You can kind of see the divisions between the biscuits (there are technically 8 of them), but I still cracked myself up when I took it out. Not to mention the very red berry juice making its escape over the sides…

IMG_1219

Add to that the explosion of berry juice that occurred in my oven – thank heavens for precautionary foil; I only had one really (quite large) entrepreneurial drip escape its confines and end up on the oven floor – this is one of those desserts that definitely tastes better than it looks! Although if you’re going for comic value… well…

IMG_1215

Also not helped by some odd overcast light this morning when I was trying to photograph before running off to the office.. sorry for the slightly off photos. If I promise it’s delicious, will you believe me?! I wouldn’t virtually feed you subpar food, promise.

Regardless of what it looks like, this cobbler is a great excuse for using up the last of summer berries – no more white shoes for you! It’s after Labor Day! Not that I really ever follow that rule, or even own white dress shoes…

A few things from late-summer life lately:

IMG_1173

IMG_1186

IMG_1196

Anyway. You really don’t need an excuse to make cobbler, so what are you waiting for? Go create a blob of your very own! But… don’t say I didn’t warn you…. BEWARE THE BLOB!

Hehe.

IMG_1216

Summer Berry Cobbler with Meyer Lemon Cream Biscuits

Lightly sweet and (barely) naturally sweetened, and perfect for showcasing the last of summer’s berries. Strawberries, blackberries and raspberries play perfectly with meyer lemon, present both in the filling and in the cream biscuits. Whole grain and refined sugar free. Adapted from the rhubarb ginger mint cobbler I made awhile back, here. Yield: 1 9″ cobbler; serves… several. Or two. Your call!

For the filling:

  • 4 c strawberries, quartered (unless they’re really small, in which case halved is fine)*
  • ~1 c mixed blackberries & raspberries**
  • zest of 1 meyer lemon
  • juice of 1 meyer lemon
  • 2 tbsp maple syrup
  • 1 tsp vanilla extract
  • 1/4 c arrowroot starch

*Basically, you want as much fruit as you need to fill your pan of choice. This about does it for me in my 9″ pie plate; I need a larger dish though since mine totally overflowed this time… whoops

**I bake straight from frozen (usually I buy mine when on sale & freeze them for later); fresh would also be fine

For the cobbler topping:

  • 1 c whole wheat pastry flour
  • 1/2 c whole grain spelt flour
  • zest of 2 meyer lemons
  • 2 tbsp meyer lemon juice
  • 2 tsp coconut sugar + a little extra for brushing the biscuit tops
  • 3/4 tsp baking powder
  • 3/4 tsp fine sea salt
  • 1 tsp vanilla extract
  • 1.5 c heavy cream (I prefer Straus because… it’s the best!), divided + a little extra for brushing the biscuit tops

Preheat the oven to 375, and grab a 9″ pie dish (or an 8 by 8 pan would be fine too I’m sure; so would a cast iron skillet if you’d rather) Just make sure whatever you use is deep enough! Not that I speak from experience…. Stick some foil on the rack below the rack on which you’ll bake the cobbler, just in case of drips.

In a large bowl, toss together strawberries, raspberries & blackberries, maple syrup, arrowroot, lemon juice & zest, and vanilla. Let sit for at least 5 minutes — easiest to do this while you put together the cream biscuit for the cobbler topping.

For the cream biscuits: in a large bowl, stir together whole wheat and spelt flours, lemon zest, coconut sugar, baking powder and sea salt. Stir in the heavy cream and lemon juice until combined – the dough will be sticky & rather wet (but DELICIOUS). Spoon large dollops of dough onto the top of the cobbler – I used a large spoon and got about 8 biscuits; you can make them smaller if you like! Brush with a bit of extra cream and sprinkle with coconut sugar. Mine obviously all became one big blob, but whatever. Delicious.

Bake for 45-55 minutes, until the cobbler is beginning to go golden around the edges, and the fruit is bubbling (or the juices runneth over…). A thermometer (if you have one) is useful here – the internal temp of the centermost biscuit should be 200F. Let cool before serving – awesome either warm out of the oven, or room temp later – with ice cream either way, obviously. AND it’s even better for breakfast the next day; leftovers keep well, covered in the fridge.

IMG_1205