Pink panna cottas

Hi friends!

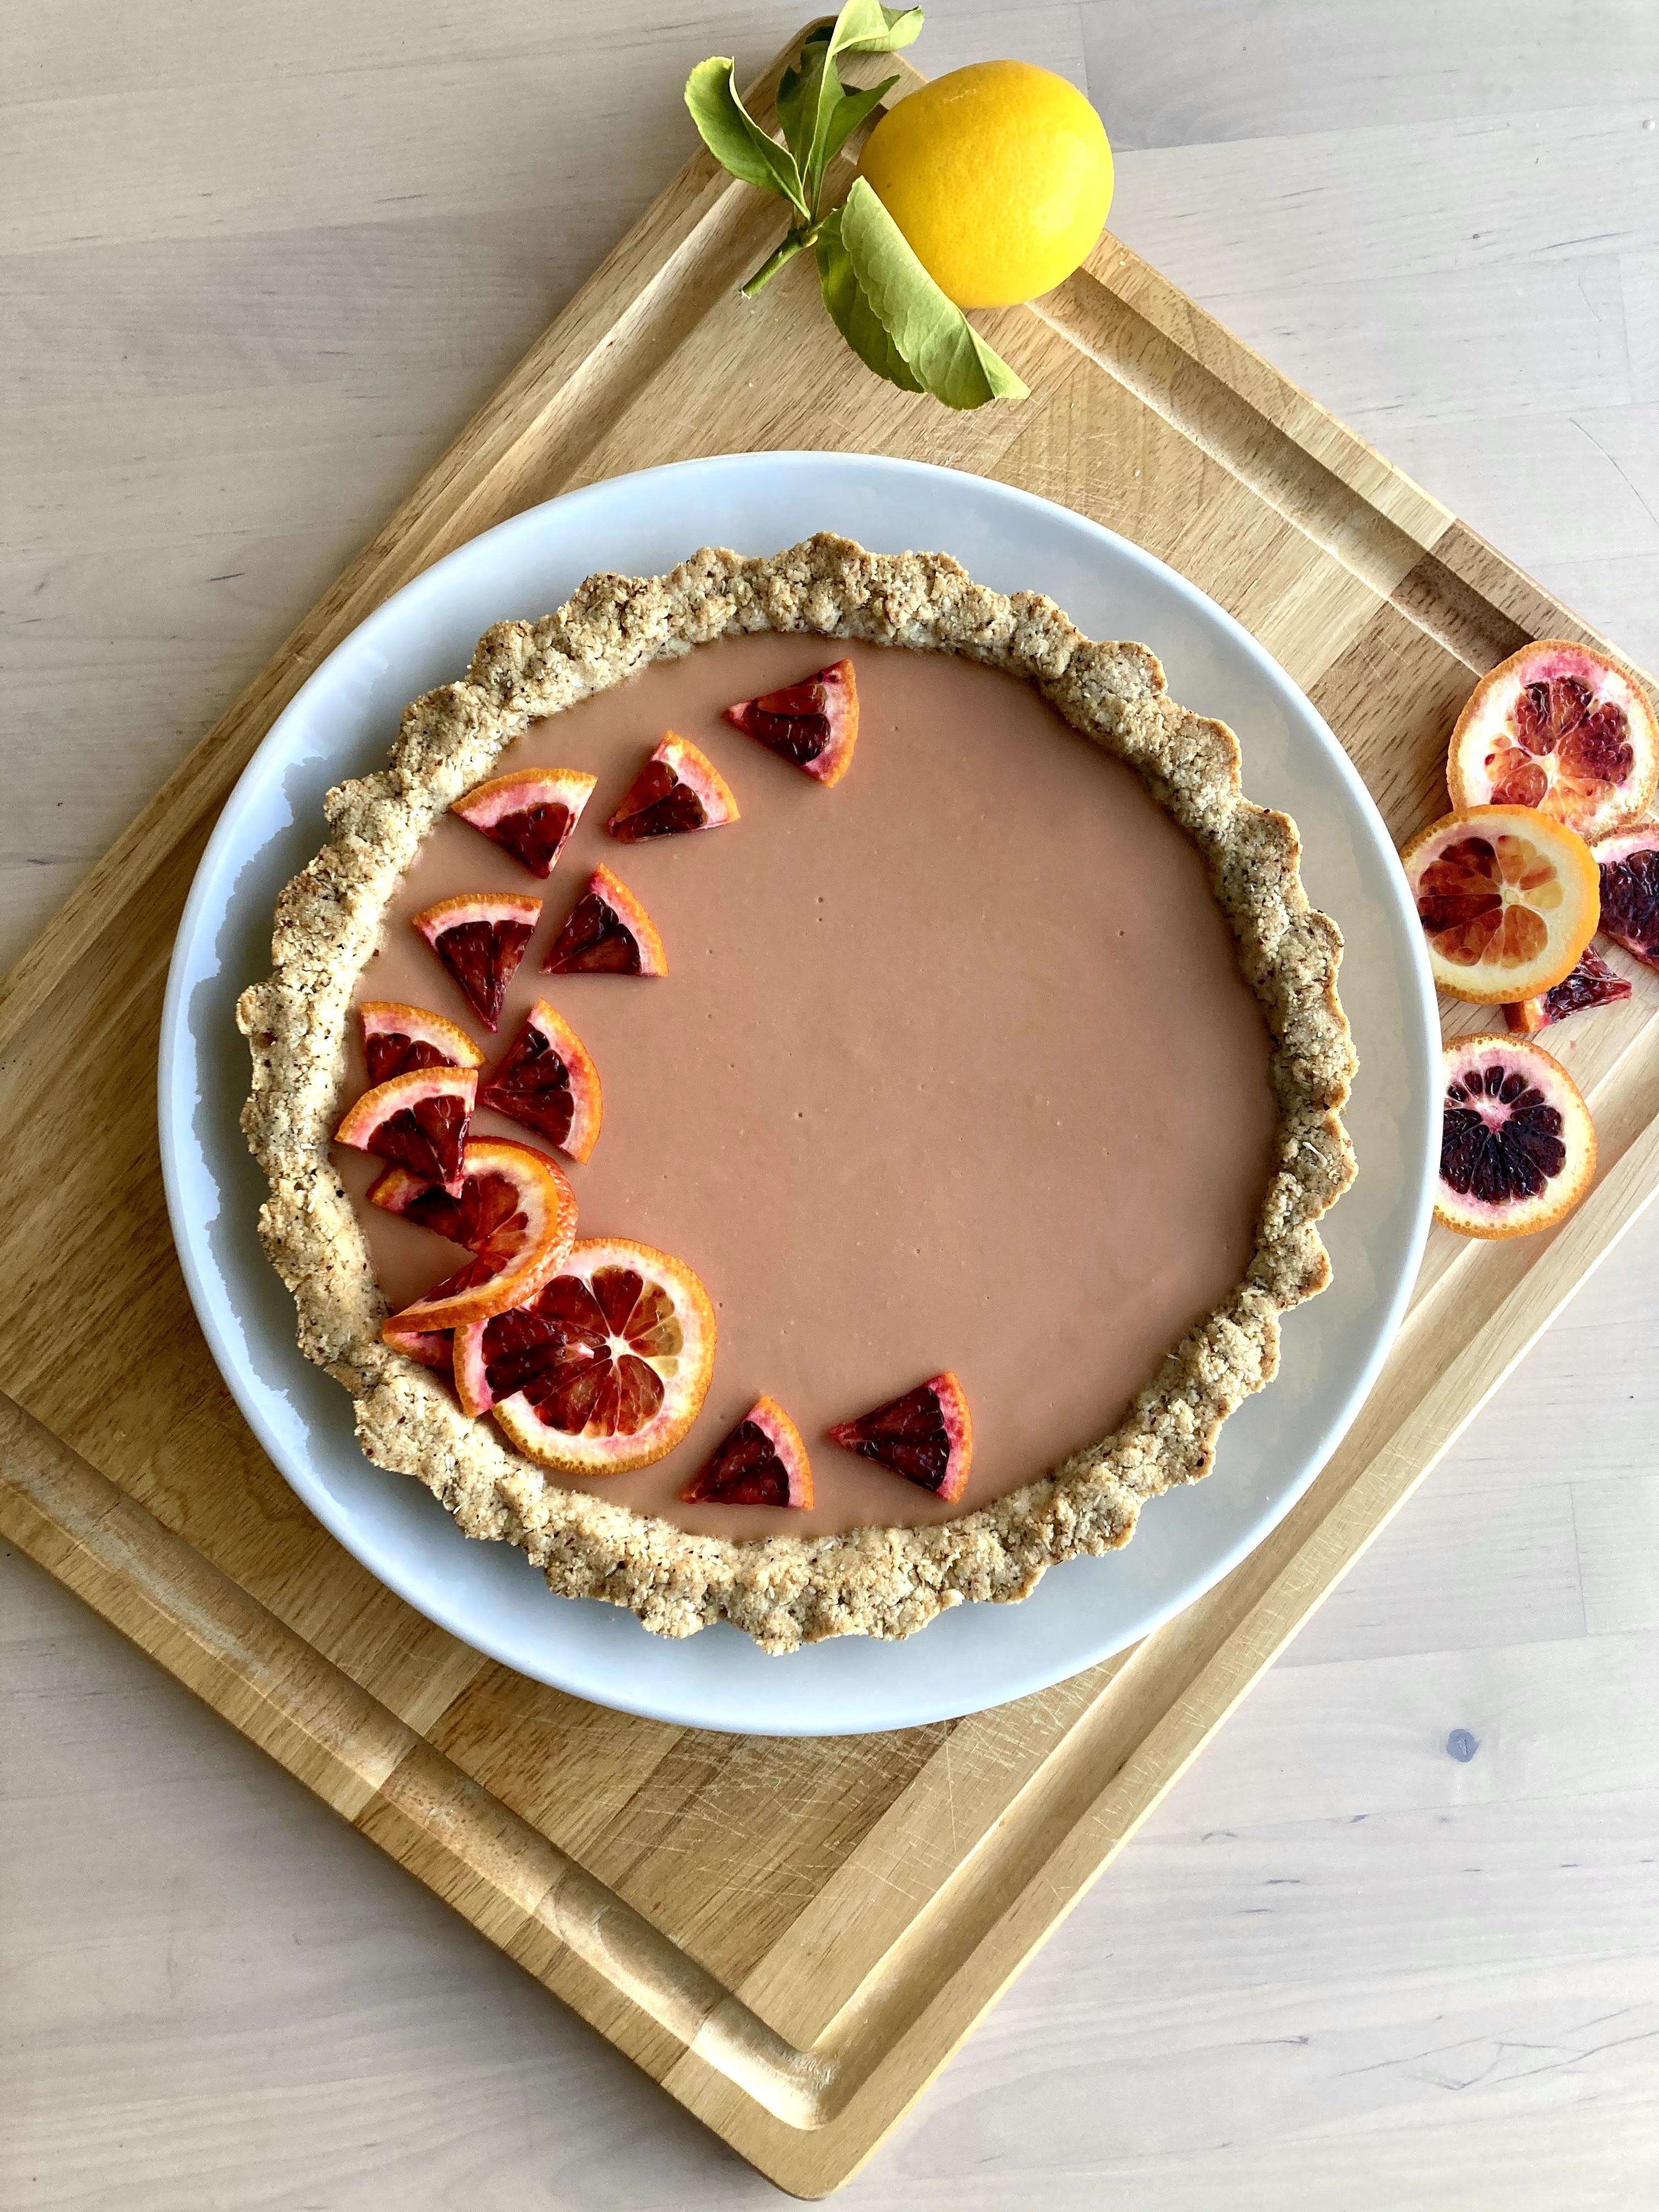
Took a week off last week but I’m back with this tart that is big on the visual impact, light on the actual work you have to do. I definitely love involved baking projects, but there is a time and a place for them – sometimes you just want something that is very pretty and very simple to put together.

I think panna cottas can sound intimidating, but they’re really not! Basically, you’re just heating coconut milk and a few flavoring things until they simmer, stirring in gelatin, and then waiting for it to set. Added bonus is that this guy can be (and arguably should be) made the night before, which frees up the next morning for things like swimming in the bay at 8a when it’s still below 50 degrees out, like the crazy that you are.

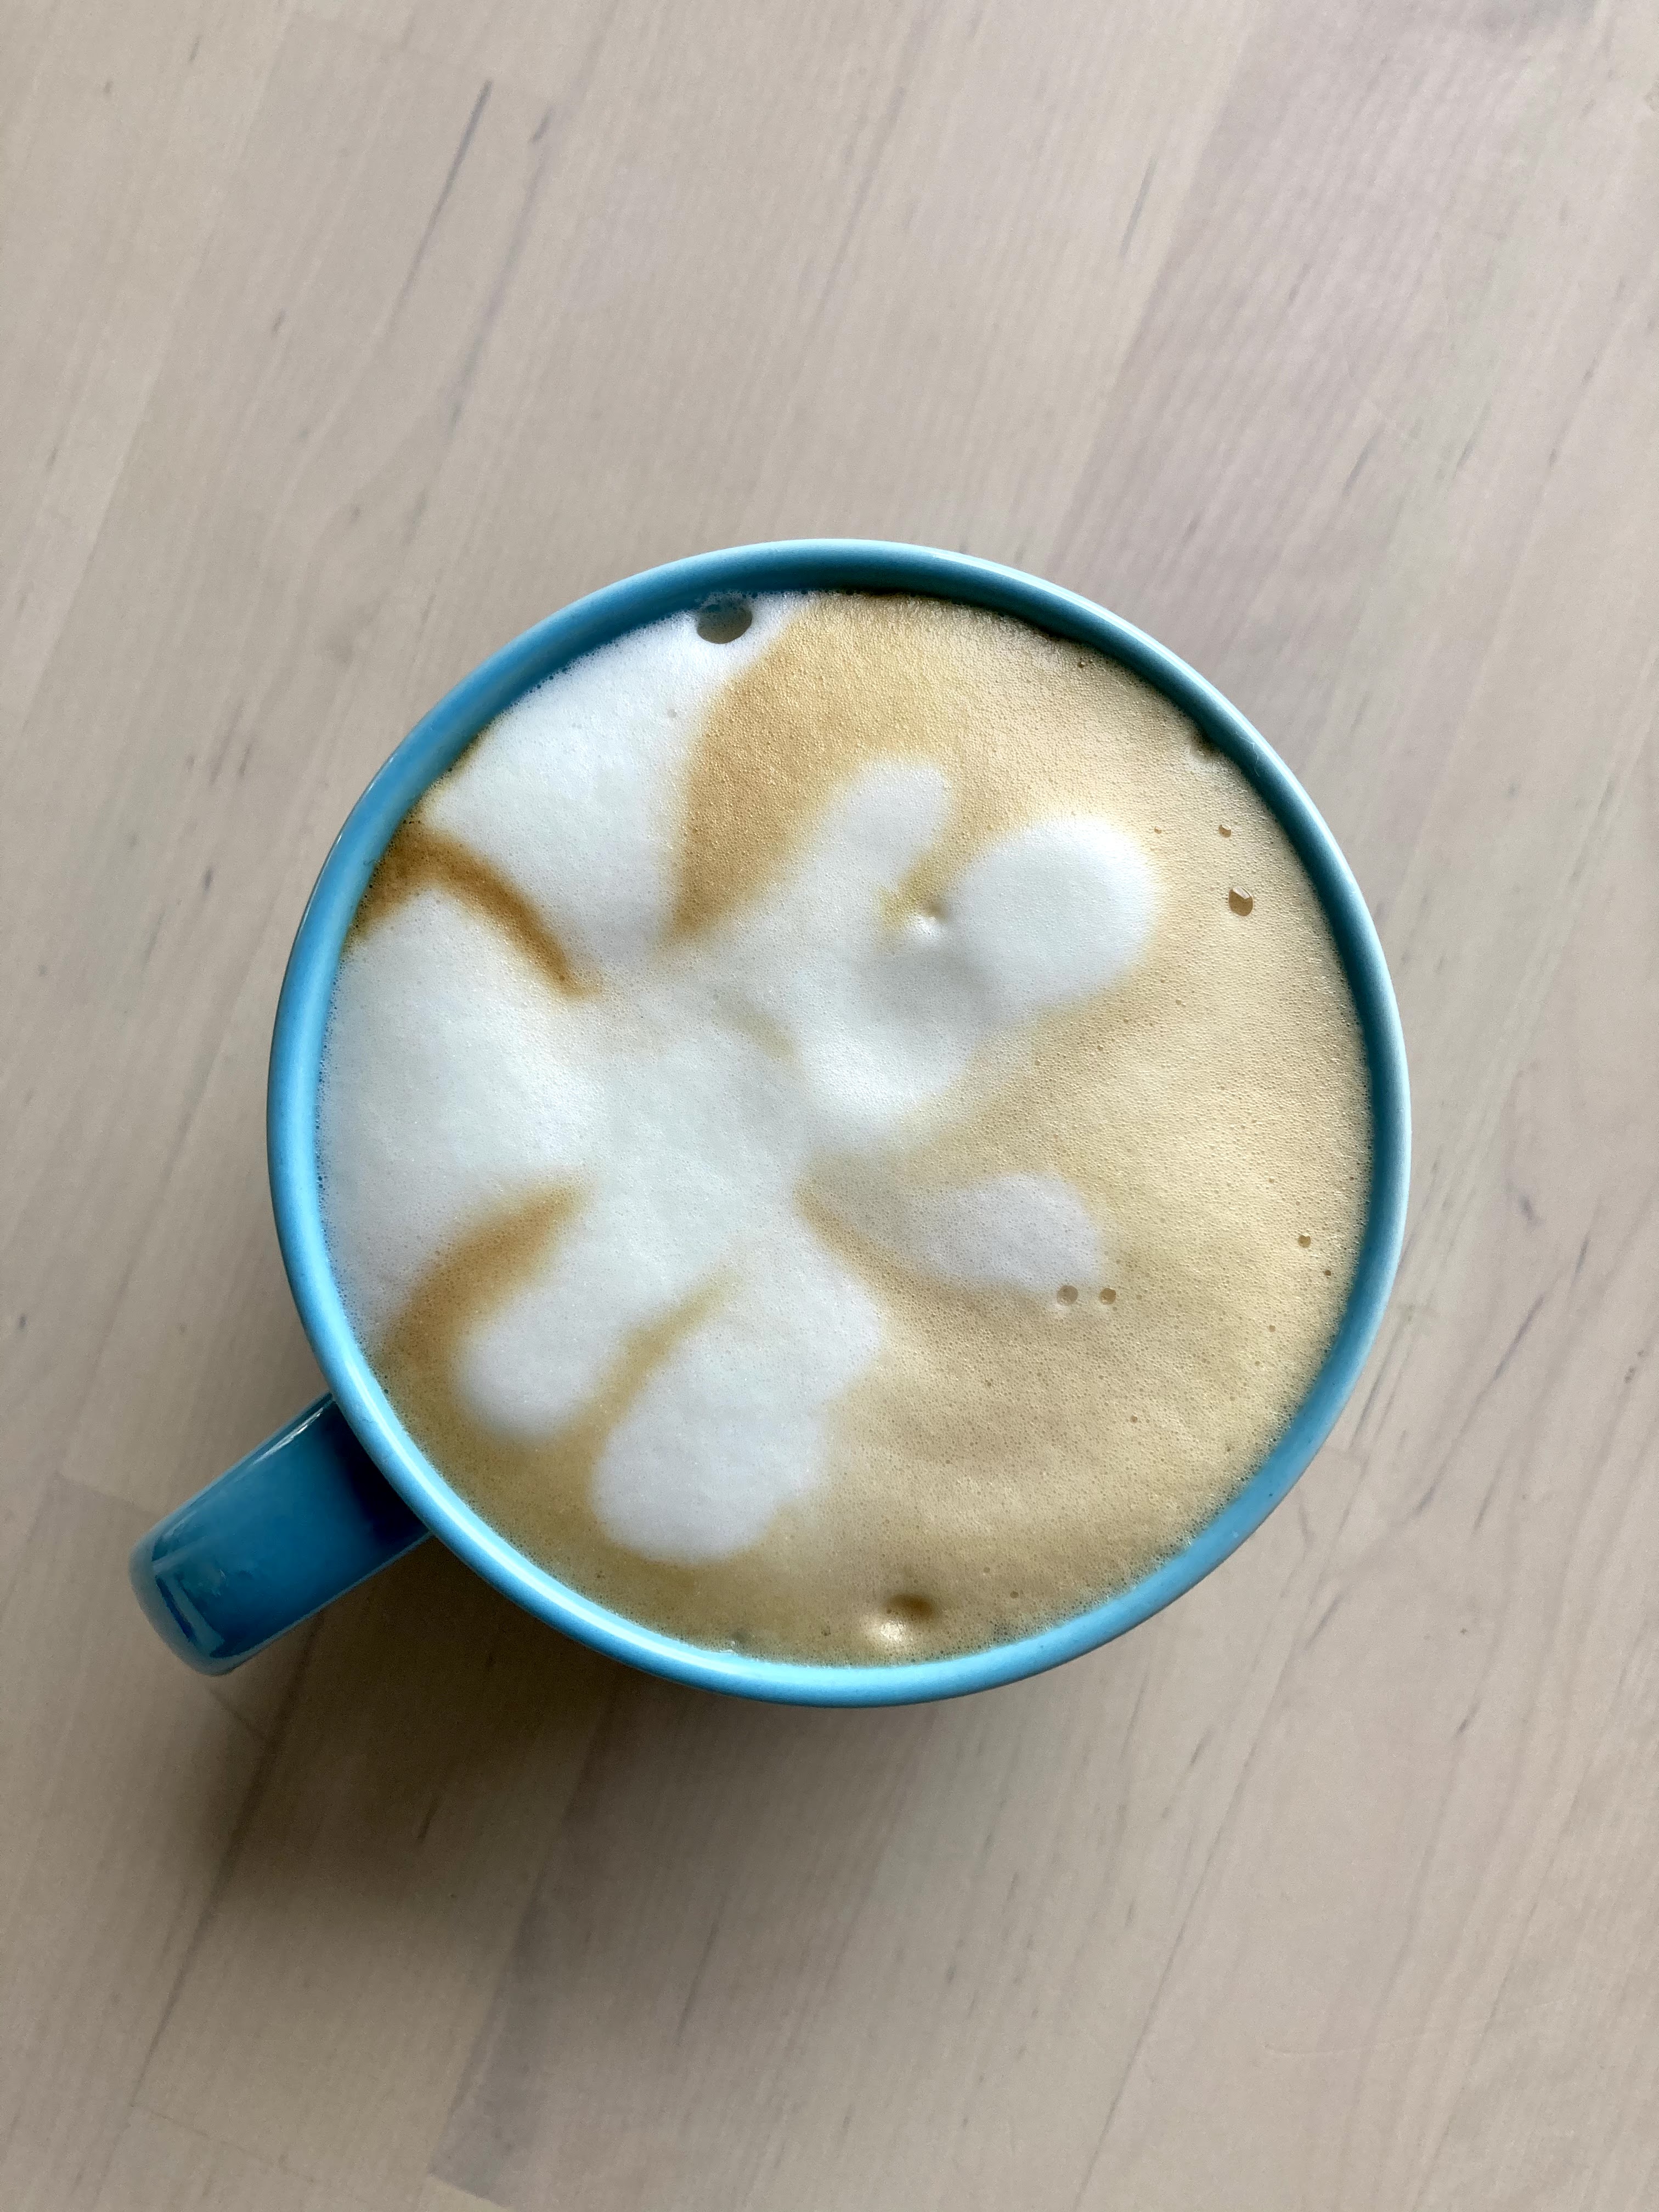
I didn’t even have coffee before I swam this morning – who am I?! It was cloudy but the water was perfectly still (or as still as the bay ever really gets) which is my favorite combination of swimming conditions. No sea lion friends in the cove today though.

I created some inadvertent latte art with my residually cold hand after I got home – or maybe it’s a coffee Rorschach?

Anyway, back to the tart: this one was the result of me really not wanting to go to the market for more food. I do enjoy grocery shopping but I was NOT in the mood this week, so just wanted to keep it simple with what I had. I’m low on fruit but I did have half a bag of raspberries in the freezer, which work perfectly for this since you end up straining out the solids anyway (so the berries don’t have to be pretty!)

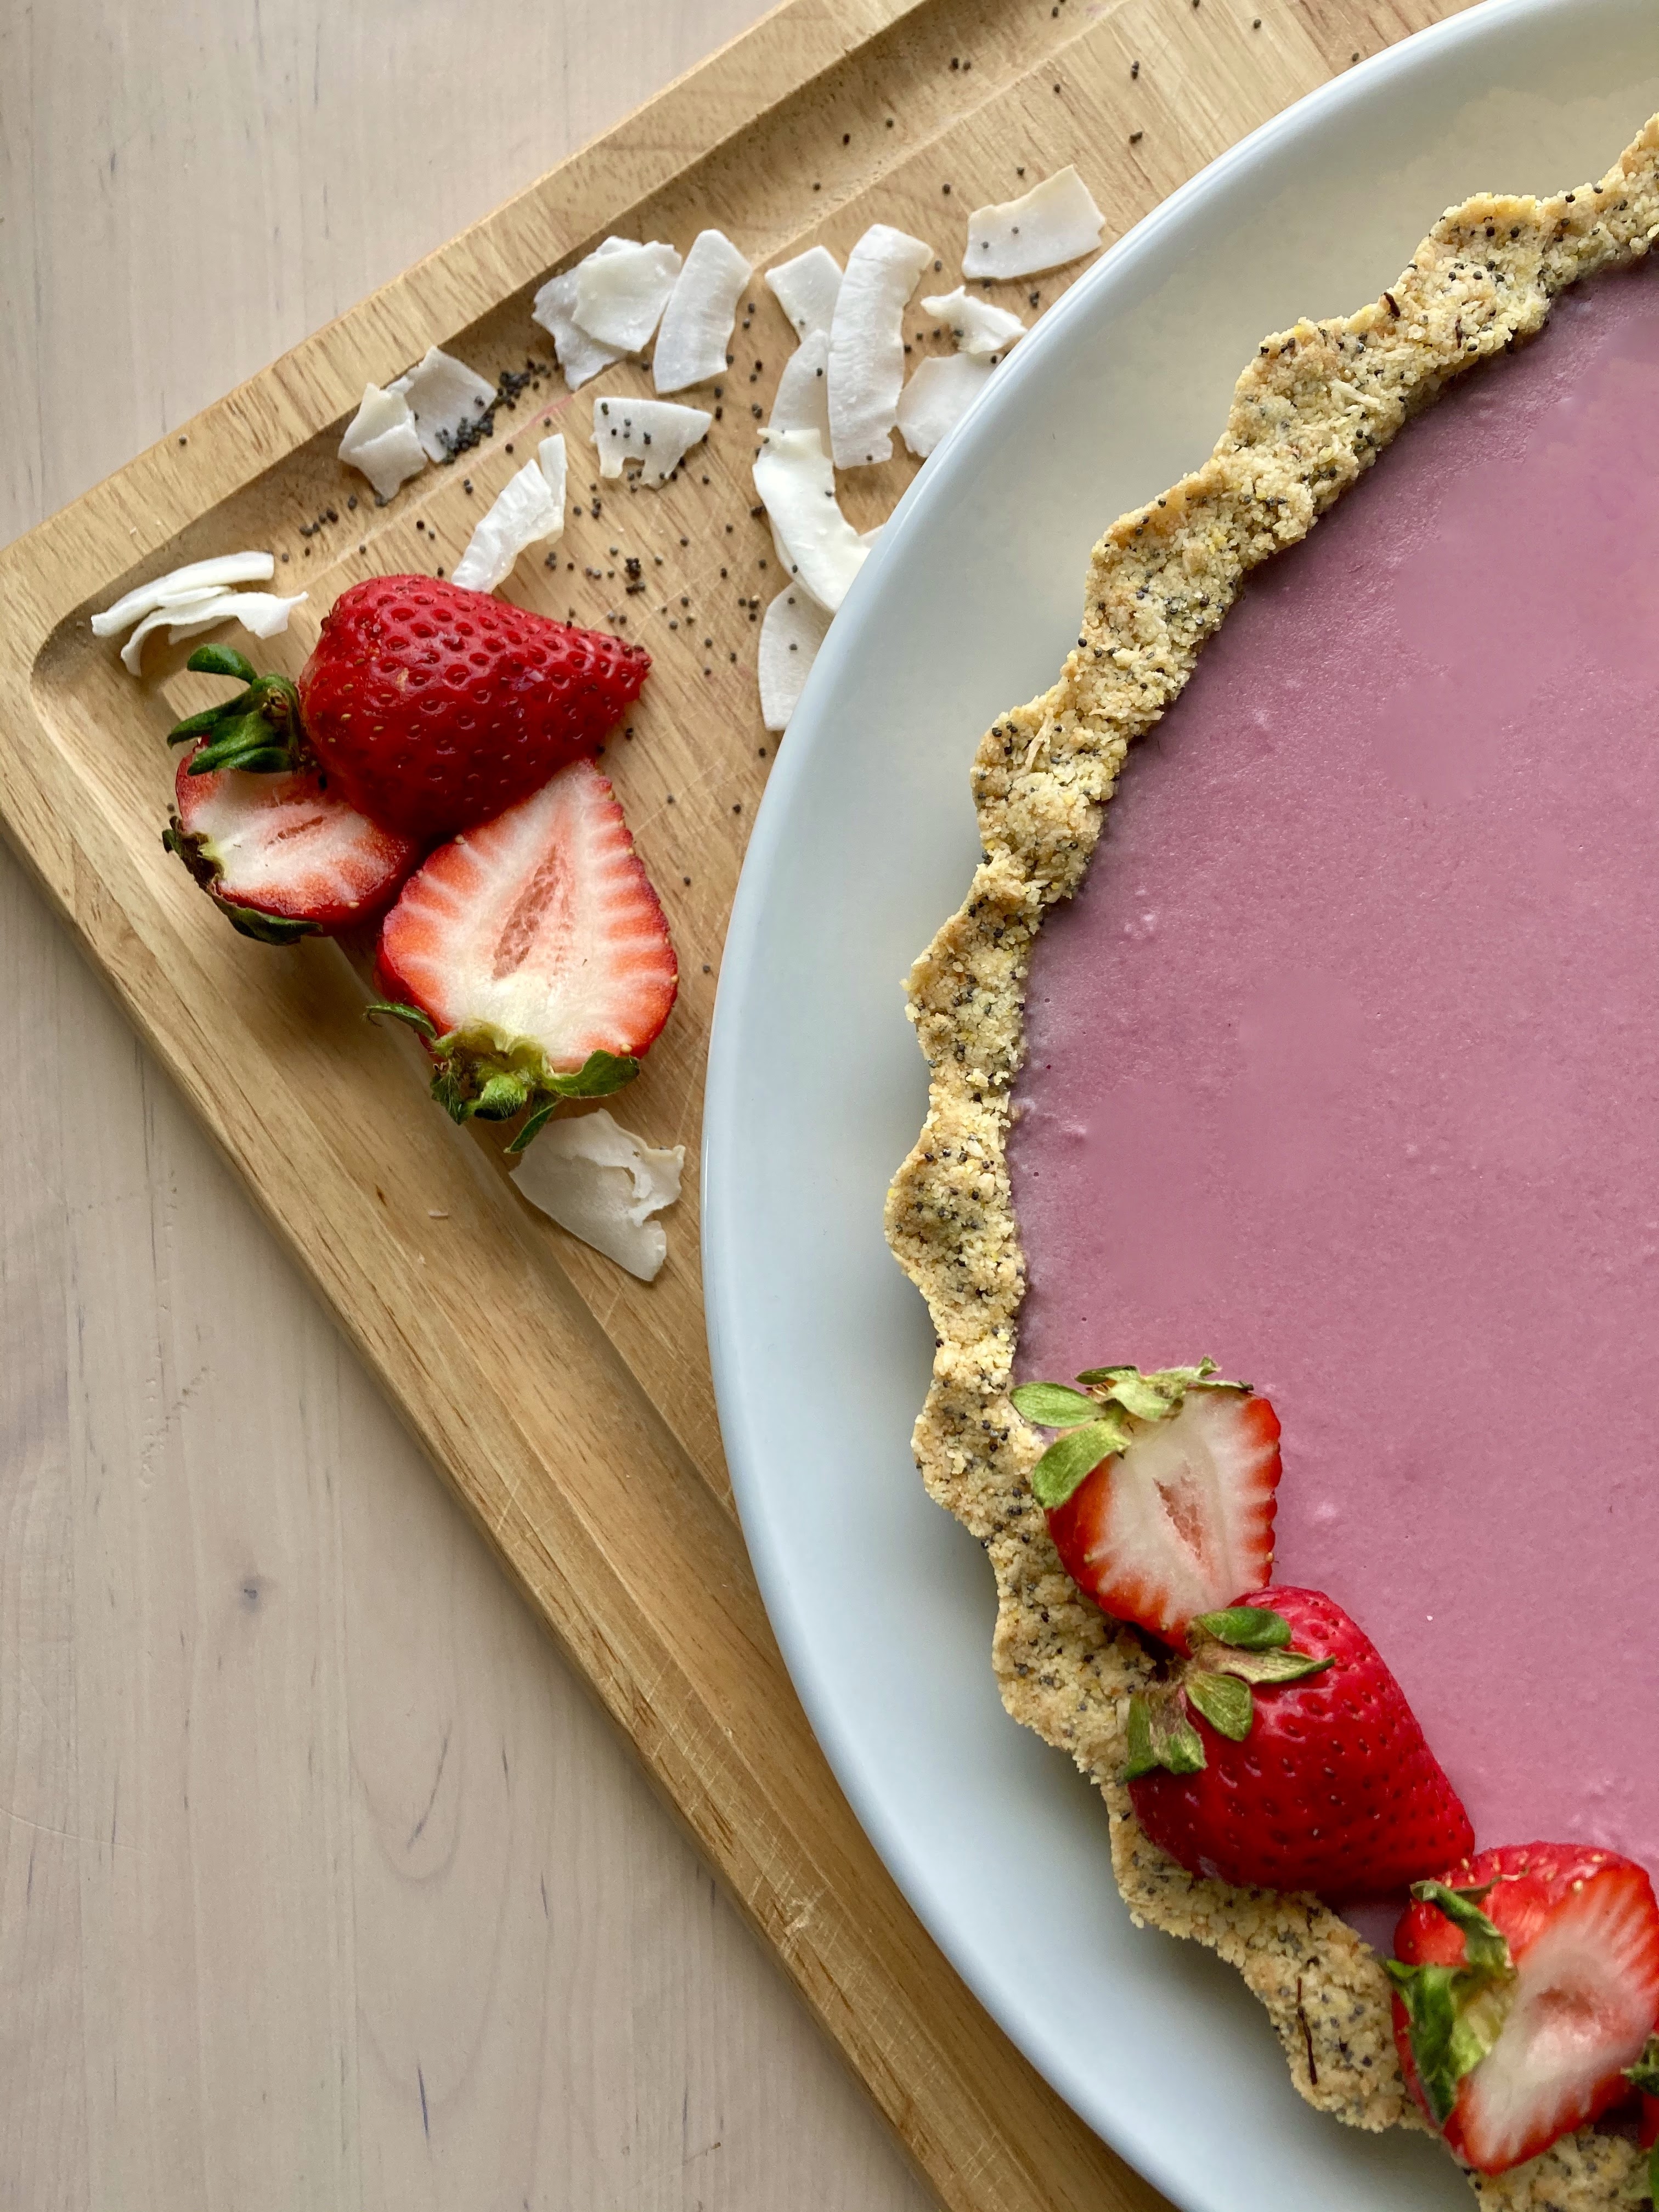
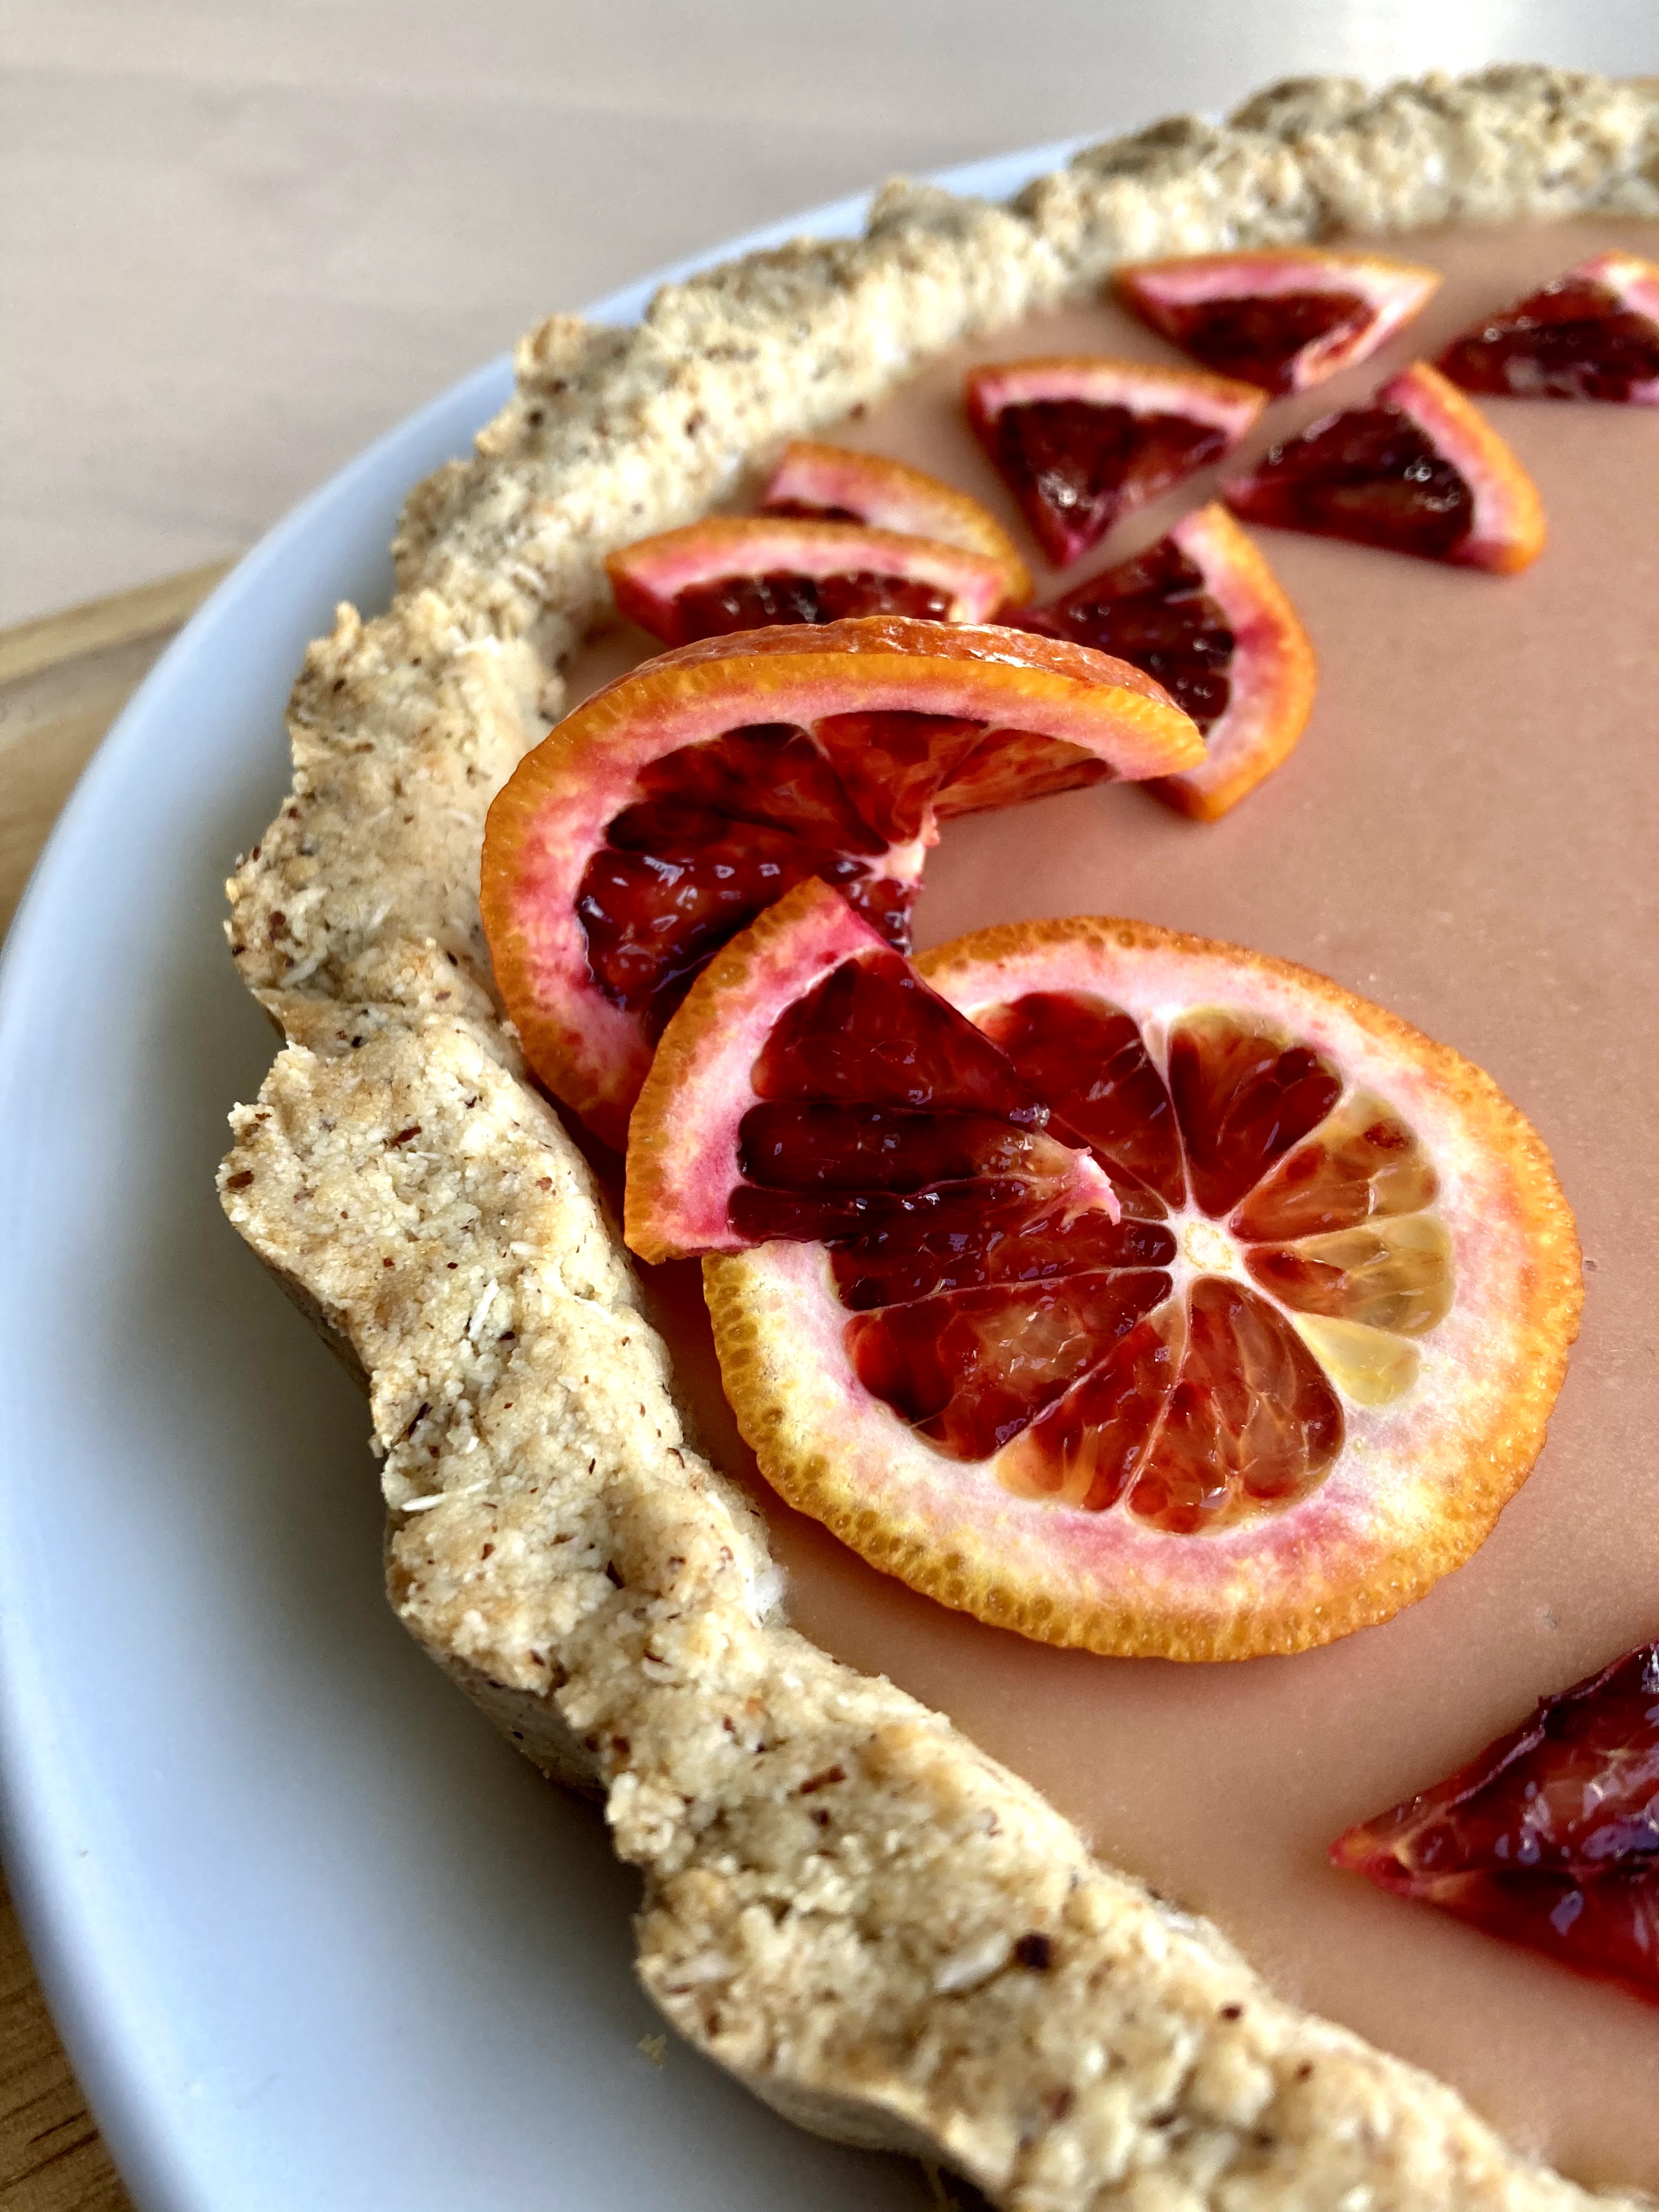
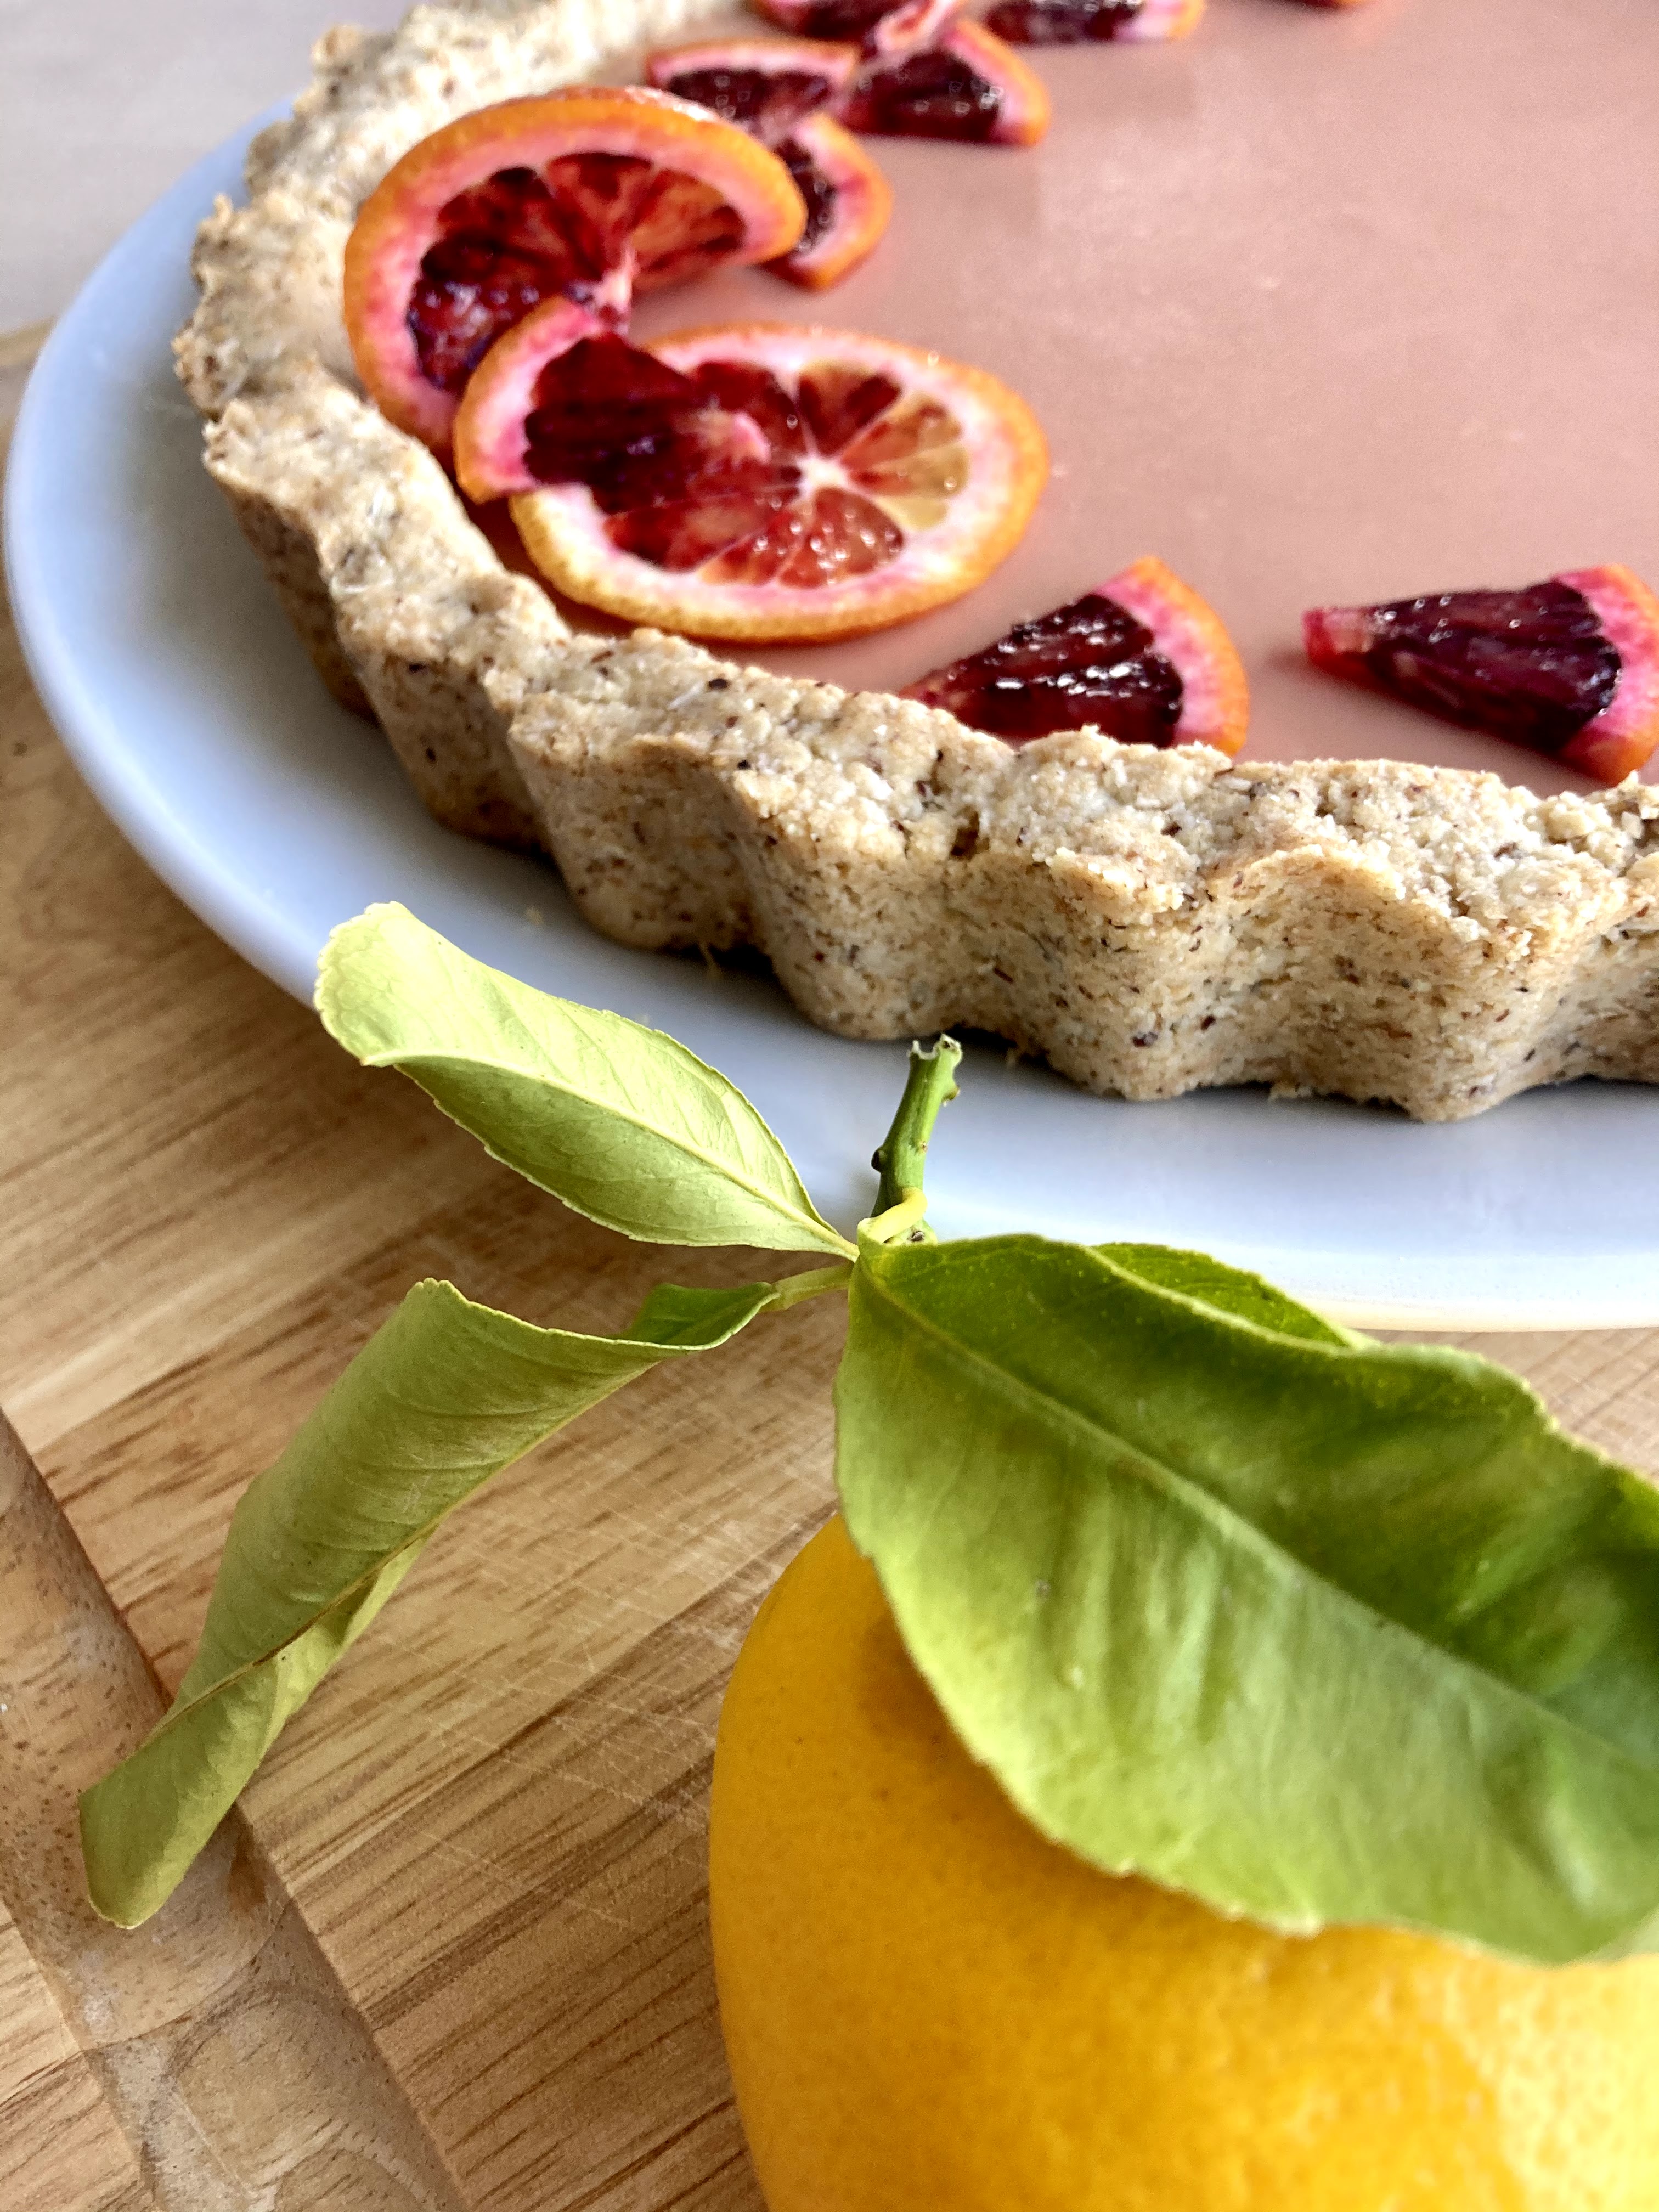
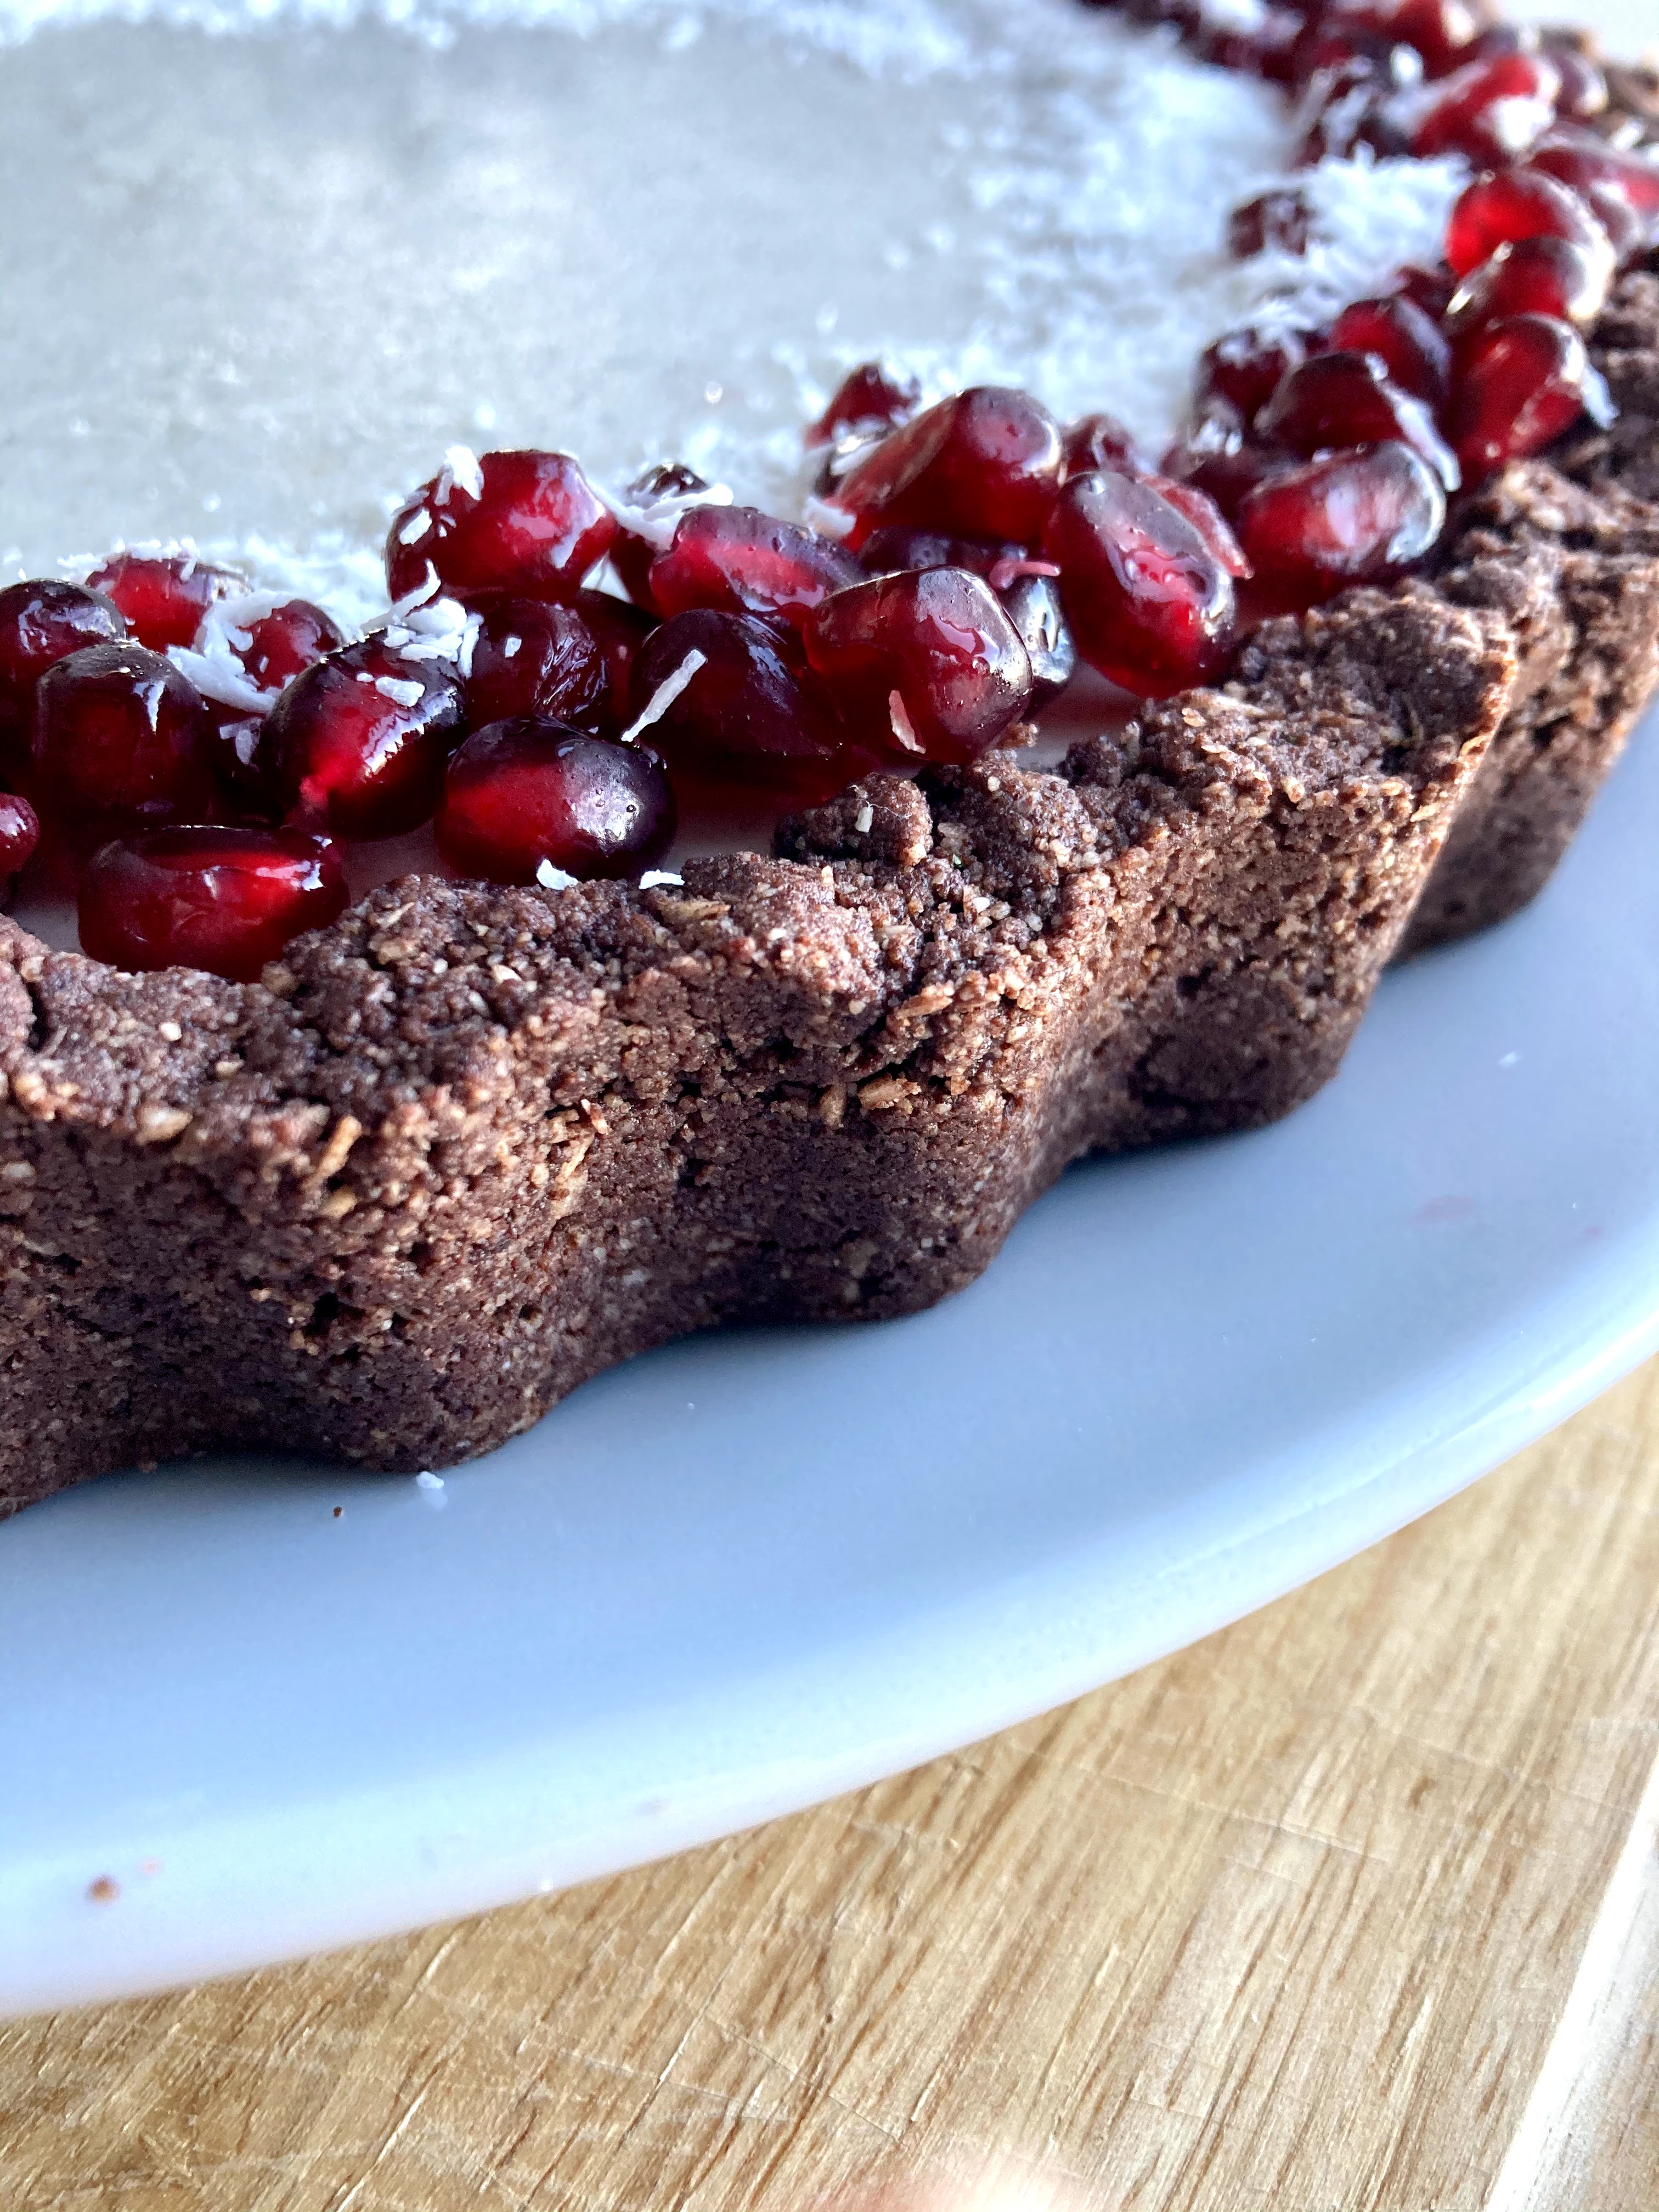
I love poppy seed-anything, so of course the crust is a major win. Plus add something fruity and dark chocolately but still on the lighter side (yay panna cotta) and you have a perfect spring dessert with a maximum visual impact but minimal work.

Happy weekending!

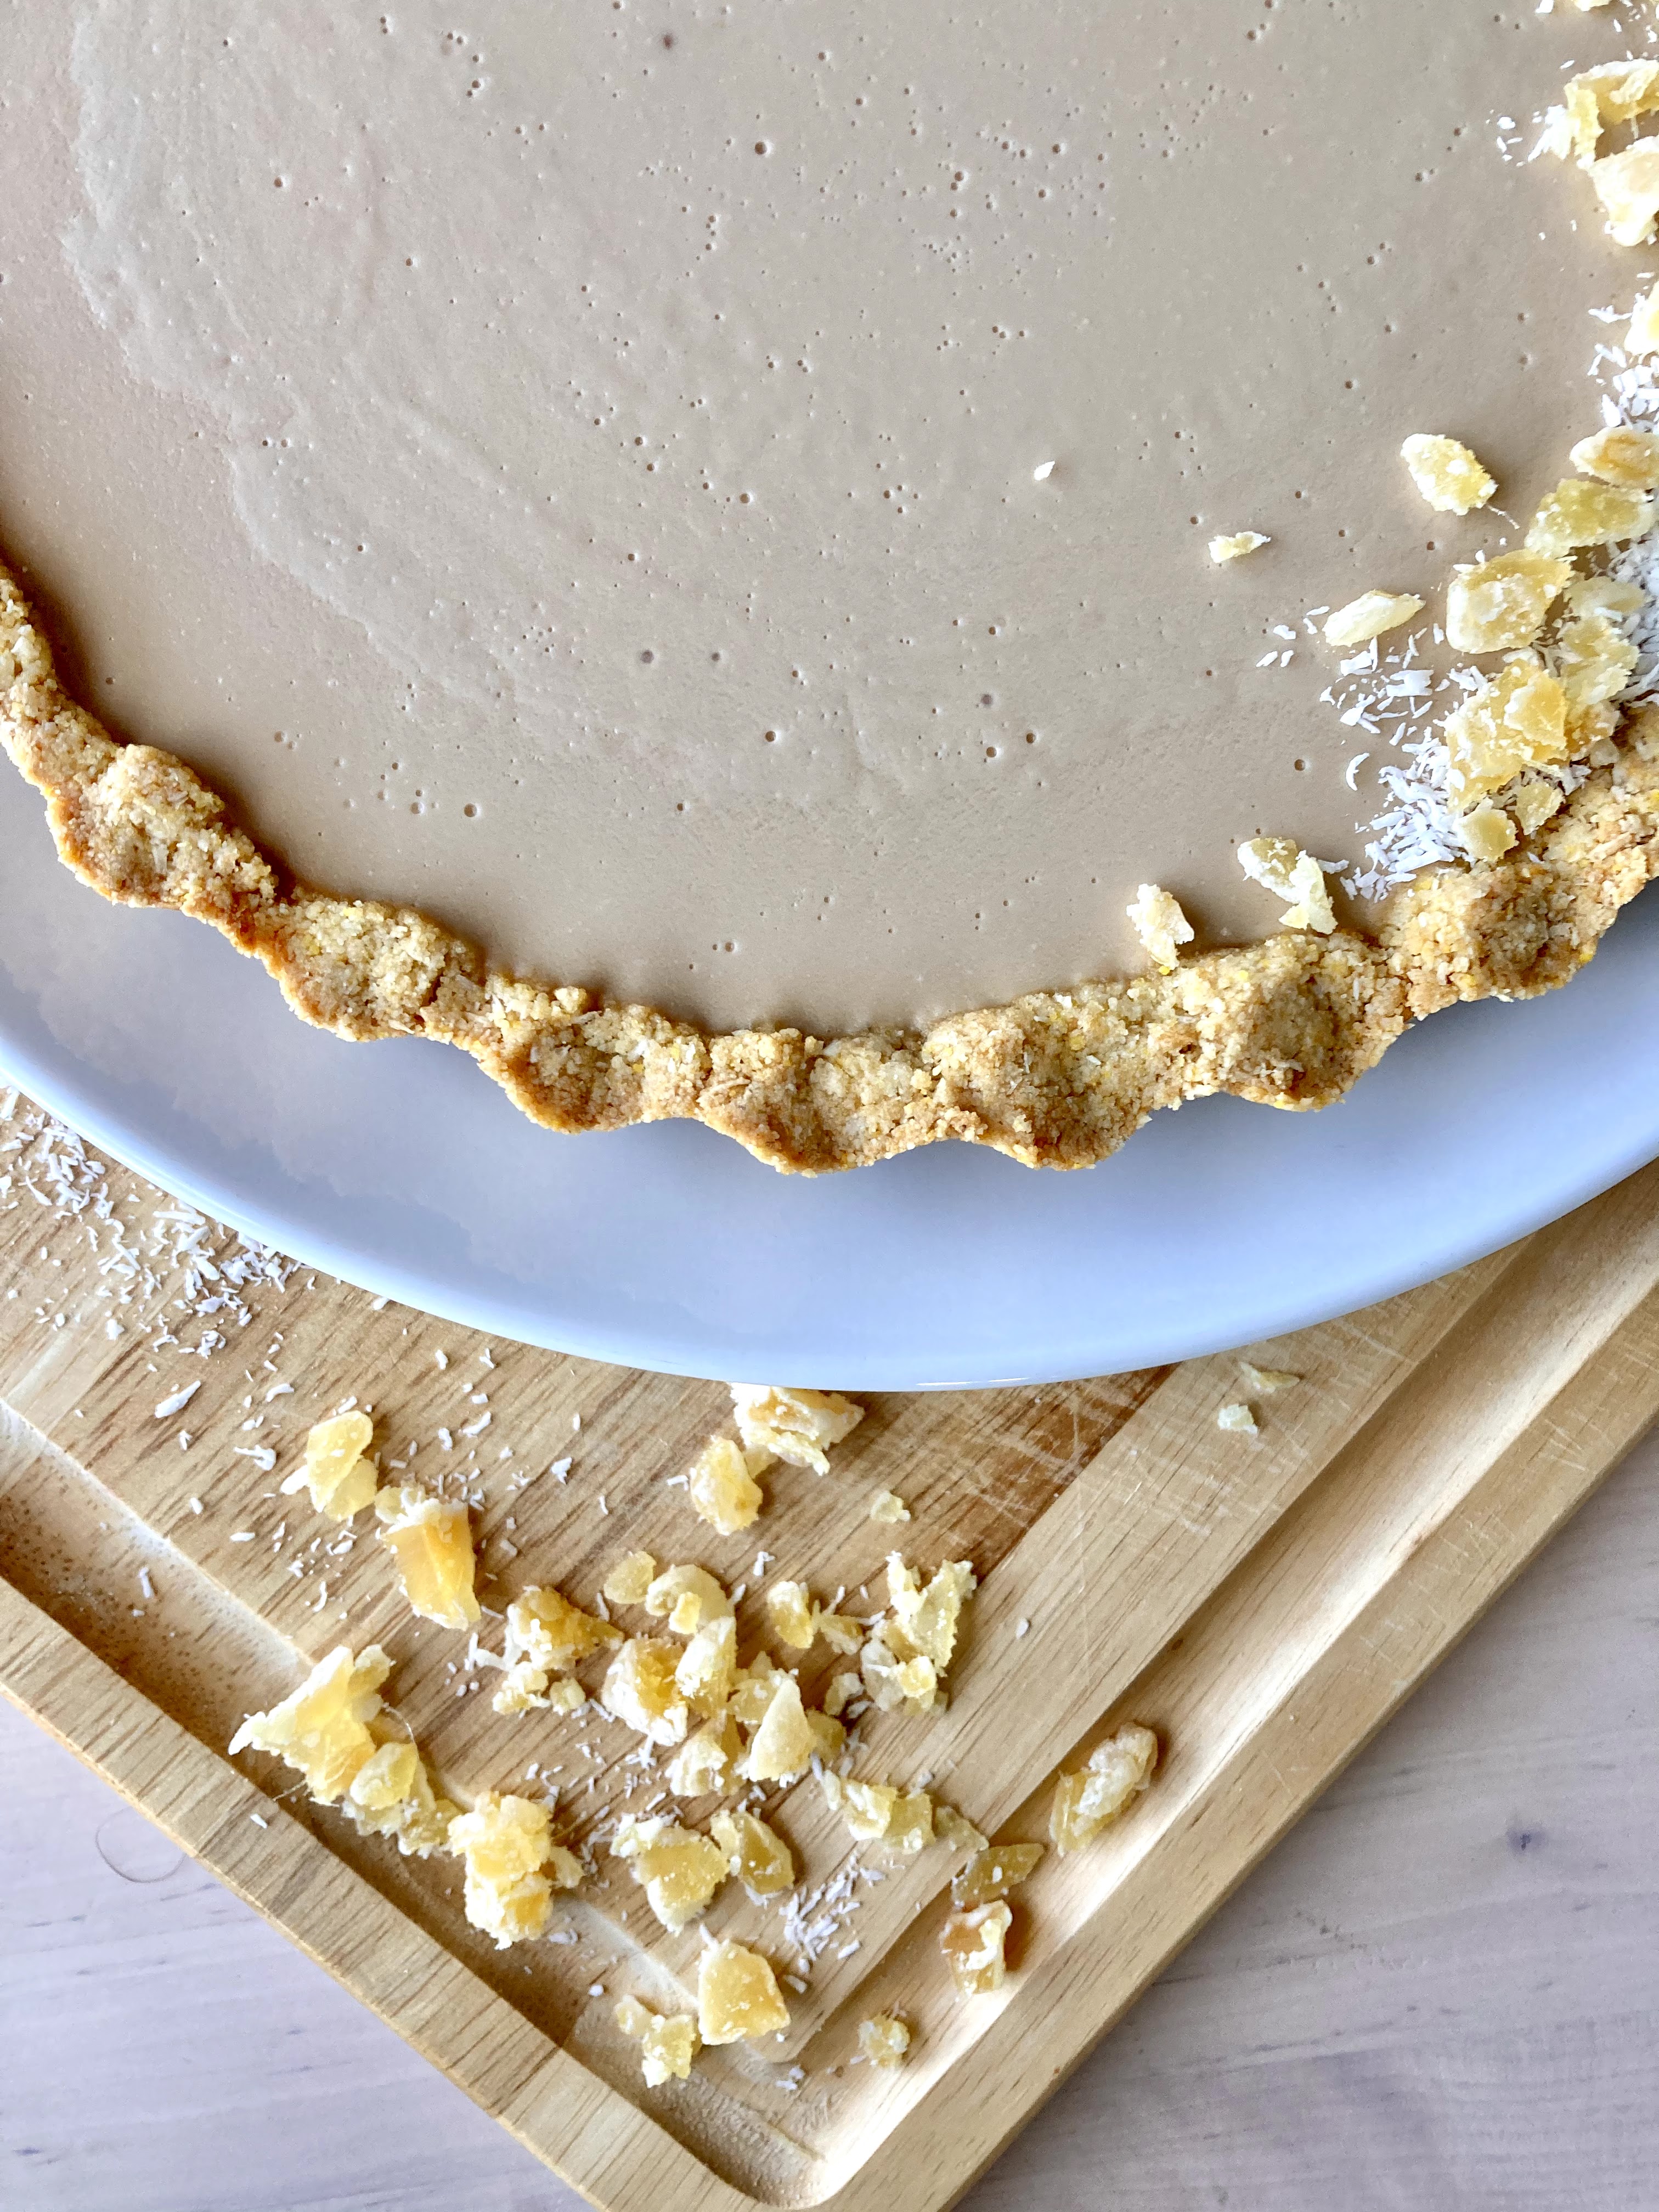
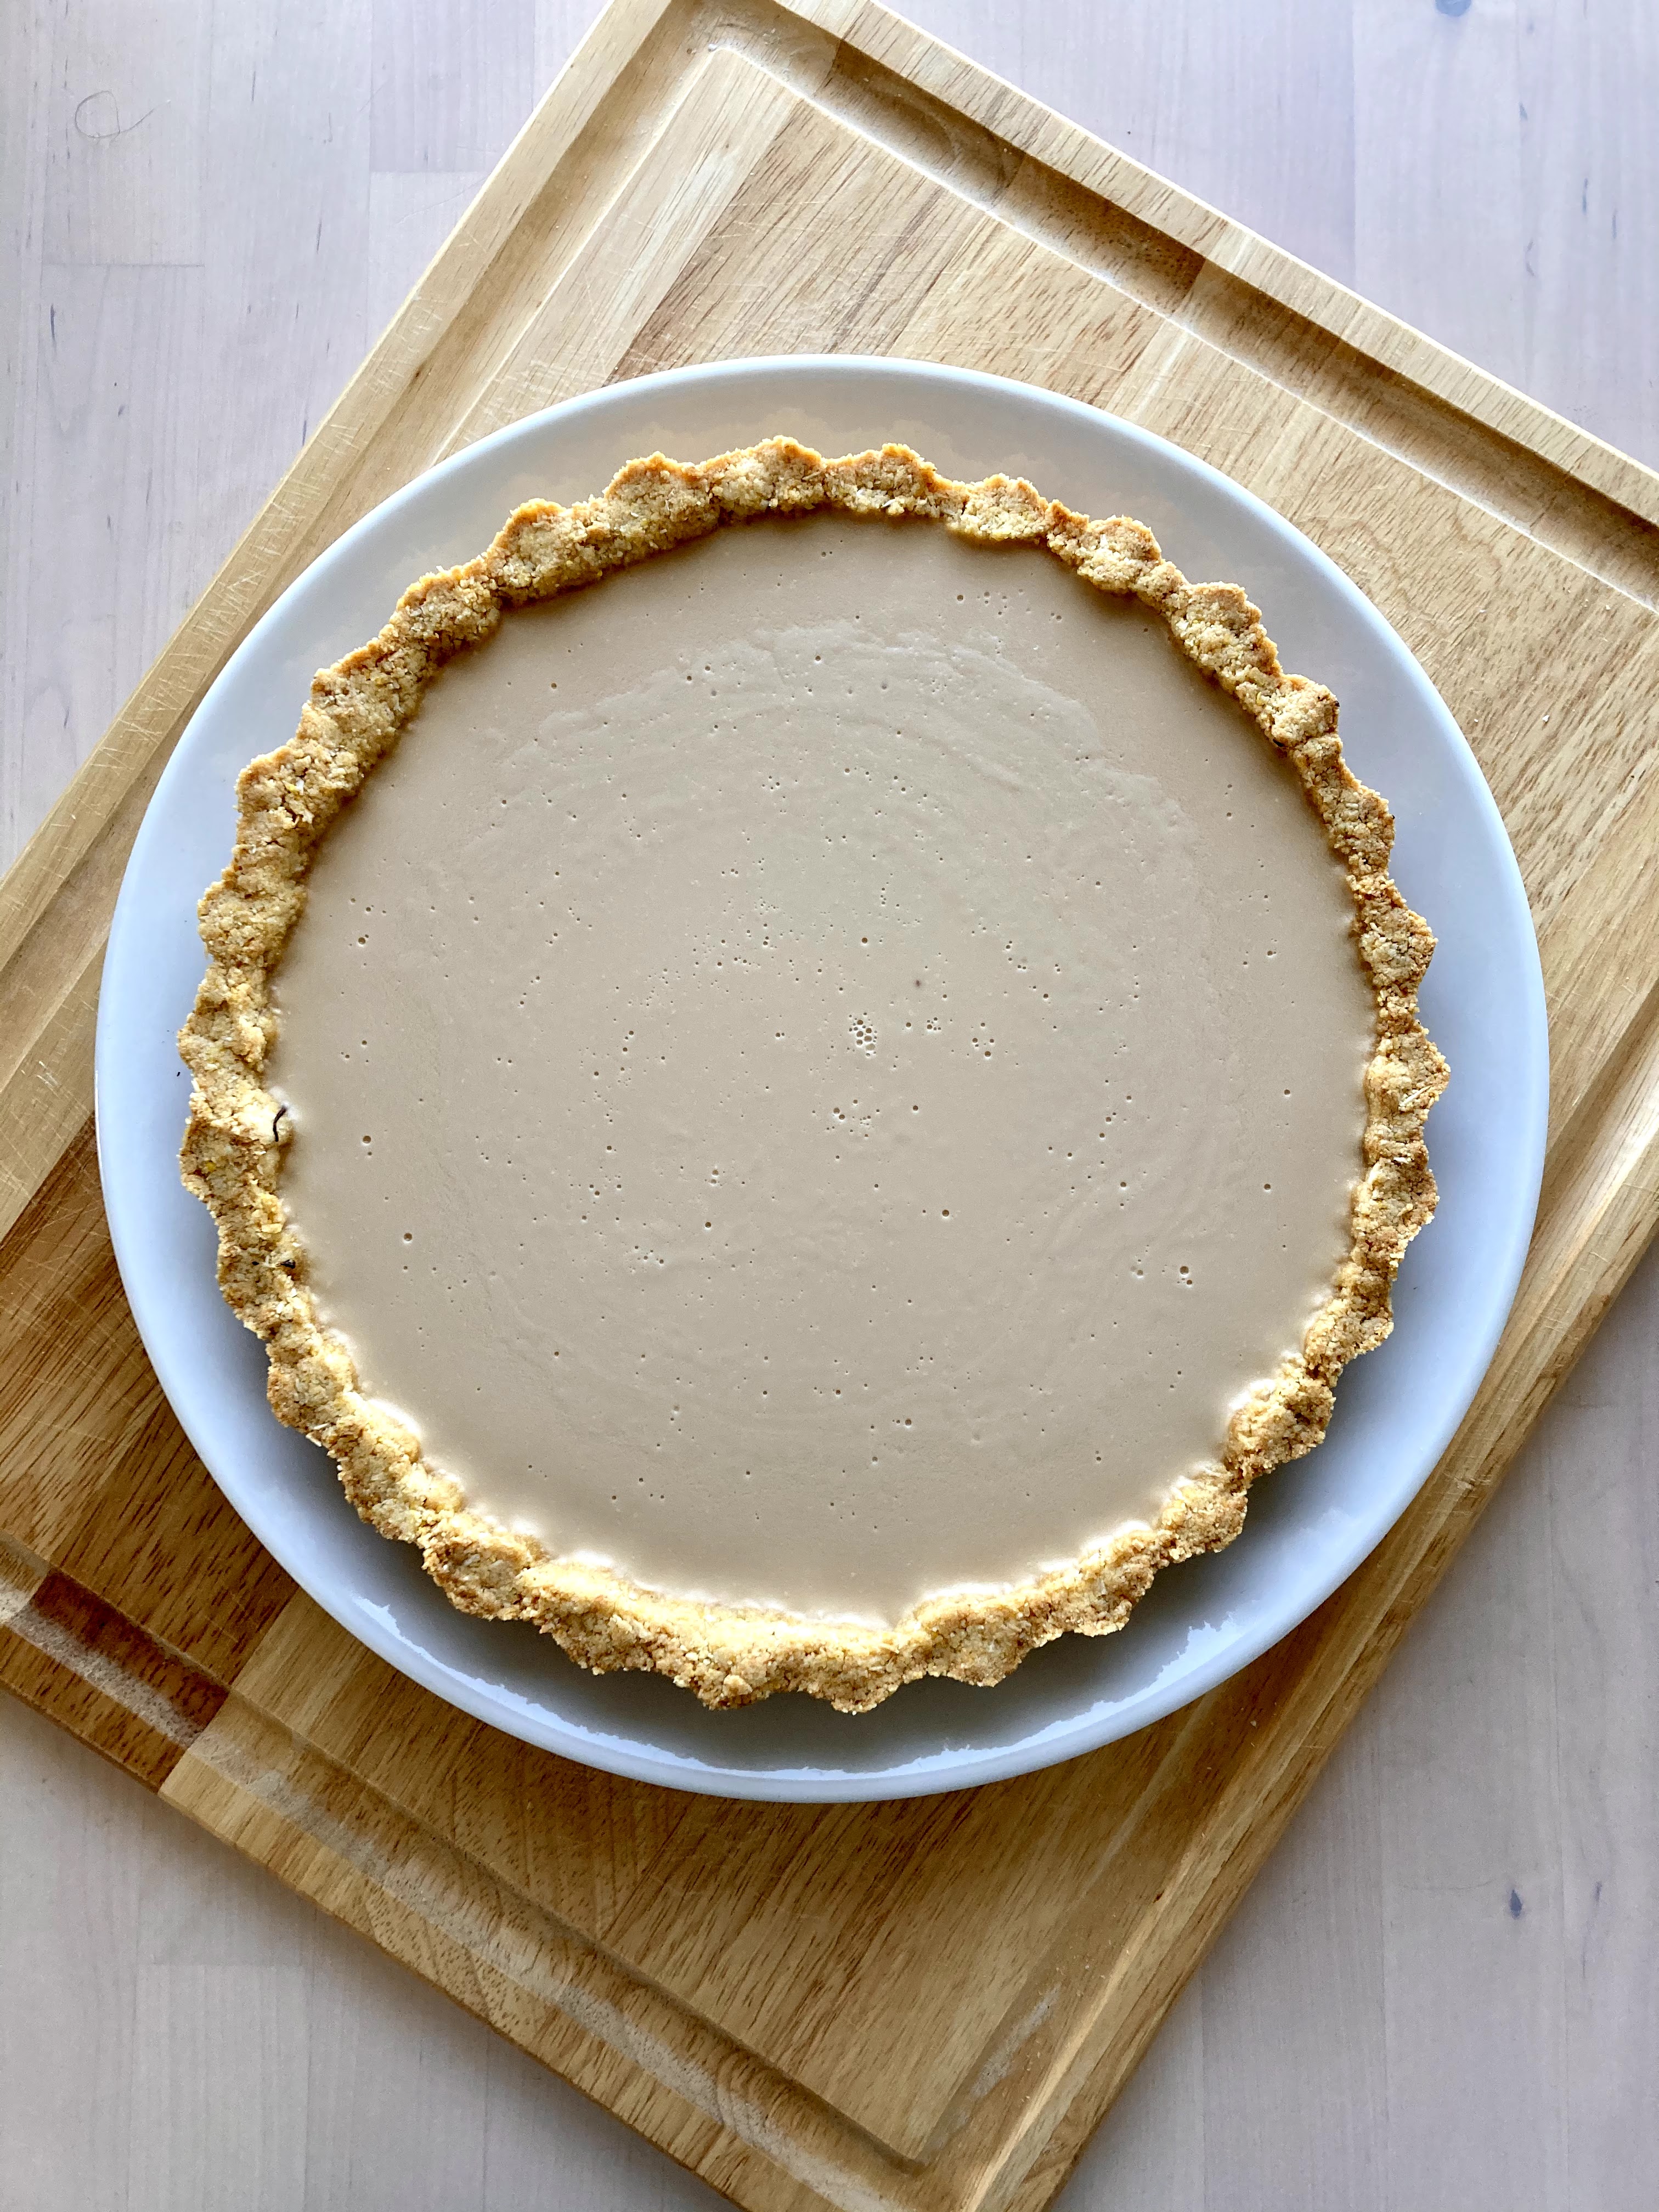
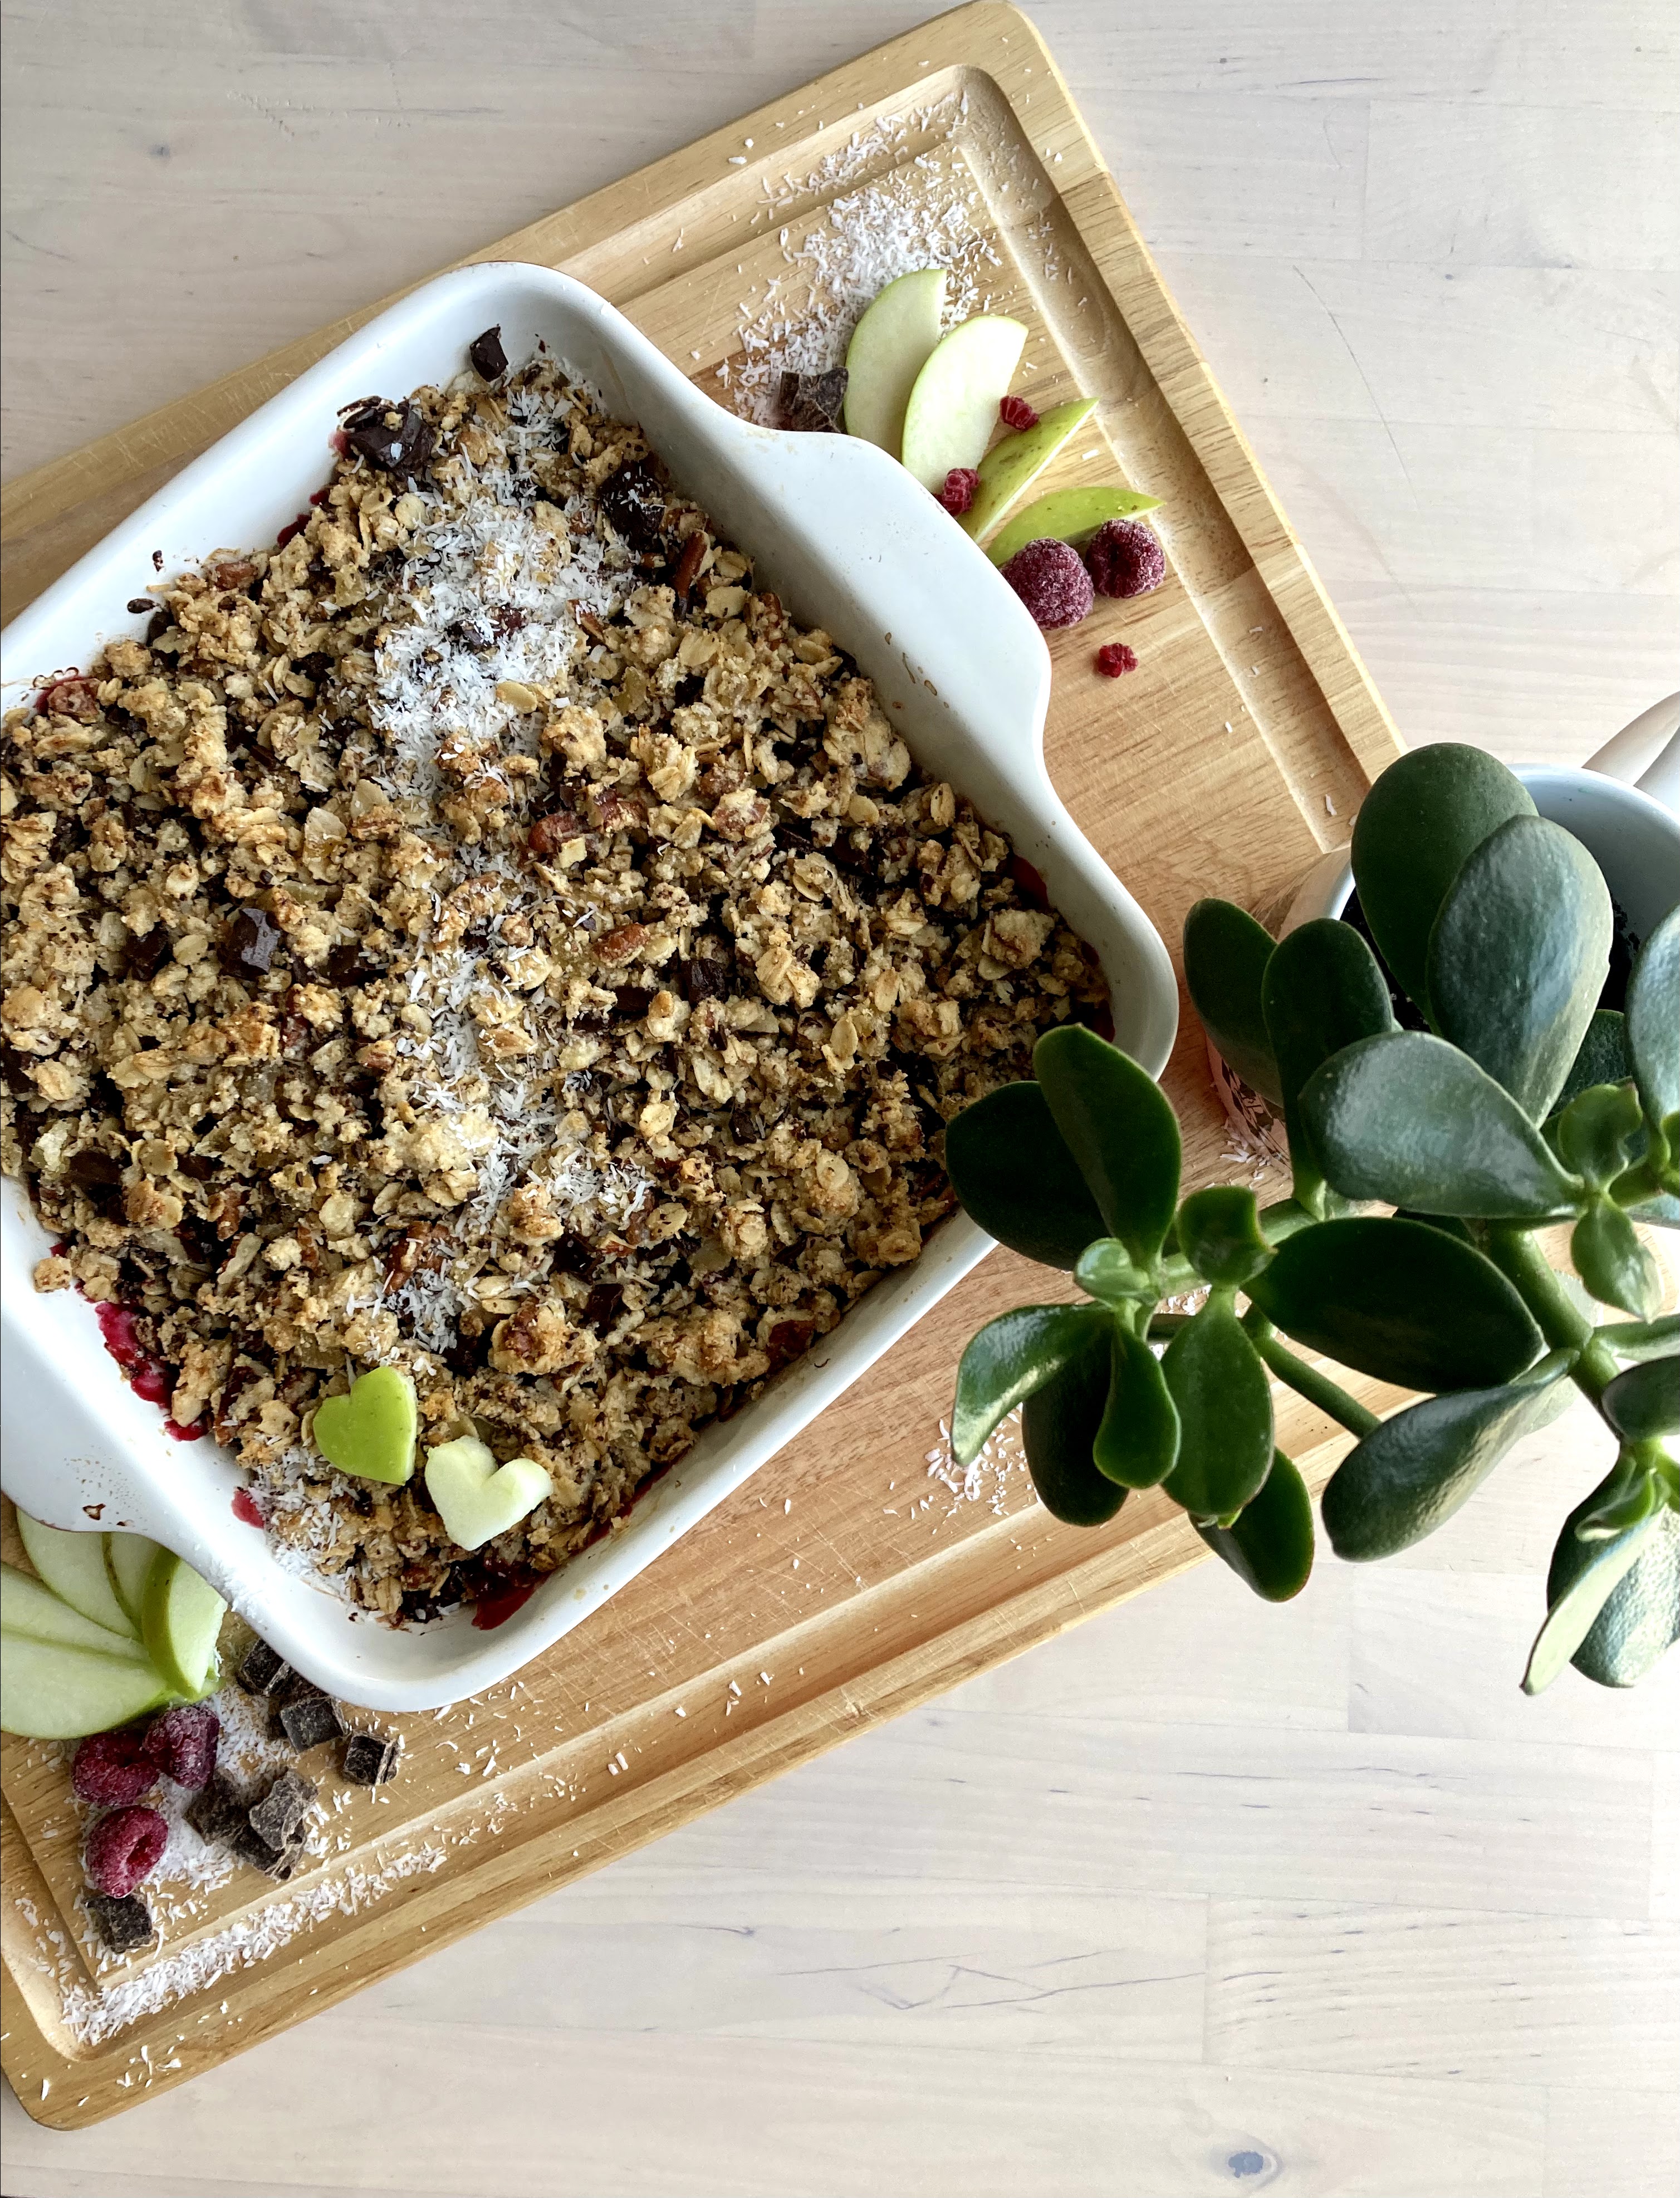
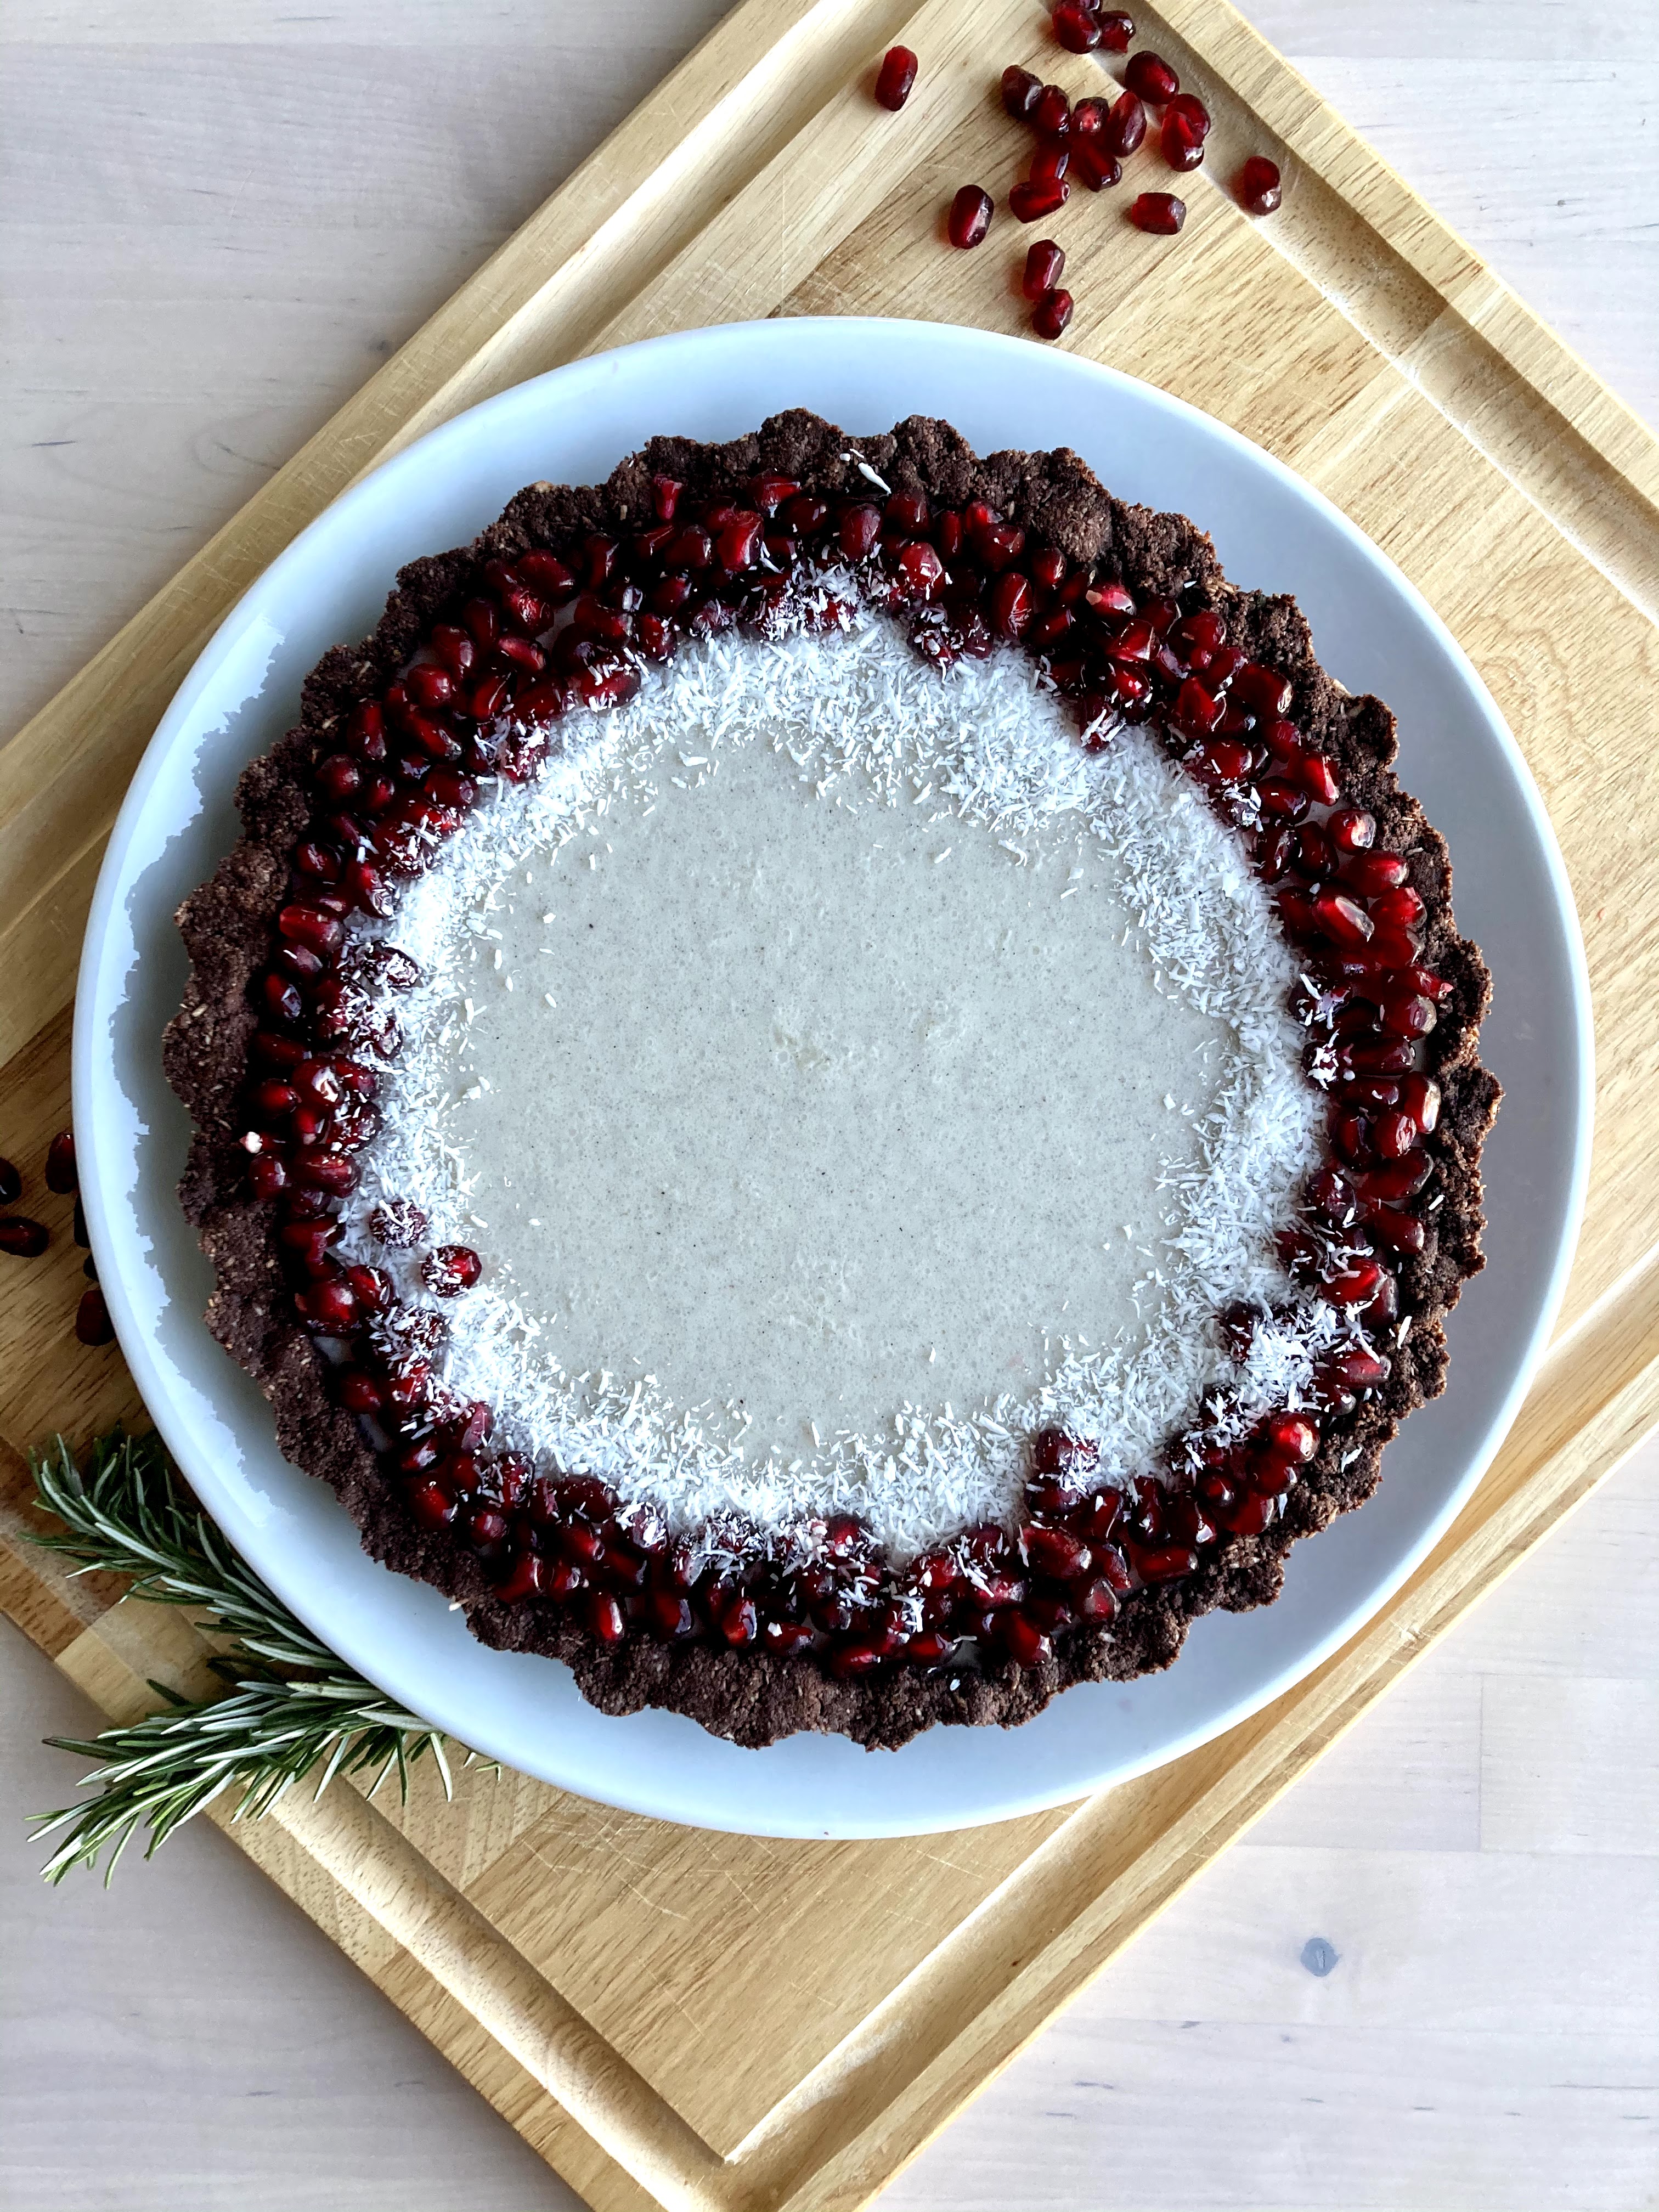
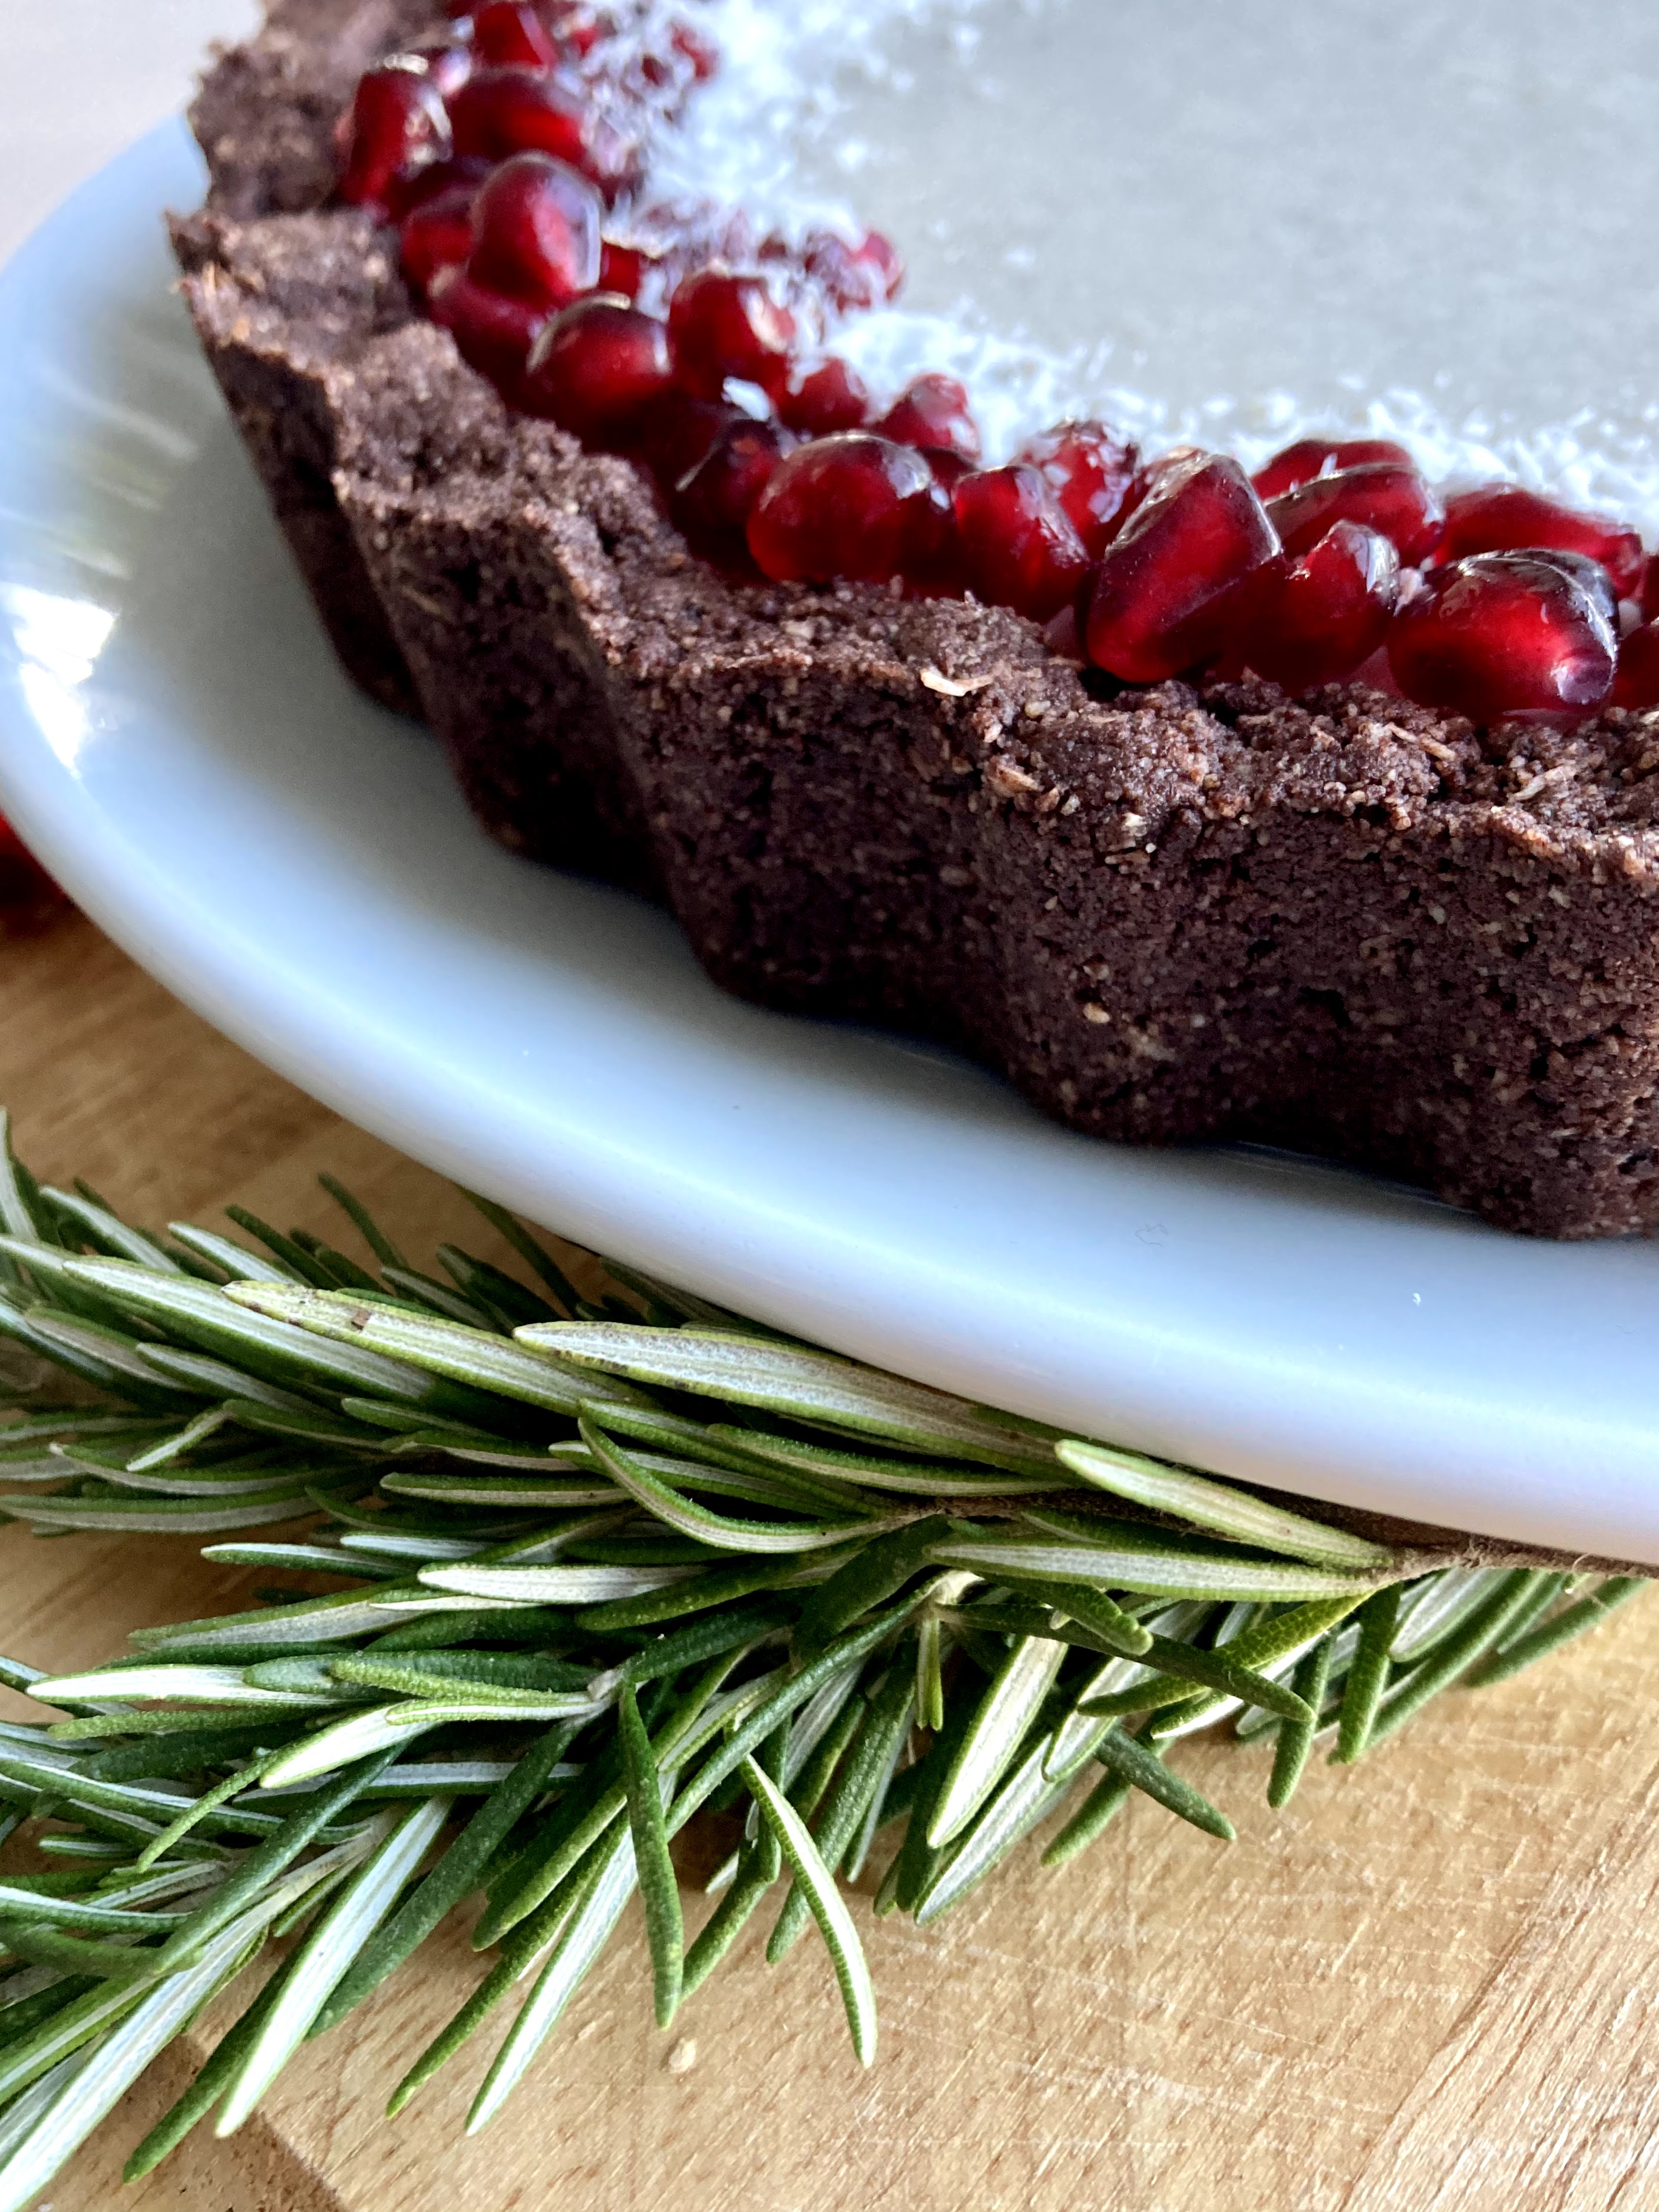
Raspberry, Poppy Seed & Dark Chocolate Panna Cotta

Gluten free, dairy free & refined sugar free. Perfect for that random half bag of raspberries lurking in your freezer – maximum visual impact, minimal work. Yield: 1 9″ tart; serves several. A Wait are those Cookies original.

For the crust:

1.5 c almond flour
1/3 c unsweetened shredded coconut
1/3 c cornmeal
2 tbsp poppy seeds
heaping 1/4 tsp sea salt
1/2 tsp baking soda
2 tsp vanilla extract
1/2 tsp almond extract
2 tbsp pure maple syrup
6 tbsp coconut oil, melted
1/3 c dark chocolate chips

In a large bowl, stir together almond flour, shredded coconut, cornmeal, poppy seeds, sea salt, and baking soda. Add in vanilla, almond extract, maple, and melted coconut oil, and stir until completely combined. The dough will look crumbly, but you’ll be able to press it together with your fingers.

Preheat the oven to 350, and lightly grease a 9″ tart pan (w/ removable bottom) with coconut oil. Press the crust into the plate and up the sides with a spoon or your fingers, creating a smooth edge (or not, your call!). Poke the bottom with a fork a few times, and bake for 15 minutes. Remove and let cool for a few minutes.

Melt the chocolate chips in a double boiler. Spread the melted chocolate over the interior of the crust, and let cool until set. You can also pop the whole thing in the fridge to help it set faster, if needed.

For the panna cotta:

1 c frozen raspberries
1 can full fat coconut milk
1 tbsp maple
1 tsp vanilla extract
1/4 c cold water
1 packet of powdered gelatin

Pour the coconut milk into a small saucepan and add the raspberries. Bring to a simmer over medium heat, stirring & mashing the berries occasionally. Remove from heat, cover and let steep for 10 minutes.

In a small bowl, sprinkle the gelatin over 1/4 cup of the cold water. Let stand without stirring until the gelatin is moistened, about 10 minutes.

Strain the berry solids out of the coconut milk. Whisk in maple and vanilla, and bring the milk back up to a simmer. Remove from heat and whisk in the gelatin mixture. Whisk until completely dissolved, about 3 minutes. Cool until lukewarm. Pour the panna cotta mixture into the cooled tart shell. Place in the refrigerator until set, approximately 4 hours or preferably overnight.

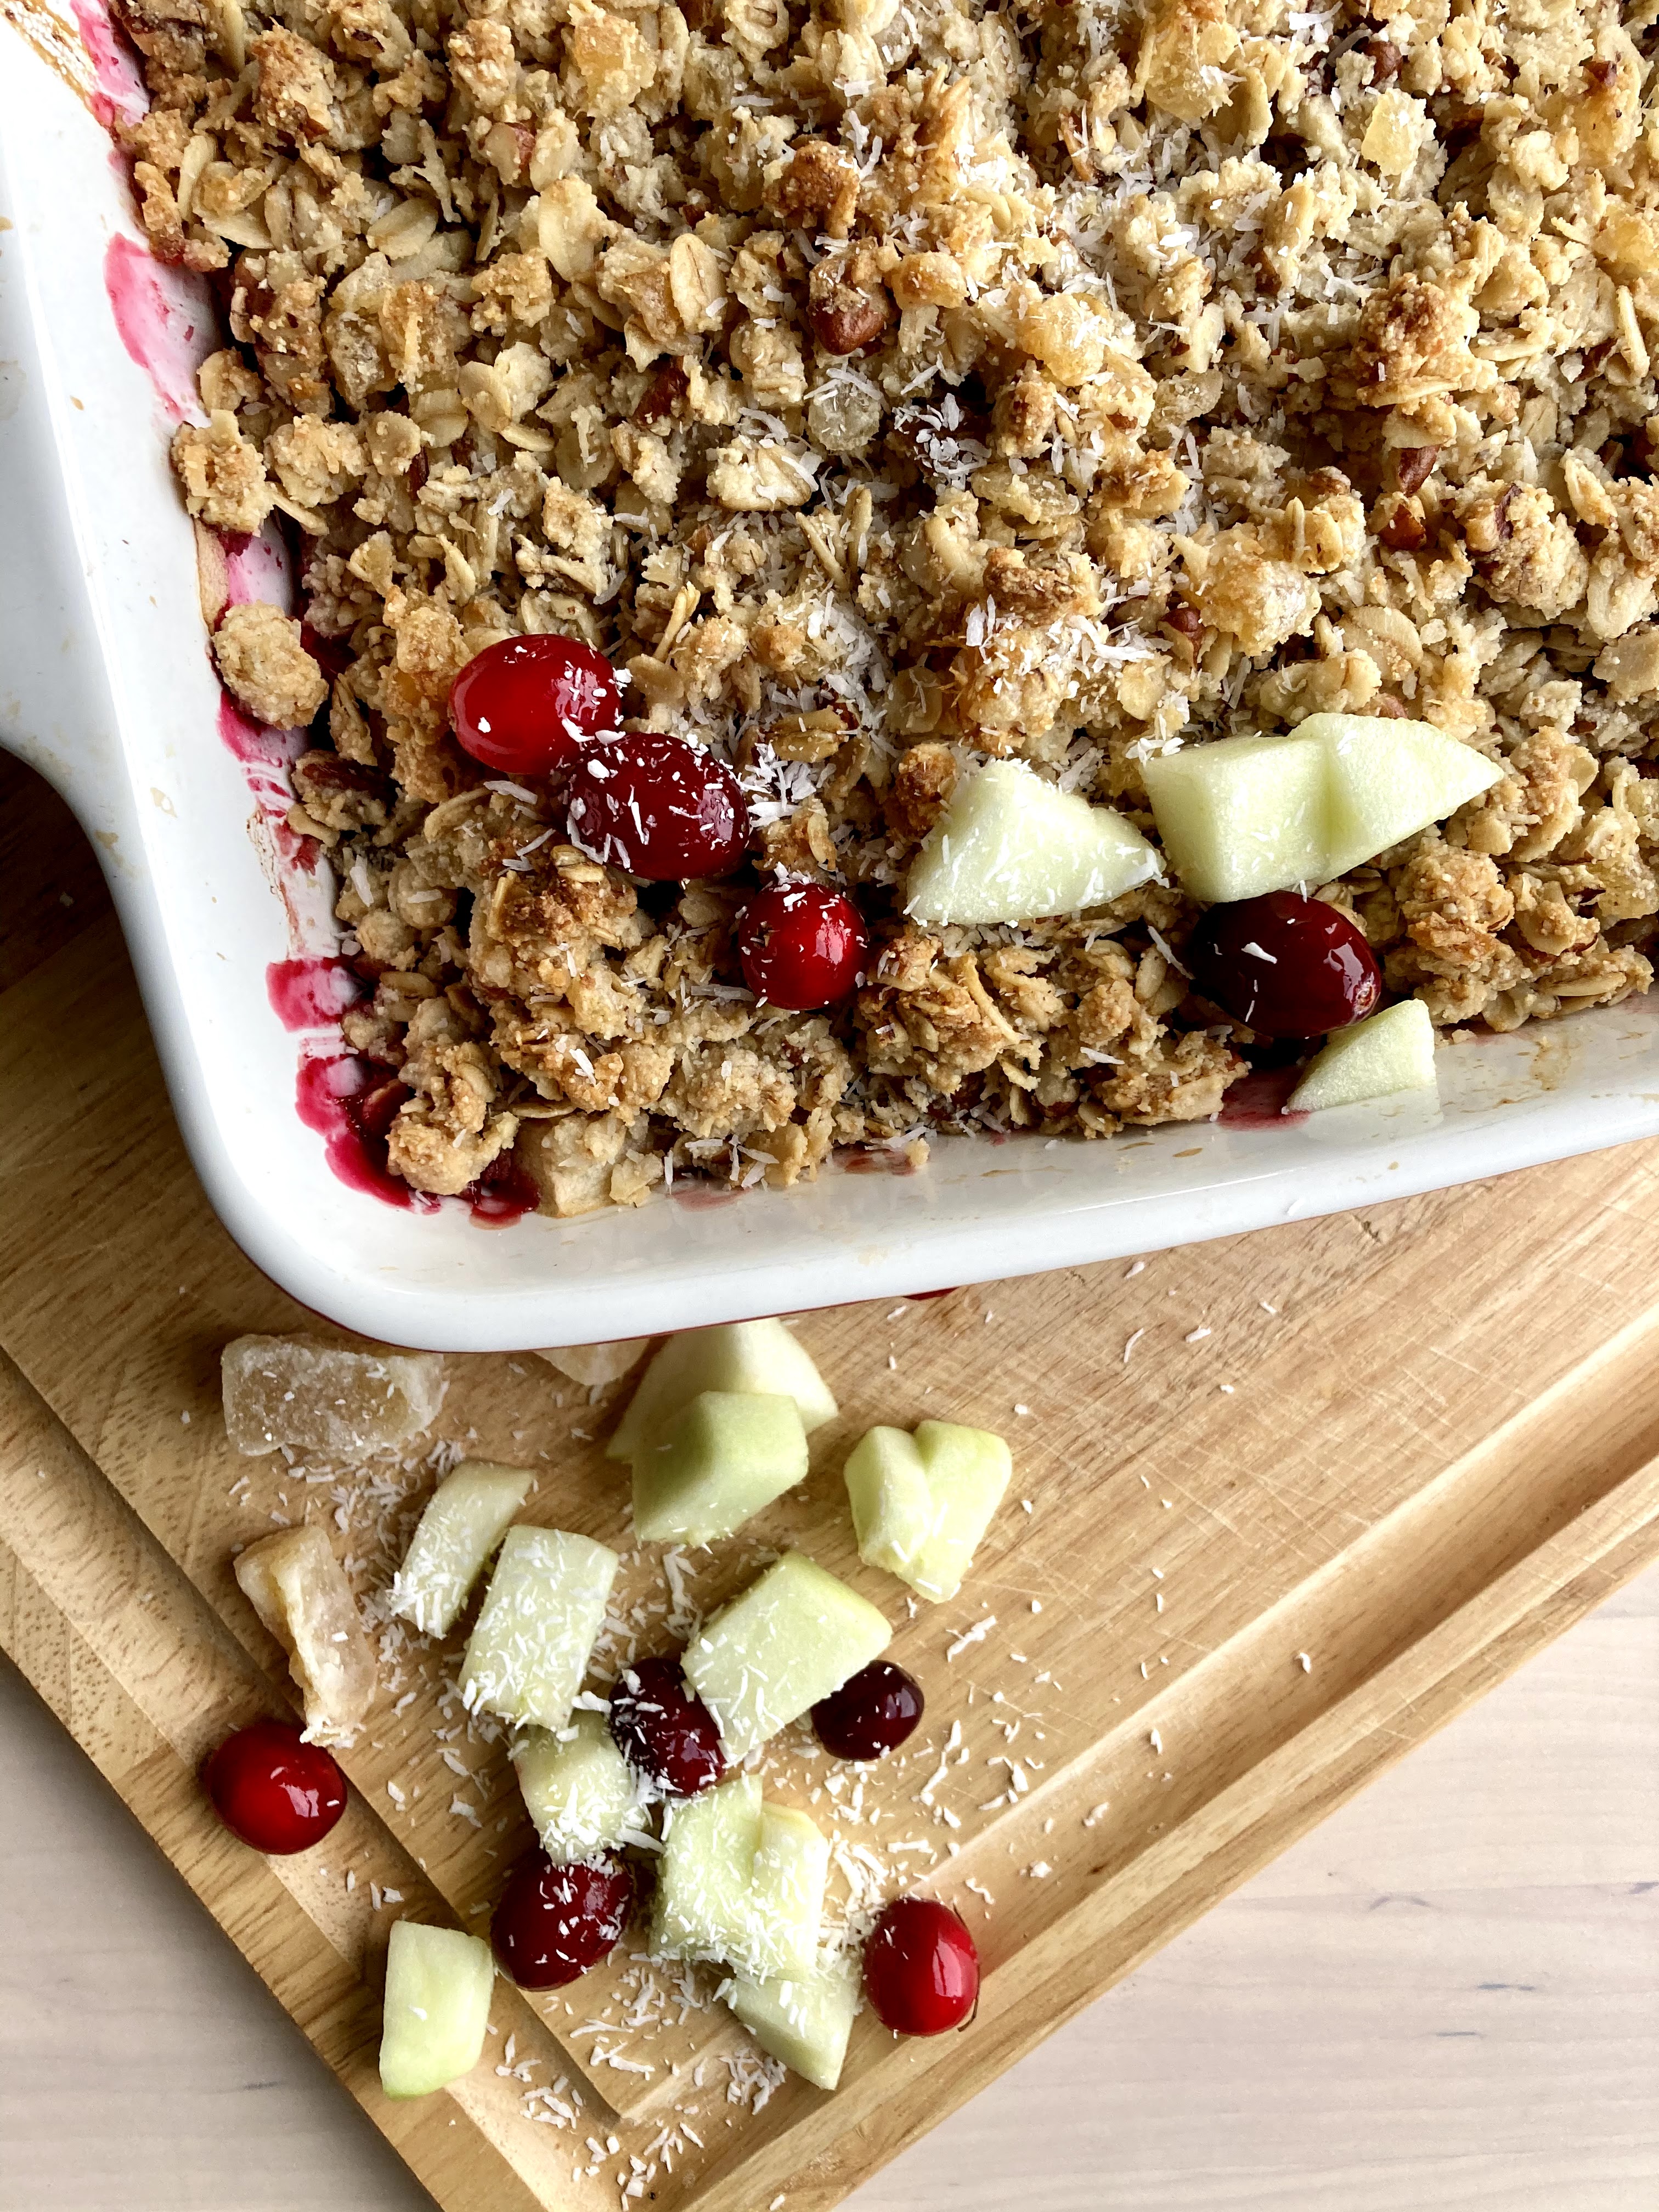
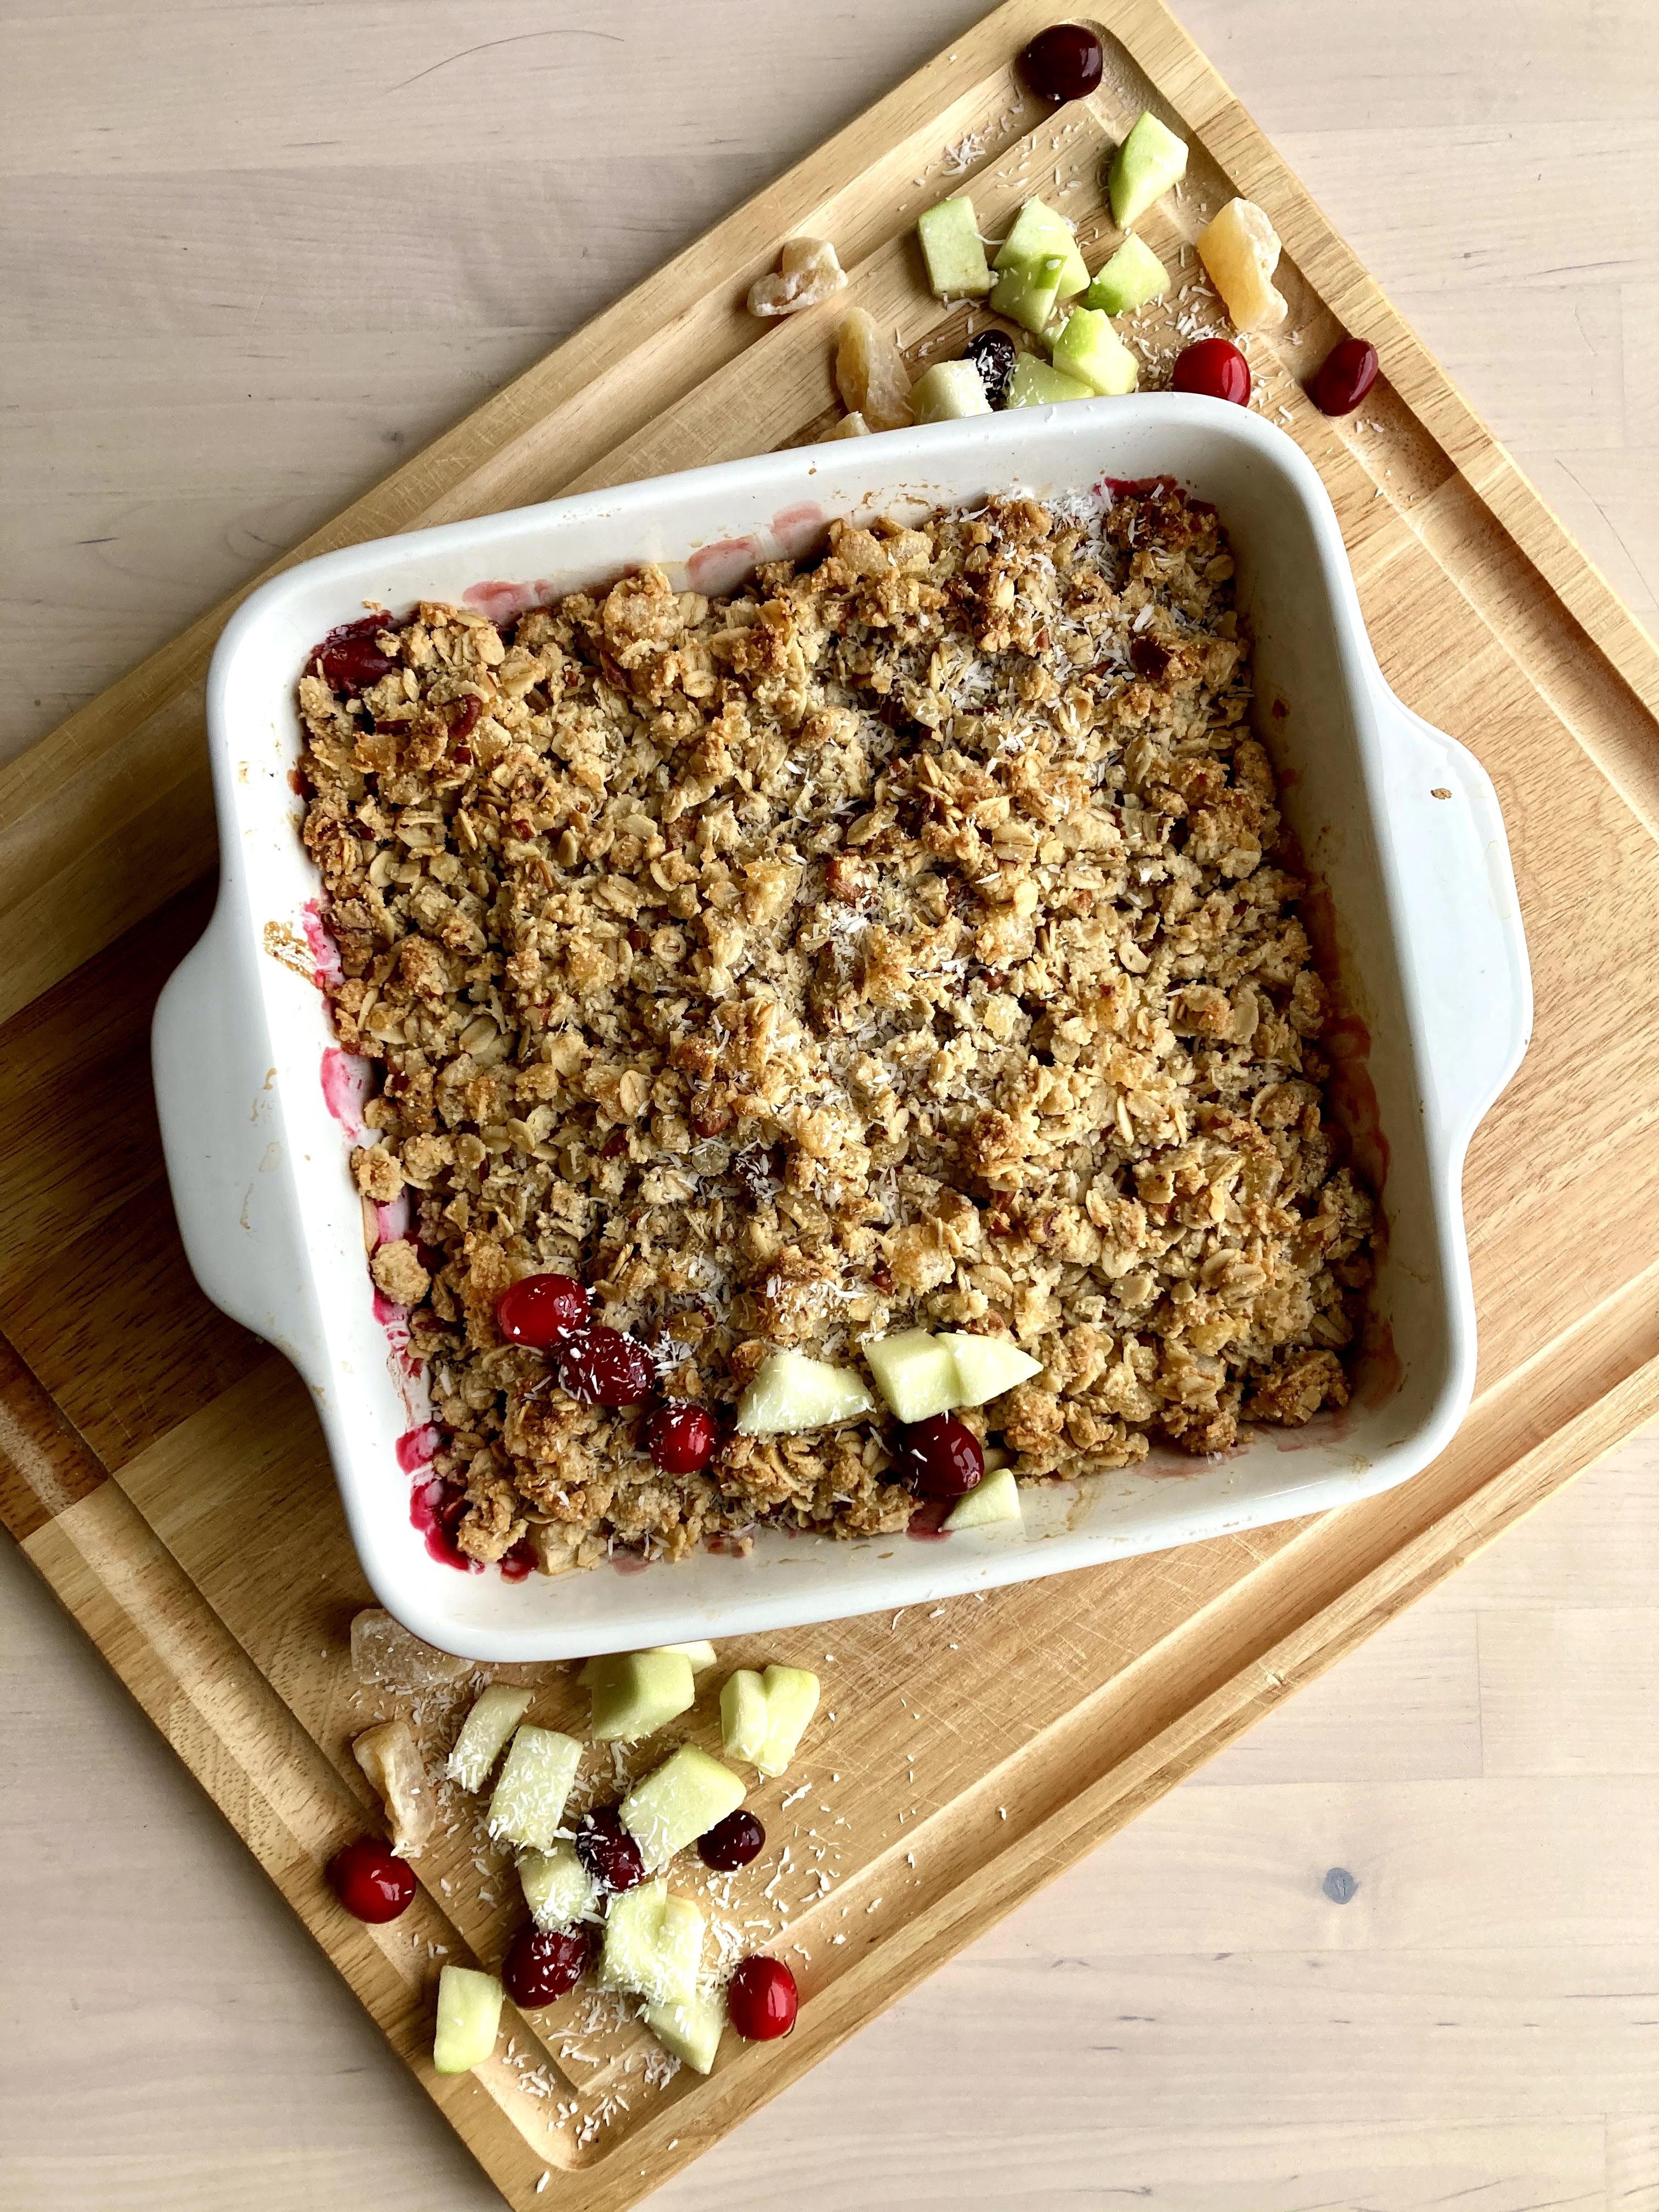
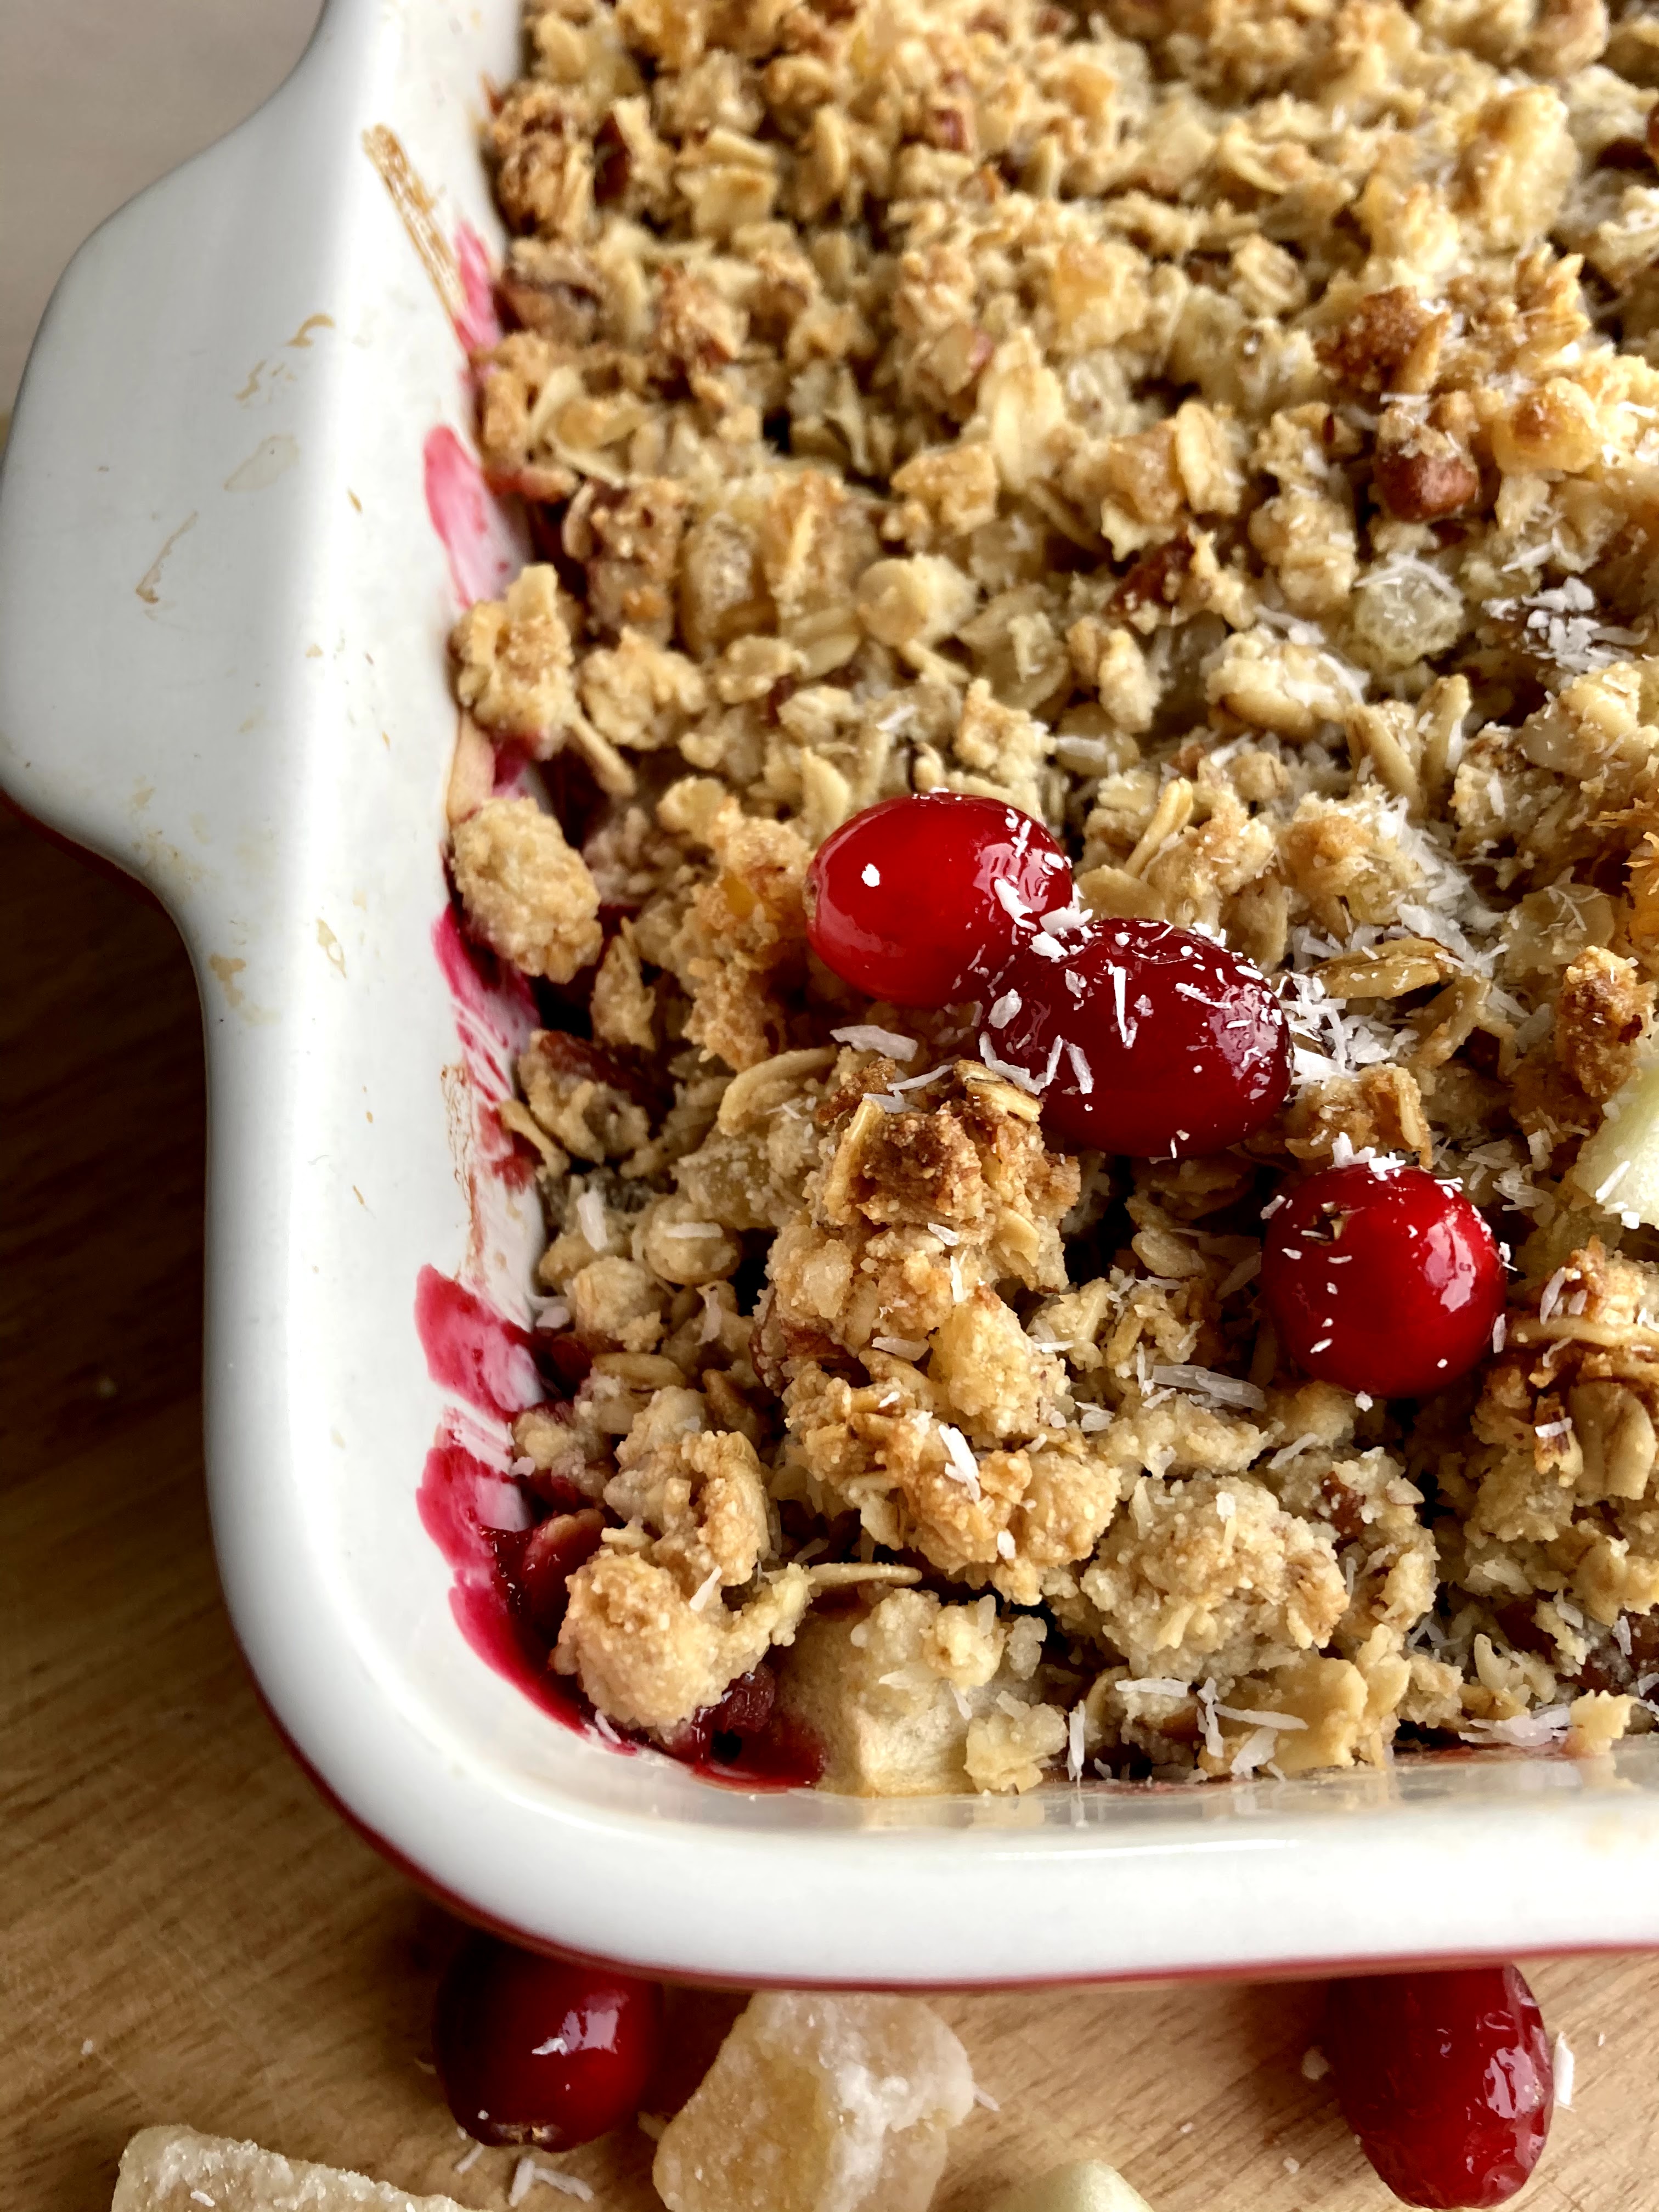
Top with whatever pretty things your heart desires! I used shredded coconut and strawberries. Store in the fridge until serving. Leftovers keep well up to two days in the fridge, covered.

I just want all the rhubarb

I found more rhubarb! Muahaa.

It’s been surprisingly difficult for me to source this year but maybe that’s just my local market. Either way, I absolutely love rhubarb so I’m happy to find it. It pairs so well with apples and raspberries… and obviously I use any excuse to put ginger in things.

This is also one of those that I love cold – refrigerating it makes the crisp topping chewy and SO good. Also highly recommend is a large scoop of vanilla over everything.

The poppies are so pretty right now! They’re all over the city.

Actually, ALL the flowers are so pretty right now:

Low key weekend over here for me, just mostly chilling and being mellow.

Happy weekending!

Rhubarb, Apple and Raspberry Crisp with Ginger

Gluten free, refined sugar free, dairy free and vegan. Springy and fresh! A Wait are Those Cookies original. Yield: 1 8 or 9″ crisp; serves several.

1 granny smith apples, chopped into cubes
3 stalks of fresh rhubarb
2 c frozen/fresh raspberries
juice of two limes
1 tbsp tapioca starch
1 tbsp maple
1/4 c water

1 cup old-fashioned oats (use certified gluten-free oats for a gluten-free crisp)
½ cup firmly packed almond flour
½ cup chopped walnuts
1/4 c unsweetened shredded coconut
2 tbsp maple syrup
heaping ¼ teaspoon fine sea salt
2 tsp vanilla extract
1/3 c coconut oil, melted
1/3 c dried ginger, chopped (mine isn’t crystalized; if yours is, thats fine!)

Preheat the oven to 350.
Toss apple, rhubarb and raspberries into your baking dish of choice (my dish is 8×8, 2 qt capacity; 9″ square or 9″ deep pie dish would also be fine). In a liquid measuring cup, whisk together the lime juice, tapioca starch, maple, water until combined. Pour the mixture over the fruit and toss to combine. Bake for 20 minutes.

While the filling is baking, make the crisp. In a mixing bowl, stir together the oats, almond flour, chopped walnuts, shredded coconut, and salt. Mix in the maple, vanilla, and coconut oil, followed by the chopped ginger. Stir until everything is mixed thoroughly.

Once the filling has baked for 20 minutes, stir it and and redistribute evenly in the dish. Plop spoonfuls of the crisp topping evenly over the filling – no need to pack it down. Return the dish to the oven and bake for 25 to 30 more minutes, until the filling is bubbling around the edges and the top is golden.

Let the crisp rest for 5 to 10 minutes before serving. Serve with vanilla ice cream, obviously! Keep leftovers, covered, in the fridge for 2-3 days (yeah right – would take some major feat to make it last more than overnight..)

Spring = Rhubarb

The first of the rhubarb!

I had to work a little to track some down – my usual market didn’t have any, but luckily I found some when I was out and about in a different neighborhood. Which also meant that I was that person walking down the street with a bunch of rhubarb clutched in my fist – but I am definitely okay being that person.

This cake is another variation on the grapefruit one I posted a few weeks ago – it’s a perfect snack or breakfast cake, as it isn’t all that sweet. It’s lightly spicy from the five spice, and the top gets jammy from the softened rhubarb + the actual jam involved. I use a jam that is fruit-sweetened only, which keeps this guy refined sugar free, but use whatever you have!

Almost wishing this had come out with the rhubarb slightly less soft – I may play around with it a little and see if I can make that happen.

Another insanely busy week here – I would like to stop working on the weekends please (insert eyeroll)…. this week should be less crazy though so I’m hoping for some downtime. At least I was able to swim most days this week; it is definitely preserving my sanity. Took today off since I know the humidity is supposed to drop next week which will trigger some autoimmune stuff – which means I’ll also be spending most days in the water, if at all possible.

Today was also a day of a food-photography mishap… I definitely broke the cake when I moved it from cooling rack to plate. Whatever, nothing some well-placed coconut won’t hide, and we’re going to eat it anyway so who cares. Not everything needs to be perfect.

I hope it is springy and nice where you are! I’m still hoping for some spring rains (CA needs it, but also I just love it.) Happy weekend :)

Rhubarb & Five Spice Upside Down Cake

Gluten free, dairy free & refined sugar free. Lightly sweet, slightly spicy, and perfect for spring. A Wait are those Cookies original. Yield: 1 8″ cake, serves several.

1.5 c almond flour
1/3 c cornmeal
3/4 tsp baking powder
1/4 tsp baking soda
heaping 1/4 tsp sea salt
1 tsp five spice
2 eggs, lightly beaten
1/4 c maple syrup
1/3 c coconut oil, melted
1.5 tsp vanilla extract
1 tsp almond extract
2 stalks of rhubarb, thinly sliced
2 tbsp apricot jam (mine is fruit sweetened only)
2 tsp coconut sugar

Preheat oven to 325. Lightly grease an 8″ cake pan with coconut oil and line the bottom with parchment paper – I flip it over, trace the outline & then cut, to get a perfectly sized circle. Spread the apricot jam evenly over the parchment, then drop the rhubarb slices into the bottom of the prepared pan. Sprinkle with coconut sugar.

In a large bowl, whisk together almond flour, cornmeal, baking powder, baking soda, sea salt & five spice. Add in eggs, honey, coconut oil, vanilla & almond extract, and stir until all ingredients are just incorporated. Drop the batter into the prepared pan – it’s thick! That’s normal – just even out the top with a spatula. Bake for 35-38 minutes, until the top of the cake is lightly browned, firm, and a tester in the center comes out clean. You can cover the cake with foil during the last 10 minutes of baking if the cake is browning too fast – though mine was done at 35 minutes, and I didn’t need the foil trick. Remove and let cool for a few minutes in the pan before flipping it out onto a cooling rack. Let cool completely before slicing and serving. Stores well overnight in the fridge, and is arguably even better for breakfast.

Grapefruit, black sesame & paints

Hiya everybody – full disclosure but I am TIRED today, mentally and physically. Too much work, too much body stuff, some degree of burnout will do that. Doing my best to just be nice to myself.

I did get to bake though, of course, which always makes me happy. It’s fun to create something pretty that’s also delicious.

Back on the panna cotta train after a bit of a hiatus. I really do enjoy them – they set up easily the night before in the fridge, making them a great make-ahead dessert idea. Not that I necessarily NEED anything make ahead these days, but I did have to work this weekend so this lets me free up my Saturday morning to go for a swim – which I did. Felt extra cold this morning but maybe that was just me? There was quite a tidal/wave swell happening today so maybe I was just working extra hard.

I really love sesame anything – especially black sesame. It’s nutty and savory and delicious and I love putting it in desserts, but I don’t think I’d ever paired it with grapefruit before. I definitely consider this a win, if a bit of an unexpected dark-horse combination. The dark chocolate is just a thin layer between the panna cotta and the crust – it adds both a nice textural and flavor contrast. Citrus and chocolate are always a win.

I’m going to keep this short today – I wanted to share this but I’m also in need of some downtime with my novel, and/or maybe my paints. I finally picked up my brushes again after YEARS of neglect, and I didn’t realize how much I missed it till I was painting again. Am definitely adding it back into my regular rotation. I took some inspiration from my last pie for this one, as I’m sure most of you will recognize:

Have a good weekend, everybody – be nice to yourselves and take a break if it’s called for. I’m trying to be better about that too, so I’m right there with you :)

Grapefruit, Dark Chocolate & Black Sesame Panna Cotta Tart

Gluten & grain free, refined sugar free, dairy free, arguably paleo. A Wait are those Cookies original. Yield: 1 9″ tart; serves several.

For the crust:

2 c almond flour, packed
1/3 c unsweetened shredded coconut
heaping 1/4 tsp sea salt
3 tbsp black sesame seeds
1/2 tsp baking soda
2 tsp vanilla extract
1/2 tsp almond extract
2 tbsp pure maple syrup
6 tbsp coconut oil, melted
1/4 c dark chocolate, melted

In a large bowl, stir together almond flour, shredded coconut, sea salt, black sesame, and baking soda. Add in vanilla, almond extract, maple, and melted coconut oil, and stir until completely combined. The dough will look crumbly, but you’ll be able to press it together with your fingers.

Preheat the oven to 350, and lightly grease a 9″ tart pan (w/ removable bottom) with coconut oil. Press the crust into the plate and up the sides with a spoon or your fingers, creating a smooth edge. Poke the bottom with a fork a few times, and bake for 15 minutes. Remove and let cool. Once the shell has cooled for a few minutes, brush the melted chocolate over the bottom evenly with a spatula. Let cool completely and then set for at least 10 minutes in the fridge before pouring in the panna cotta.

For the panna cotta:

1 package unflavored powdered gelatin
1.25 c full-fat coconut milk
1/3c + 1/4 c grapefruit juice, divided & cold
3 tbsp maple syrup
1 tbsp vanilla extract

For garnish: sliced meyer lemons & grapefruit + strawberries

In a small bowl, sprinkle the gelatin over 1/4 c cold grapefruit juice. Let stand without stirring until the gelatin is moistened, about 10 minutes.

Pour the 1.25 cups of coconut milk into a small saucepan. Add 1/3 c grapefruit juice, maple, vanilla into it. Bring to a simmer over medium heat, stirring consistently. Remove from the heat. Add the gelatin mixture and stir until completely dissolved, about 3 minutes. Cool until lukewarm, about
20 minutes. Remove the tart shell from the fridge. Pour the panna cotta mixture into the chilled tart shell, and place in the refrigerator until set, approximately 4 hours (though I typically set mine overnight). Top with sliced citrus, strawberries, etc.

Store in the fridge – keeps well overnight and is EXCELLENT for breakfast the next morning :)

Citrus Saturday

More citrus!

Couldn’t resist; I haven’t made a citrus curd in a bit, and I love using blood oranges while I can get them in season. Plus, C’s meyer lemon tree has been producing again so I figured I’d take advantage.

This is one of those desserts that looks and sounds fancy and intimidating, but it’s not! Break it down into its component parts and it’s pretty straightforward. It’s also grain & gluten free, plus of course refined sugar free – and actually, there is only 1/4c of maple in the whole thing! It’s perfect for those of us who like our desserts on the tart side of sweet, ha. The crust is actually naturally sweet from the almond flour though anyway, so it really balances out the citrus curd.

I took a field trip out to visit Goldie today – Karl wouldn’t come out to play but Goldie and I played hide and seek for awhile while I hiked the bluffs to batteries trail. All told, it was 7mi from the Lincoln steps > coastal trail > Baker Beach > bluffs to batteries > bay area ridge trail (presidio) > home, about two hours and a beautiful day.

hi Goldie!

Swam most days than not this week (see photo evidence), found some really pretty blooming things & watched a few gorgeous sunsets (yay western exposure from my apartment! amazing at all times except when it’s hot)

YES I wear a wetsuit, the water is currently 52 degrees so, yes.

Also, of course – I made a tart! Citrusy and nutty and delicious. Highly recommend, while we’re still in blood orange season (at least out here on the West coast/best coast.)

Happy weekending! Go get outside :)

Blood Orange & Meyer Lemon Tart on a Hazelnut Almond Crust

Gluten & grain free; refined sugar free. I included a couple of options for the order of making this, so read through the whole thing before you get started :) A Wait are those Cookies original. Yield: 1 9″ tart; serves several.

I stabilized the curd for this tart with gelatin, as I was after the texture of a panna cotta more than a softer curd tart for slicing and serving. I’m including an option for a baked tart, if you’d prefer to avoid gelatin or are out.

For tart assembly:

~1c of blood orange & meyer lemon curd, recipe below (I use all of what the recipe makes for a 9″ tart)
1 tart shell, recipe below
1/4 c cold meyer lemon juice (I used two lemons)
1 packet powdered gelatin
1 blood orange, sliced

I suggest making the crust first and letting it cool. Once it’s cooling, start the curd – then just adding the softened gelatin into the already warm curd once the curd is finished cooking.

In a small bowl, sprinkle 1 packet of gelatin over 1/4c cold meyer lemon juice. Stir until incorporated and let sit for a minute. Once softened, stir into the warm curd, whisking until the gelatin is dissolved completely (give it 1-2 minutes of continuous whisking). Strain the curd through a fine metal strainer into a bowl to cool a bit, before pouring the curd into the baked crust shell and transferring to the fridge to cool completely – preferably overnight but at least 4 hours. Top with sliced blood oranges, etc. Store the tart in the fridge until serving. Leftovers keep well overnight, refrigerated.

If you prefer not to use gelatin, you can also set the curd by pouring it into the pre-baked tart shell, and baking the whole thing at 350 for 8-10 minutes, then letting cool completely and refrigerating for at least 4 hours before serving. I prefer the gelatin method with this curd since it will set completely – the baked version might have more wobble / lose some structural integrity when sliced, but it’s a pretty solid second option & is definitely still delicious.

Blood Orange & Meyer Lemon Curd:

3 whole eggs
2 egg yolks
1/2 c blood orange + meyer lemon juice (I used 2 blood oranges + 1 large lemon)
zest of 2 blood oranges
zest of 1 meyer lemon
pinch of sea salt
2 tbsp maple syrup
4 tbsp butter, unsalted
1 tsp vanilla

I use a double boiler for this lemon curd, which I highly recommend! You don’t have to, but in my experience it makes for a better cooking process. Heat water in the bottom of the double boiler until it’s at a high simmer. In the top of the double boiler, whisk together eggs, egg yolks, citrus zest and juice, sea salt, and maple syrup. Add in the butter one tbsp at a time, whisking continuously, not adding the next tbsp until the first is completely melted. Whisk in vanilla. Cook, stirring constantly, until the curd thickens and will coat the back of a spoon (or your whisk leaves tracks) – usually around 5 to 8 minutes. It’s a noticeable change when it happens, so just watch the cooking magic! Remove from heat, and whisk in gelatin (see notes above); strain through a metal strainer to remove zest and any bits of cooked egg and let cool until room temp before pouring into the tart shell.

For the crust:

1.5 c almond flour
1/2 c hazelnut flour/meal
1/3 c unsweetened shredded coconut
heaping 1/4 tsp sea salt
1/2 tsp baking soda
2 tsp vanilla extract
1/2 tsp almond extract
2 tbsp pure maple syrup
6 tbsp coconut oil, melted

In a large bowl, stir together almond & hazelnut flours, shredded coconut, sea salt, and baking soda. Add in vanilla, almond extract, maple, and melted coconut oil, and stir until completely combined. The dough will look crumbly, but you’ll be able to press it together with your fingers.

Preheat the oven to 350, and lightly grease a 9″ tart pan (w/ removable bottom) with coconut oil. Press the crust into the plate and up the sides with a spoon or your fingers, creating a smooth edge (or not, your call!). Poke the bottom with a fork a few times, and bake for 15 minutes. Remove and let cool.

Cake for breakfast

Cake!

It feels like I hardly ever make cake anymore, but boy am I glad I broke that streak.

I was intrigued by the idea of an upside-down cake, but I’ve never liked them that much since they are always SO full of sugar and way overly sweet. I liked the idea in theory but I was curious to see if I could pull it off with just a bit of fruit-only jam & coconut sugar. Turns out, it works marvelously! This guy is gluten & dairy free + refined sugar free; could probably be pretty easily vegan too with an egg replacement.

It’s citrusy and sunny with a satisfying crunch from the poppyseeds; the texture is great with a combination of almond flour & cornmeal. It’s not really dense exactly, but more like a cake/quick bread hybrid.

We both love poppyseed anything, so it was an easy sell. Both of us really enjoyed the cake aspect of it too, so I might put cake back in the rotation more frequently. This one is arguably best for breakfast; we ate it both for dessert and for breakfast per usual, but it reminds me quite a bit of a muffin (in a good way.)

Took a nice long walk on the beach at Fort Funston today; it’s been dry out here and my autoimmune stuff HATES low humidity so I’ve been in the bay or next to the ocean literally every day – and sometimes both.

March already, almost! That’s hard to believe. Definitely wishing I had another day of weekend. Hopefully yours were full of outside time and good food! :)

Grapefruit Poppyseed Upside-down Cake

Free of gluten, dairy and refined sugar. MUCH less sweet than a standard upside-down cake, which always contain scary amounts of sugar. This one makes an amazing breakfast cake, so highly recommend saving a bit for the next morning. Yield: 1 8″ cake, serves several. A Wait are those Cookies original.

1.5 c almond flour
1/3 c cornmeal
3/4 tsp baking powder
1/4 tsp baking soda
heaping 1/4 tsp sea salt
2 tbsp poppy seeds
2 eggs, lightly beaten
1/4 c maple syrup
1/3 c coconut oil, melted
1.5 tsp vanilla extract
1 tsp almond extract
zest of 2 grapefruits
juice of 1 lemon
Two grapefruits, peeled & sliced
1 tbsp apricot jam (mine is fruit sweetened only)
2 tsp coconut sugar

Preheat oven to 325. Lightly grease an 8″ cake pan with coconut oil and line the bottom with parchment paper – I flip it over, trace the outline & then cut, to get a perfectly sized circle. Spread the apricot jam evenly over the parchment, then drop the grapefruit slices into the bottom of the prepared pan. Sprinkle with coconut sugar.

In a large bowl, whisk together almond flour, cornmeal, baking powder, baking soda, sea salt & poppy seeds. Add in eggs, honey, coconut oil, vanilla & almond extract extract, grapefruit zest and lemon juice, and stir until all ingredients are just incorporated. Pour the batter into the prepared pan – it’s thick batter! That’s normal – just even out the top with a spatula. Bake for 35-38 minutes, until the top of the cake is lightly browned, firm, and a tester in the center comes out clean. You can cover the cake with foil during the last 10 minutes of baking if the cake is browning too fast – though mine was done at 37 minutes, and I didn’t need the foil trick. Remove and let cool for a few minutes in the pan before flipping it out onto a cooling rack. Let cool completely before slicing and serving. Stores well overnight in the fridge, and is arguably even better for breakfast.

Panna cotta Saturday

Hi blog friends!

Feels strange to be putting out a blog post on a ‘normal’ weekend when my friends in Texas and family/friends in the PNW have been pretty hammered this week, but I’m going to do my best to create a peaceful little corner of the internet, in case anyone needs a mental break for a minute.

Today I have a rooibos and chai panna cotta for you! It’s sitting in an almond cornmeal crust that has a sneaky layer of dark chocolate hiding between the panna cotta and the crust – a nice little texture contrast you weren’t expecting. The flavors are subtle and delicate – if you love tea, this is absolutely for you. It’s also gluten, dairy and refined sugar free! Easy vegan & grain free swaps listed in the recipe notes, as well.

I drink Numi’s rooibos chai every night – not a sponsored post at all, I just totally love it! It’s caffeine free so perfect for evening. I used it here to infuse coconut milk – the panna cotta itself is made with tea two ways (cold tea to bloom the gelatin + steeped coconut milk.)

Highly recommend for dessert, breakfast, snacks, and anything in between.

what things really look like around here

In other news, the tulip trees are going bananas all over the city; I took a very cold & windy swim this morning at 830, and I have a new wetsuit, courtesy of the fave human. Yay!

Also, the skies have been amaaaazing lately.

please ignore crookedness of this image…. was too lazy to fix it. It’s saturday.

I hope the weekend is treating you well – and that it’s warming up for those who got hit with the gnarly cold last week. Happy Saturday!

Rooibos Chai Panna Cotta with an Almond Crust

A panna cotta tart with subtle chai flavors and a hint of chocolate in an almond crust. Gluten free, refined sugar free, dairy free, paleo. If you need a vegan version, feel free to set the panna cotta with agar, instead of gelatin. For grain free, sub in an extra 1/2 c almond flour for the cornmeal. A Wait are those Cookies original. Yield: 1 9″ panna cotta, serves several.

For the crust:

1.5 c almond flour
1/3 c unsweetened shredded coconut
1/3 c cornmeal
heaping 1/4 tsp sea salt
1/2 tsp baking soda
2 tsp vanilla extract
1/2 tsp almond extract
2 tbsp pure maple syrup
6 tbsp coconut oil, melted
1/3 c dark chocolate chips

In a large bowl, stir together almond flour, shredded coconut, cornmeal, sea salt, and baking soda. Add in vanilla, almond extract, maple, and melted coconut oil, and stir until completely combined. The dough will look crumbly, but you’ll be able to press it together with your fingers.

Preheat the oven to 350, and lightly grease a 9″ tart pan (w/ removable bottom) with coconut oil. Press the crust into the plate and up the sides with a spoon or your fingers, creating a smooth edge (or not, your call!). Poke the bottom with a fork a few times, and bake for 15 minutes. Remove and let cool for a few minutes.

Melt the chocolate chips in a double boiler or in the microwave. Spread the melted chocolate over the interior of the crust, and let cool until set. You can also pop the whole thing in the fridge to help it set faster, if needed.

For the Panna Cotta:

1 package unflavored powdered gelatin
1 can full-fat coconut milk
3 bags of rooibos chai (I used Numi; regular chai would be great too)
1 tbsp vanilla extract
3 tbsp maple
pinch of sea salt
1/4 c brewed rooibos chai (or reg. chai), cold
shredded coconut and crystalized ginger for topping

Pour the coconut milk into a small saucepan and add the bags of rooibos chai tea. Bring to a simmer over medium heat, stirring occasionally. Remove from heat, cover and let steep for 15 minutes.

In a small bowl, sprinkle the gelatin over 1/4 cup of the cold tea. Let stand without stirring until the gelatin is moistened, about 10 minutes.

Remove the tea bags from the coconut milk. Whisk in maple, vanilla and sea salt, and bring the milk back up to a simmer. Remove from heat and whisk in the gelatin mixture. Whisk until completely dissolved, about 3 minutes. Cool until lukewarm. Pour the panna cotta mixture into the cooled tart shell. Place in the refrigerator until set, approximately 4 hours or preferably overnight.

Top with whatever pretty things your heart desires! I used shredded coconut and crystalized ginger, finely chopped. Store in the fridge until serving. Leftovers keep well up to two days in the fridge, covered.

I’m just in a crisp-y kind of mood

Hey look, made another crisp!

Slight nod to the weekend’s Hallmark holiday down there in the lower right… couldn’t help it, but also had no inclination to make something overly themed. I had apples, wanted crisp. Easy!

Ever since I made that last one two weeks ago, all I can think about is the way coconut oil is SO GOOD in the crisp topping. I love how solid it gets when refrigerated… but maybe I’m just weird that way; it would seem that like love cold things (bay water, anyone?)

Regardless, this is another variation on a pretty stellar crisp. Excellent for using up a glut of tiny, rather blemished apples – they don’t have to be pretty to be tasty! This version has a bit of dark chocolate – the Manperson requested that I do something with chocolate this weekend, so here it is! Chocolate and ginger are a fave, and pecans just make things that much better.

It’s excellent for breakfast; since there is hardly any added sweetener, it’s basically just fruit / nuts / oats – C and I have compared it to muesli in the past. Not quite, but close! Or granola, either way. Of course it’s also great for dessert with a scoop of ice cream too – no complaints if someone plunks a bowl down in front of me.

Let’s see… in life news, I swam in the bay a bunch more last week because I seemingly can’t get enough, hiked on the beach, saw some pretty blooming trees (the cherry blossoms are out in my neighborhood!) and enjoyed the rain.

It was bath day for the plants today – thinking maybe Kuzco needs a bit of a haircut. It would help him fill out a bit up top so I really should but I love how trailing his vines have gotten and I’m really loath to trim them. Ah well, sometime soon.

I hope your weekend is full of outside time! Happy Saturday :)

Razapple Crisp with Ginger, Dark Chocolate & Pecan

Gluten free, refined sugar free, vegan, dairy free & whole grain. Yay! Fruity, nutty & not too sweet – perfect for breakfast. A Wait are those Cookies original. Yield: 1 9″ crisp, serves several.

4-5 small granny smith apples, chopped into cubes
1 c fresh raspberries (mine were frozen)
1 tbsp tapioca starch
1 tbsp maple
1/4 c water
juice of 1 lemon

1 cup old-fashioned oats (use certified gluten-free oats for a gluten-free crisp)
½ cup firmly packed almond flour
½ cup chopped pecans
1/4 c unsweetened shredded coconut
2 tbsp maple syrup
heaping ¼ teaspoon fine sea salt
2 tsp vanilla extract
1/3 c coconut oil, melted
1/3 c dried ginger, chopped (mine isn’t crystalized; if yours is, thats fine!)
1/4 c dark chocolate, roughly chopped

Preheat the oven to 350.
Toss apples and raspberries into your baking dish of choice (my dish is 8×8, 2 qt capacity; 9″ square or 9″ deep pie dish would also be fine). In a liquid measuring cup, whisk together the tapioca starch, maple, water and lemon juice until combined. Pour the mixture over the fruit and toss to combine. Bake for 20 minutes.

While the filling is baking, make the crisp. In a mixing bowl, stir together the oats, almond flour, chopped pecans, shredded coconut, and salt. Mix in the maple, vanilla, and coconut oil, followed by the chopped ginger. Stir until everything is mixed thoroughly. Stir in chocolate.

Once the filling has baked for 20 minutes, stir it and and redistribute evenly in the dish. Plop spoonfuls of the crisp topping evenly over the filling – no need to pack it down. Return the dish to the oven and bake for 25 to 30 more minutes, until the filling is bubbling around the edges and the top is golden.

Let the crisp rest for 5 to 10 minutes before serving. Serve with vanilla ice cream, obviously! Keep leftovers, covered, in the fridge for 2-3 days (yeah right – would take some major feat to make it last more than overnight..)

Apple crisp for the soul

Full disclosure: it was a rough autoimmune week over here – mentally and physically. So while I was very, VERY glad for the weekend, I’m haven’t been feeling quite as upbeat as usual. That being said, I spent a very nice Saturday evening & Sunday with C – worked out like a crazy today which helps, at least mentally.

I’m keeping this relatively short, but I wanted to share this crisp with you – it’s gluten free, refined sugar free, dairy free & vegan! I had half a bag of cranberries hanging out in my freezer that I wanted to use before they felt too out of season – plus, crisps are easy and delicious. I think this might actually be one of the best crisps I’ve ever made – at least, it’s probably my favorite that I’ve ever made, and that’s saying a lot!

I really couldn’t stop eating it today; very nearly all of it is gone (to be fair, we both worked out hard today so it was a great post workout snack.)

a few of the plants wanted in

I hope everyone enjoyed their weekends! I’m bummed it’s finished already – can we get on this 4-day workweek train already? Sheesh. Looking forward to the next one! Something grapefruity is on the menu I think; I have some coming in my imperfect produce box this week. Stay tuned :)

Apple, Cranberry, Date & Ginger Crisp

Refined sugar free, gluten free, dairy free & vegan. Yield: 1 9″ crisp; serves several. A Wait are those Cookies original.

5 small granny smith apples, chopped into cubes
1/2 c fresh cranberries (or frozen)
5 large medjool dates, chopped
1 tbsp tapioca starch
1 tbsp maple
1/4 c water

1 cup old-fashioned oats (use certified gluten-free oats for a gluten-free crisp)
½ cup firmly packed almond flour
½ cup chopped pecans
1/4 c unsweetened shredded coconut
2 tbsp maple syrup
heaping ¼ teaspoon fine sea salt
2 tsp vanilla extract
1/3 c coconut oil, melted
1/3 c dried ginger, chopped (mine isn’t crystalized; if yours is, thats fine!)

Preheat the oven to 350.
Toss apples, cranberries and dates into your baking dish of choice (my dish is 8×8, 2 qt capacity; 9″ square or 9″ deep pie dish would also be fine). In a liquid measuring cup, whisk together the tapioca starch, maple, water until combined. Pour the mixture over the fruit and toss to combine. Bake for 20 minutes.

While the filling is baking, make the crisp. In a mixing bowl, stir together the oats, almond flour, chopped pecans, shredded coconut, and salt. Mix in the maple, vanilla, and coconut oil, followed by the chopped ginger. Stir until everything is mixed thoroughly. Stir in chocolate.

Once the filling has baked for 20 minutes, stir it and and redistribute evenly in the dish. Plop spoonfuls of the crisp topping evenly over the filling – no need to pack it down. Return the dish to the oven and bake for 25 to 30 more minutes, until the filling is bubbling around the edges and the top is golden.

Let the crisp rest for 5 to 10 minutes before serving. Keep leftovers, covered, in the fridge for 2-3 days (yeah right – would take some major feat to make it last more than overnight..)

2021!

Hello, blog friends in my corner of the internet!

What a year. Not sure I need to say much else on that subject, other than happy new year, and here’s to 2021! Needless to say, let’s hope 2021 is a smoother ride than this absurdity.

Keeping it short with the text today… I’m finishing my ritual new year’s eve cleaning and tidying; freshening up my space to welcome a fresh year. I’m looking forward to getting in one last 2020 workout, and spending a low key evening with C.

Looking over the last few weeks – here are a few snaps of things that brought me joy:

the first yeasted rolls I’ve made in AGES. so delicious. expect more like this.
this one has her paw wrapped firmly around my heartstrings.
see? gah. look at that little face

Sending all the love out your way – happy new year! Thanks for hanging out with me over here in blogland :)

Vanilla & Mint Panna Cotta Tart with a Dark Chocolate Rosemary Crust

Minty, chocolatey and slightly herby. This tart is best made the night before and left to set overnight in the fridge, so it’s perfect for a make-ahead holiday dessert. Gluten & grain free, dairy free, refined sugar free & paleo. Yield: 1 9″ tart, serves several! A Wait are those Cookies original.

For the crust:

1.75 c almond flour
1/3 c unsweetened cacao powder
1/4 c unsweetened shredded coconut
heaping 1/4 tsp sea salt
1/2 tsp baking soda
2 tsp fresh rosemary, finely chopped
2 tsp vanilla extract
2 tbsp pure maple syrup
4 tbsp coconut oil, melted
1/4 c dark chocolate, melted

In a large bowl, stir together almond flour, cacao powder, coconut, sea salt, baking soda and rosemary. Add in vanilla, maple, and melted coconut oil and stir until completely combined. The dough will look crumbly, but you’ll be able to press it together with your fingers.

Preheat the oven to 350, and lightly grease a pie plate with coconut oil. Press the crust into the plate and up the sides with a spoon or your fingers, creating a smooth edge (or not, your call!). Poke the bottom with a fork a few times, and bake for 15 minutes.

Let cool for a few, then pour the melted chocolate into the bottom of the tart shell and use a spoon or a brush to smooth it out. Let cool completely to set the chocolate.

For the panna cotta:

1 package unflavored powdered gelatin
1.75 cup full-fat coconut milk
2 tbsp vanilla bean paste
2 tsp peppermint extract
scant 1/4 cup maple
scant 1/4 tsp sea salt

In a small bowl, sprinkle the gelatin over 1/4 cup of cold water. Let stand without stirring until the gelatin is moistened, about 10 minutes.

Pour the coconut milk into a small saucepan. Add maple, vanilla paste, mint extract and salt. Bring to a simmer over medium heat, stirring consistently. Add the gelatin mixture and stir until completely dissolved, about 3 minutes. Cool until lukewarm, about 5 minutes. Whisk in the yogurt until well blended. Pour the panna cotta mixture into the cooled tart shell. Place in the refrigerator until set, approximately 4 hours.

Store in the fridge – keeps well overnight for breakfast the next morning :)